4 sec exposure of Washington Monument, D.C.
Using slow shutter speeds to create long exposures is a great way to add a little more creativity to your photography. The uses for slow shutter speeds are almost endless. Below are 9 examples.
Examples of Slow Shutter Speeds
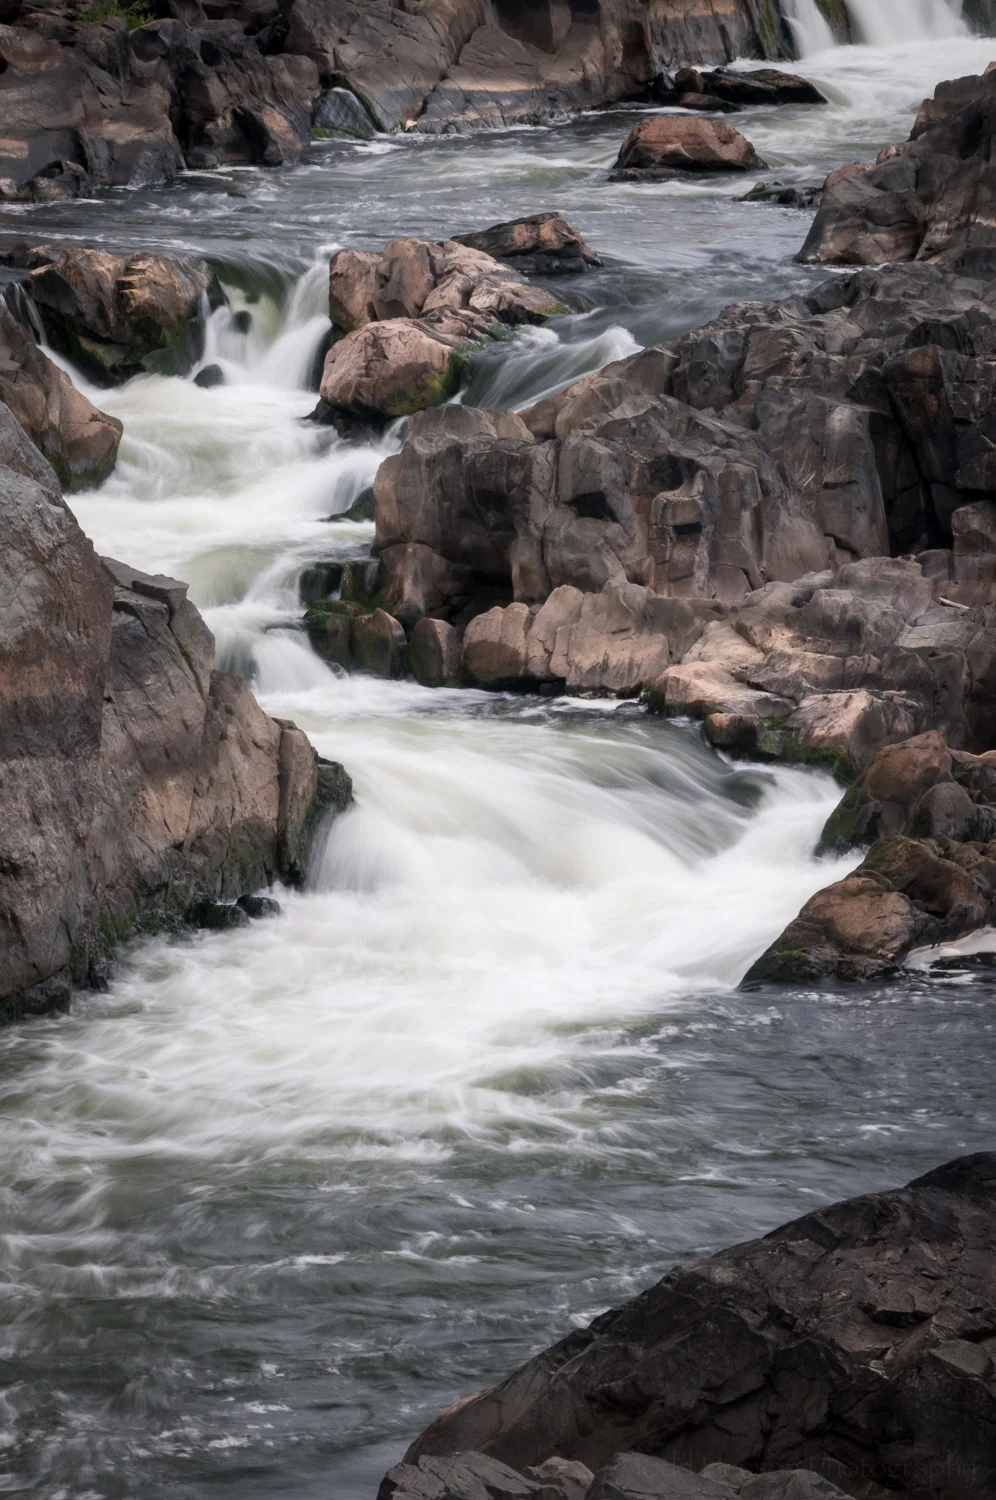
1. Waterfalls
Waterfalls are a classic example of using slow shutter speeds creatively in landscape photography. As you slow the shutter speed the water begins to blur, turning into a silky smooth flow instead of frozen droplets of water. The shutter speed you choose will depend on your personal preference and the speed of the water. How smooth do you like the water? Do you want to show a little motion but still capture some of the raw energy of the water? Or do you want to completely blur the water into a rolling milky stream? This technique almost always requires a tripod to stabilize the camera during the exposure.
Here I show examples of several waterfalls and rapids shot at different shutter speeds so you can see the effects different shutter speeds have. At faster shutter speeds (shorter exposure) you can see more movement in the water. At slower shutter speeds (longer exposure) the water turns into a milky flow. Which image is best is a personal preference.

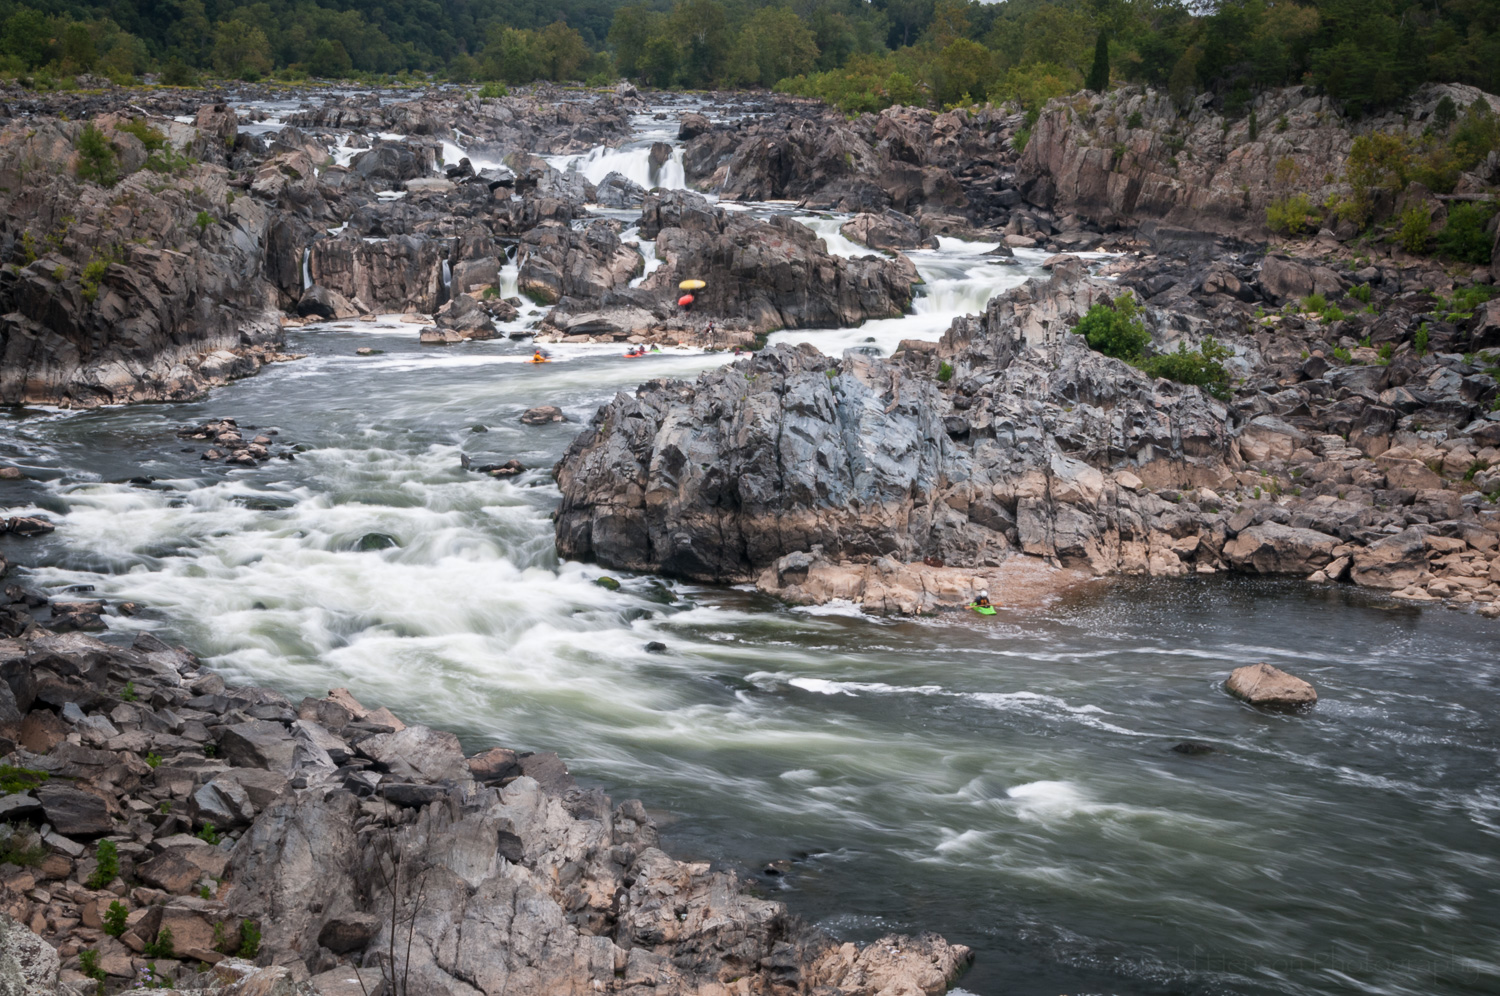


2. Whitewater Sports
When shooting sports you can use faster shutter speeds to freeze the action, or use slower shutter speeds to add a little creative blur, showing motion. Whitewater sports, such as kayaking, is a great example of adding a little drama by slowing down the shutter speed and capturing motion blur in the water, and sometimes in the athlete as well. As with waterfalls, which shutter speed you choose is personal preference, and a factor of what you’re trying to capture. Perhaps you want to fully freeze the athlete but show a little motion in the water spray. Or perhaps you want a longer exposure to show a lot of flowing motion in the water. The longer the shutter speed the more difficult it will be to capture a sharp image of the athlete, but depending on how the athlete is moving it can be done. And a little motion in the athlete is not always a bad thing, especially if you’re trying for a more artistic photograph. This technique can be performed hand-held or with a tripod. If you use a tripod loosen the head to allow you to move the camera.


3. Landscapes with Water or Clouds
Long exposures can still water in a landscape or blur moving clouds in the sky. Longer exposures are more likely to still the water, and longer exposures will blur the clouds more. If the clouds are moving very fast or you use a very long exposure you can turn the clouds into nothing more than white streaks in the sky. If the water is reasonably flat you can sometimes still it enough to show reflections that more closely match the subject. Instead of wavy reflections you can capture straight ones. You can see an example of this in the photo of the Washington Monument. This technique usually requires a tripod.


20 sec exposure. The water near the camera is perfectly still and the clouds show some motion blur. The extra gold and blue tones are caused by a Singh-Ray Gold-N-Blue polarizer.
4. Turning People into Ghosts or Removing People from a Scene
Have you ever been to a monument or other scene that you’d like to photograph without any people, but there are too many people around and they never leave the scene? Sometimes you can use a very long exposure to eliminate most or all of the people, provided the people are moving fast enough. Slow the shutter down (use a long exposure) and you will start to blur the motion of the people. Slow it down enough and the people won’t even show up in the final image. This doesn’t always work, but give it a try. This technique is best used with a tripod.
To create ghosts you choose a middle ground shutter speed, something slow enough to blur the people, but fast enough to capture them. You really have to experiment with this technique. Which shutter speed you choose depends on how fast the people are moving and how blurry, or ghost-like, you want to capture them.
Many people have become ghosts in the first photo below. The second photo uses a slower shutter speed, but it's not long enough to make all people completely disappear. You can still see some blurred motion from them. But if I'd taken an even longer exposure, perhaps 10 or 20 seconds, most of the people would have disappeared.


5. Stationary Panning
You can capture some very dynamic photos if you stand still and pan with a moving subject, using a slow shutter speed. The goal is to try to capture the subject mostly in focus but blur the background. This takes a lot of practice. Examples of this are photographing bicycles or vehicles as they pass by on the street, and capturing birds in flight. This technique is most easily performed hand-held. If you use a tripod loosen the head to allow the camera to move.


6. Panning While Moving
Similar to stationary panning, but this time you are moving while panning. The subject could be stationary or moving. As an example of a moving subject, you could photograph a moving motorcycle from a moving car. For a stationary subject you could photograph a farm and fields from a moving car. Objects closer to the camera will exhibit more motion blur than objects at a distance. This technique is most easily performed hand-held.
1/20 sec exposure from the passenger side of a moving car (I was the passenger, not the driver). Notice the motion blur of the green field.
7. Air Shows
Air shows hosting aircraft with propellers are a great place to try slower shutter speeds. When an aircraft has a moving propeller it’s best to try to capture some motion in that propeller. Creating a photograph of a moving plane with a perfectly frozen propeller just doesn’t look right, it looks fake. But capturing some motion in the propeller helps convey the motion of the aircraft. This technique can be performed hand-held or with a tripod. If using a tripod loosen the head to allow the camera to move.
1/50 sec exposure. This is another example of stationary panning. I was standing still while panning with the moving aircraft.
8. Zooming During Exposure
If you have a zoom lens you can really get creative by using a longer shutter speed and zooming the lens during the exposure. This is best performed from a tripod, but you can also try doing this hand held. The key is experimentation. Try zooming out during the exposure, then try zooming in during the exposure. They give different results. Try different subjects, different angles. Look for colors that can blur during the zoom.


9. Moving Camera During Exposure
This technique doesn’t require anything but a camera with a lens. Any camera will do provided you can use slow shutter speeds. You don’t need a tripod. All you need to do is move the camera during the exposure. You don’t even need to look through the viewfinder if you don’t want to. Experiment. Try different subjects, different shutter speeds, different motions. I don’t do this very often, but it’s something worth trying and I’d like to put a little more time into it. The results are usually far more abstract than many forms of photography. You may create photos of abstract blurs of color. Or perhaps you partially pan on a subject, then move elsewhere and create something close to a double exposure.
2.5 sec exposure while moving the camera. Notice the multiple ghosted images of the Jefferson Memorial.
How to Get Slow Shutter Speeds
Hopefully I’ve convinced you to try some long exposure photography. But how do you do it? How do you slow the shutter speed down? There are various ways to achieve slower shutter speeds (longer exposures), depending on what gear you have available.
Shoot on an overcast day, when there is less sunlight, or at night. There’s less light at these times, so the camera will require more time to capture enough light to create the photograph.
Use a smaller aperture. This means apertures with higher numbered f-stops, such as f/16, f/22, f/32, etc. This will limit the light entering the camera and allow you to lengthen the exposure, as the camera needs more time to capture enough light to create the photograph.
Keep your ISO low. Some cameras use ISO 100 or 200 as the standard setting. Keep it here, or try the lower settings. ISO is the camera’s sensitivity to light. If you raise the ISO, for example to 800, the camera becomes more sensitive to light and requires less time to capture enough light to make the exposure. Note that higher ISO’s are, generally, also more prone to noise (grain in film). To create longer exposures set the ISO low, so the camera needs more time to capture enough light.
Use a polarizing filter. A polarizer, in addition to polarizing the light, will also block some of the light entering the camera. Most polarizers will block between 1 to 2 stops of light. This will allow you capture slightly longer exposures. Combining this with a low ISO and a small aperture may be enough to let you get the shutter speeds you want.
Use a neutral density filter. If you want really long exposures you may need to purchase some neutral density filters. These are dark filters that block some light. Think sunglasses for your lens. They’re called neutral density because they are supposed to be neutral in color, not introducing color casts. However, some filters, especially less expensive ones, do alter the color somewhat. You can usually correct this in post processing. Neutral density filters come in many different strengths. For very long exposures look at some of the 5, 10, or 15 stop neutral density filters out there. These will let you capture multi-minute exposures.
Combine any or all of the above to get even slower shutter speeds. Be aware, though, if you use too many filters with wide angle lenses you may begin to actually see the filter in the corners of the frame. If that happens you can remove filters until you no longer see them, zoom in or use a lens that isn't quite as wide-angle, or create the image and crop it in post.
As a reminder, if you use really slow shutter speeds you may need a tripod, or some other support, to hold the camera steady during the exposure.
There are many other uses for slow shutter speeds. But I hope the few examples I’ve shown will prompt you to go out and experiment. Try different shutter speeds of the same scene, see how the different speeds affect the final image. You may be pleasantly surprised by some of the results.
Do you enjoy these posts?
Sign up to receive periodic emails with updates and thoughts. Don’t worry, I won’t spam you. And please consider purchasing artwork or products from my online store, and using my affiliate links in the sidebar to the right when shopping online.
I appreciate your support!