Photo Failures

When Autofocus Fails Us by Todd Henson

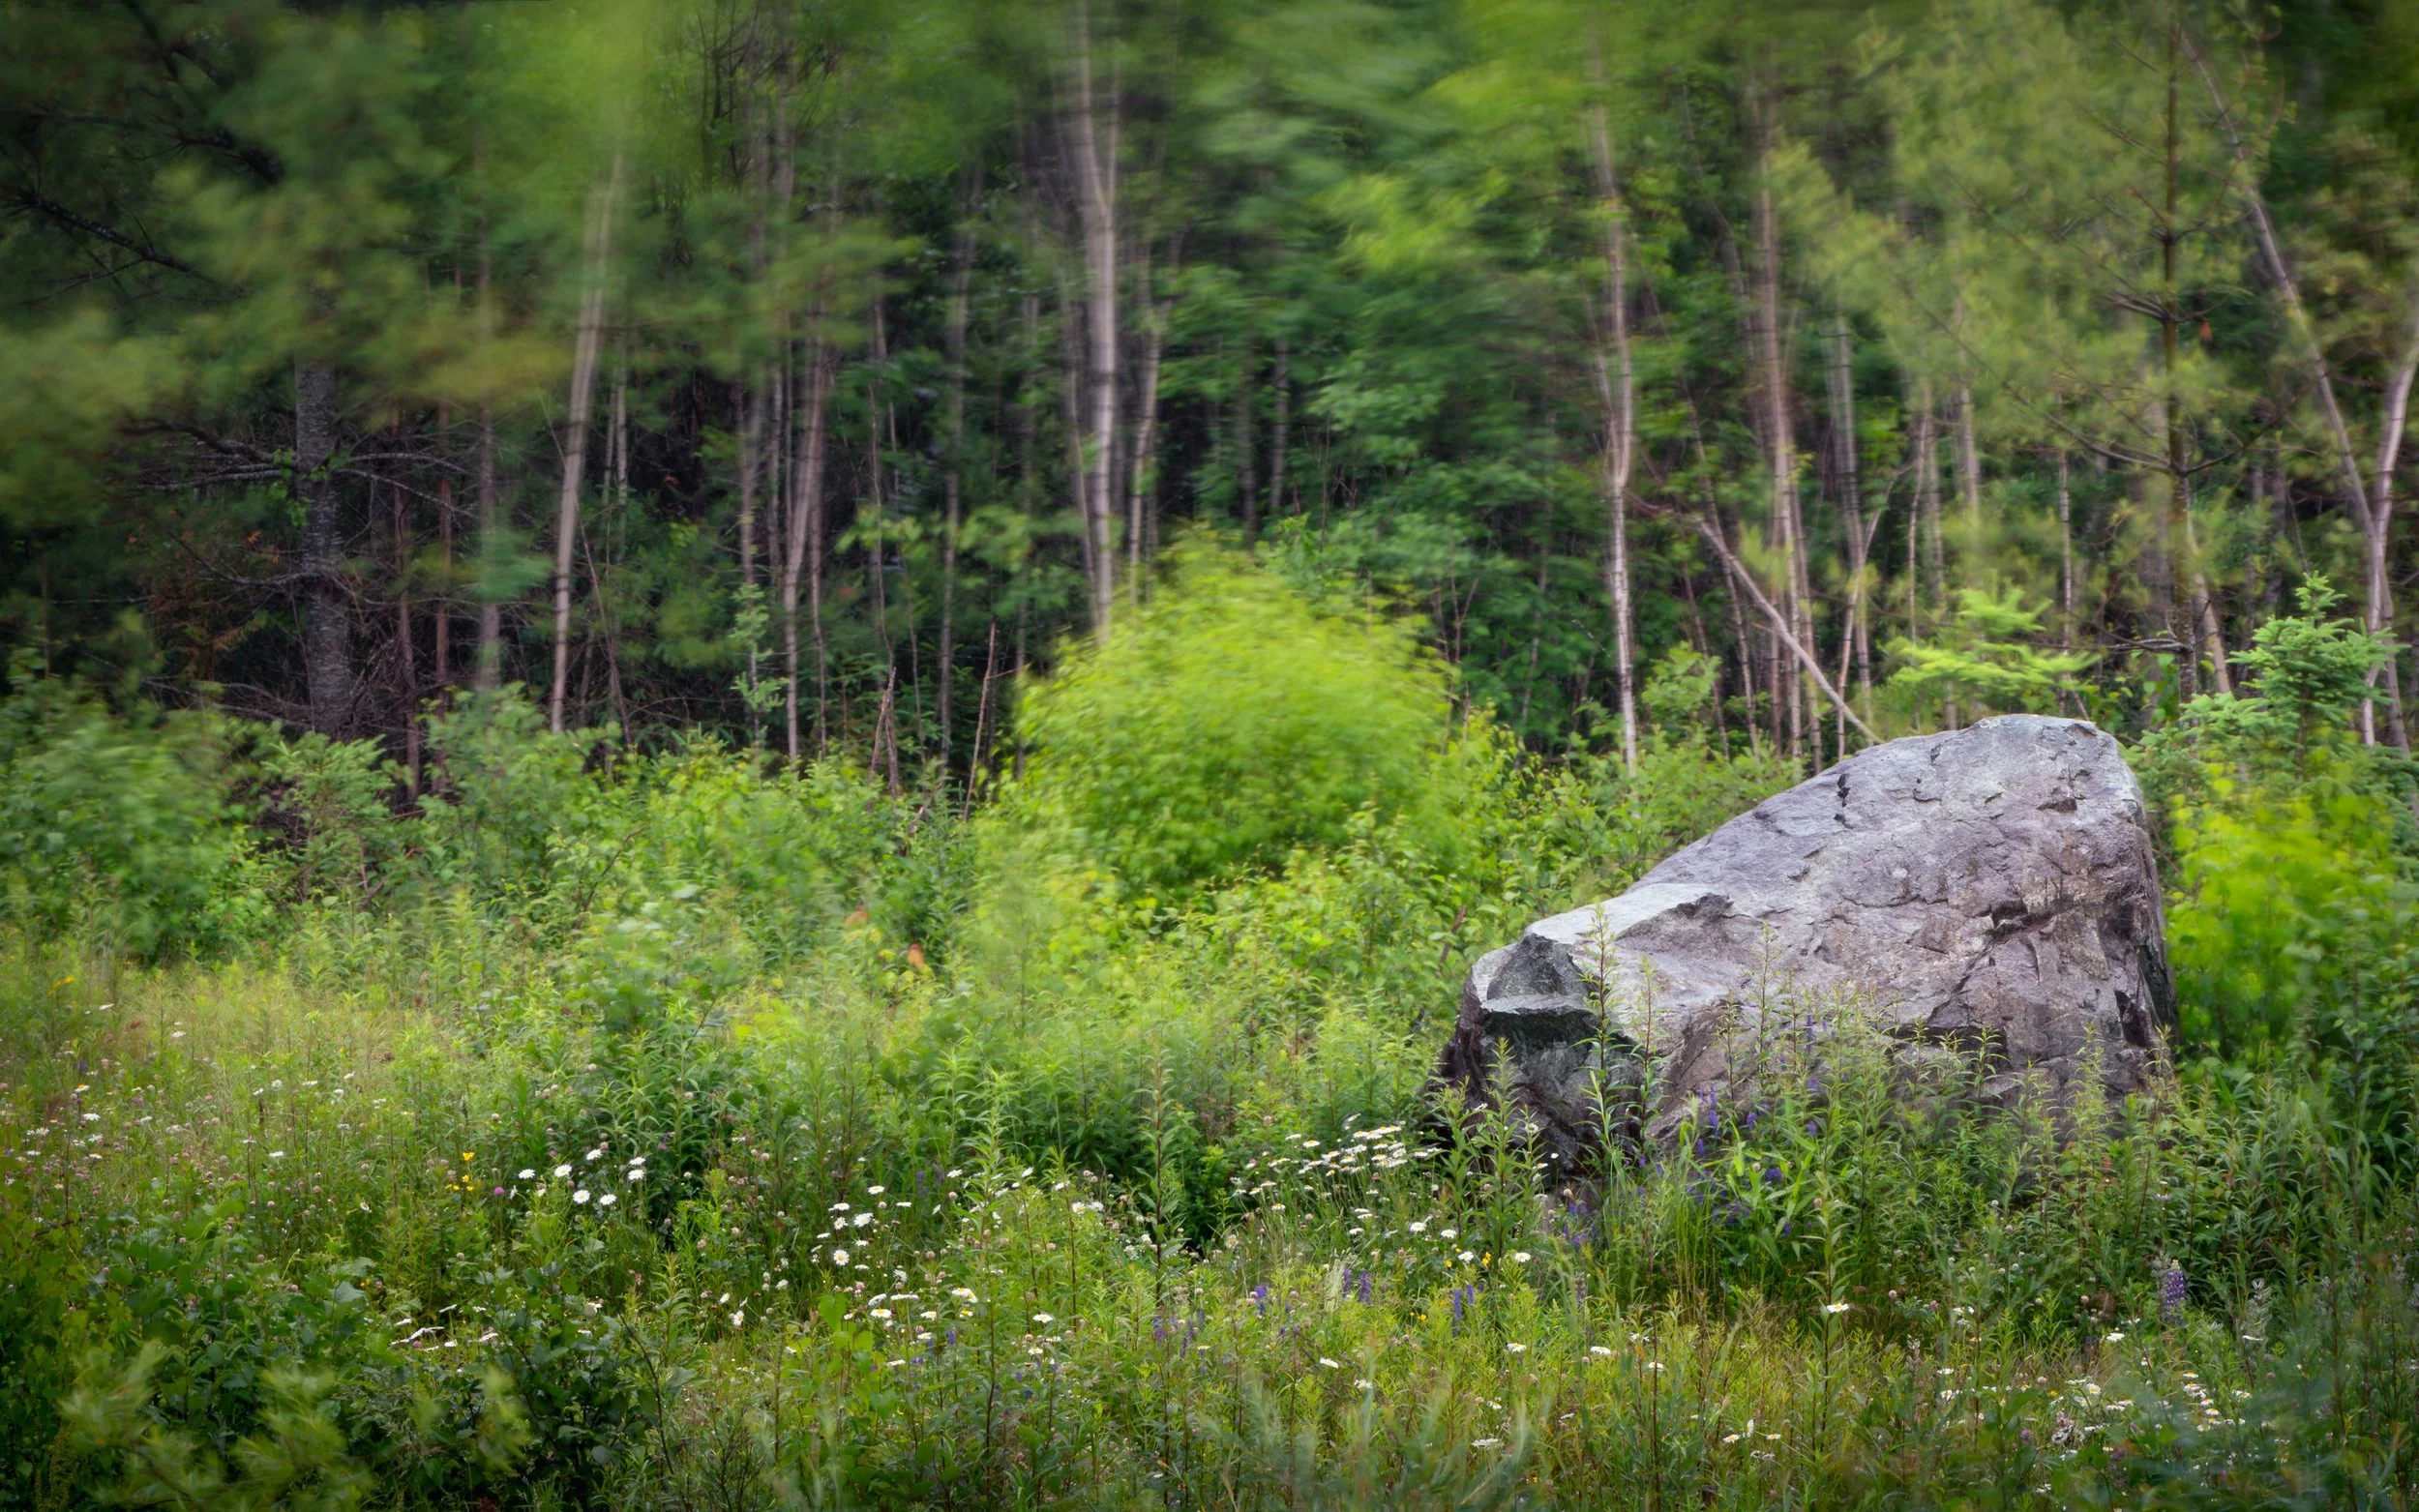
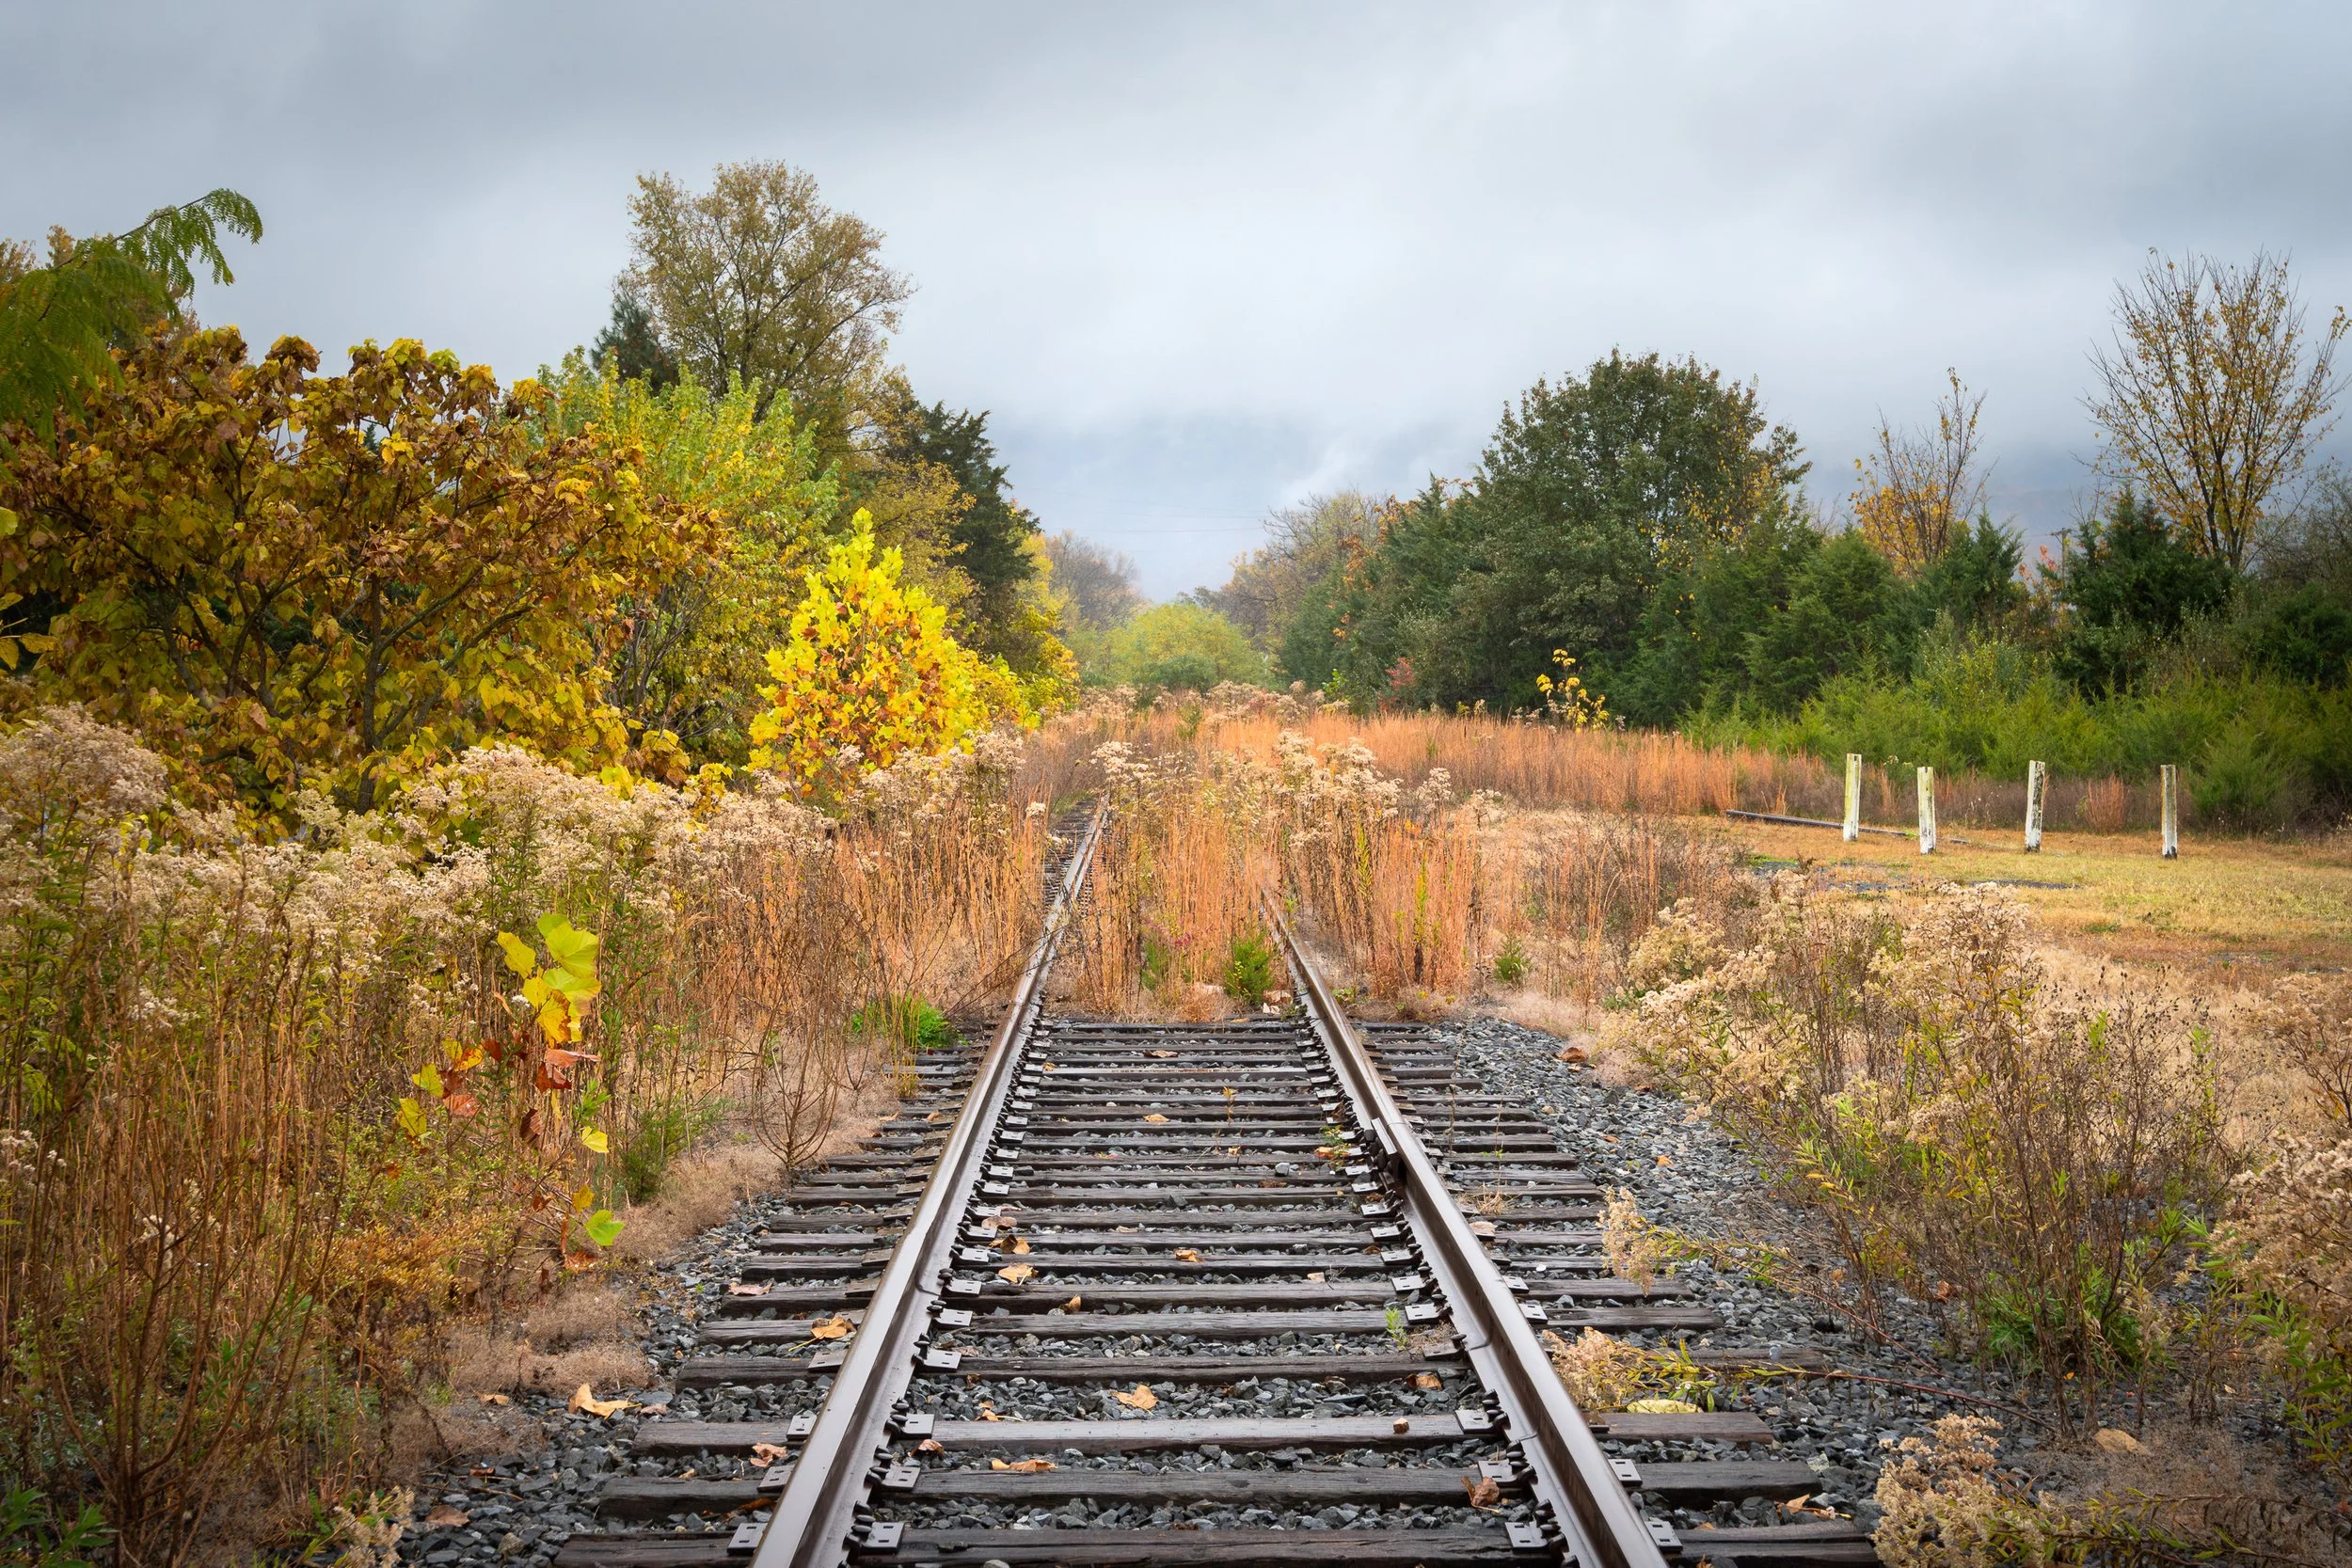
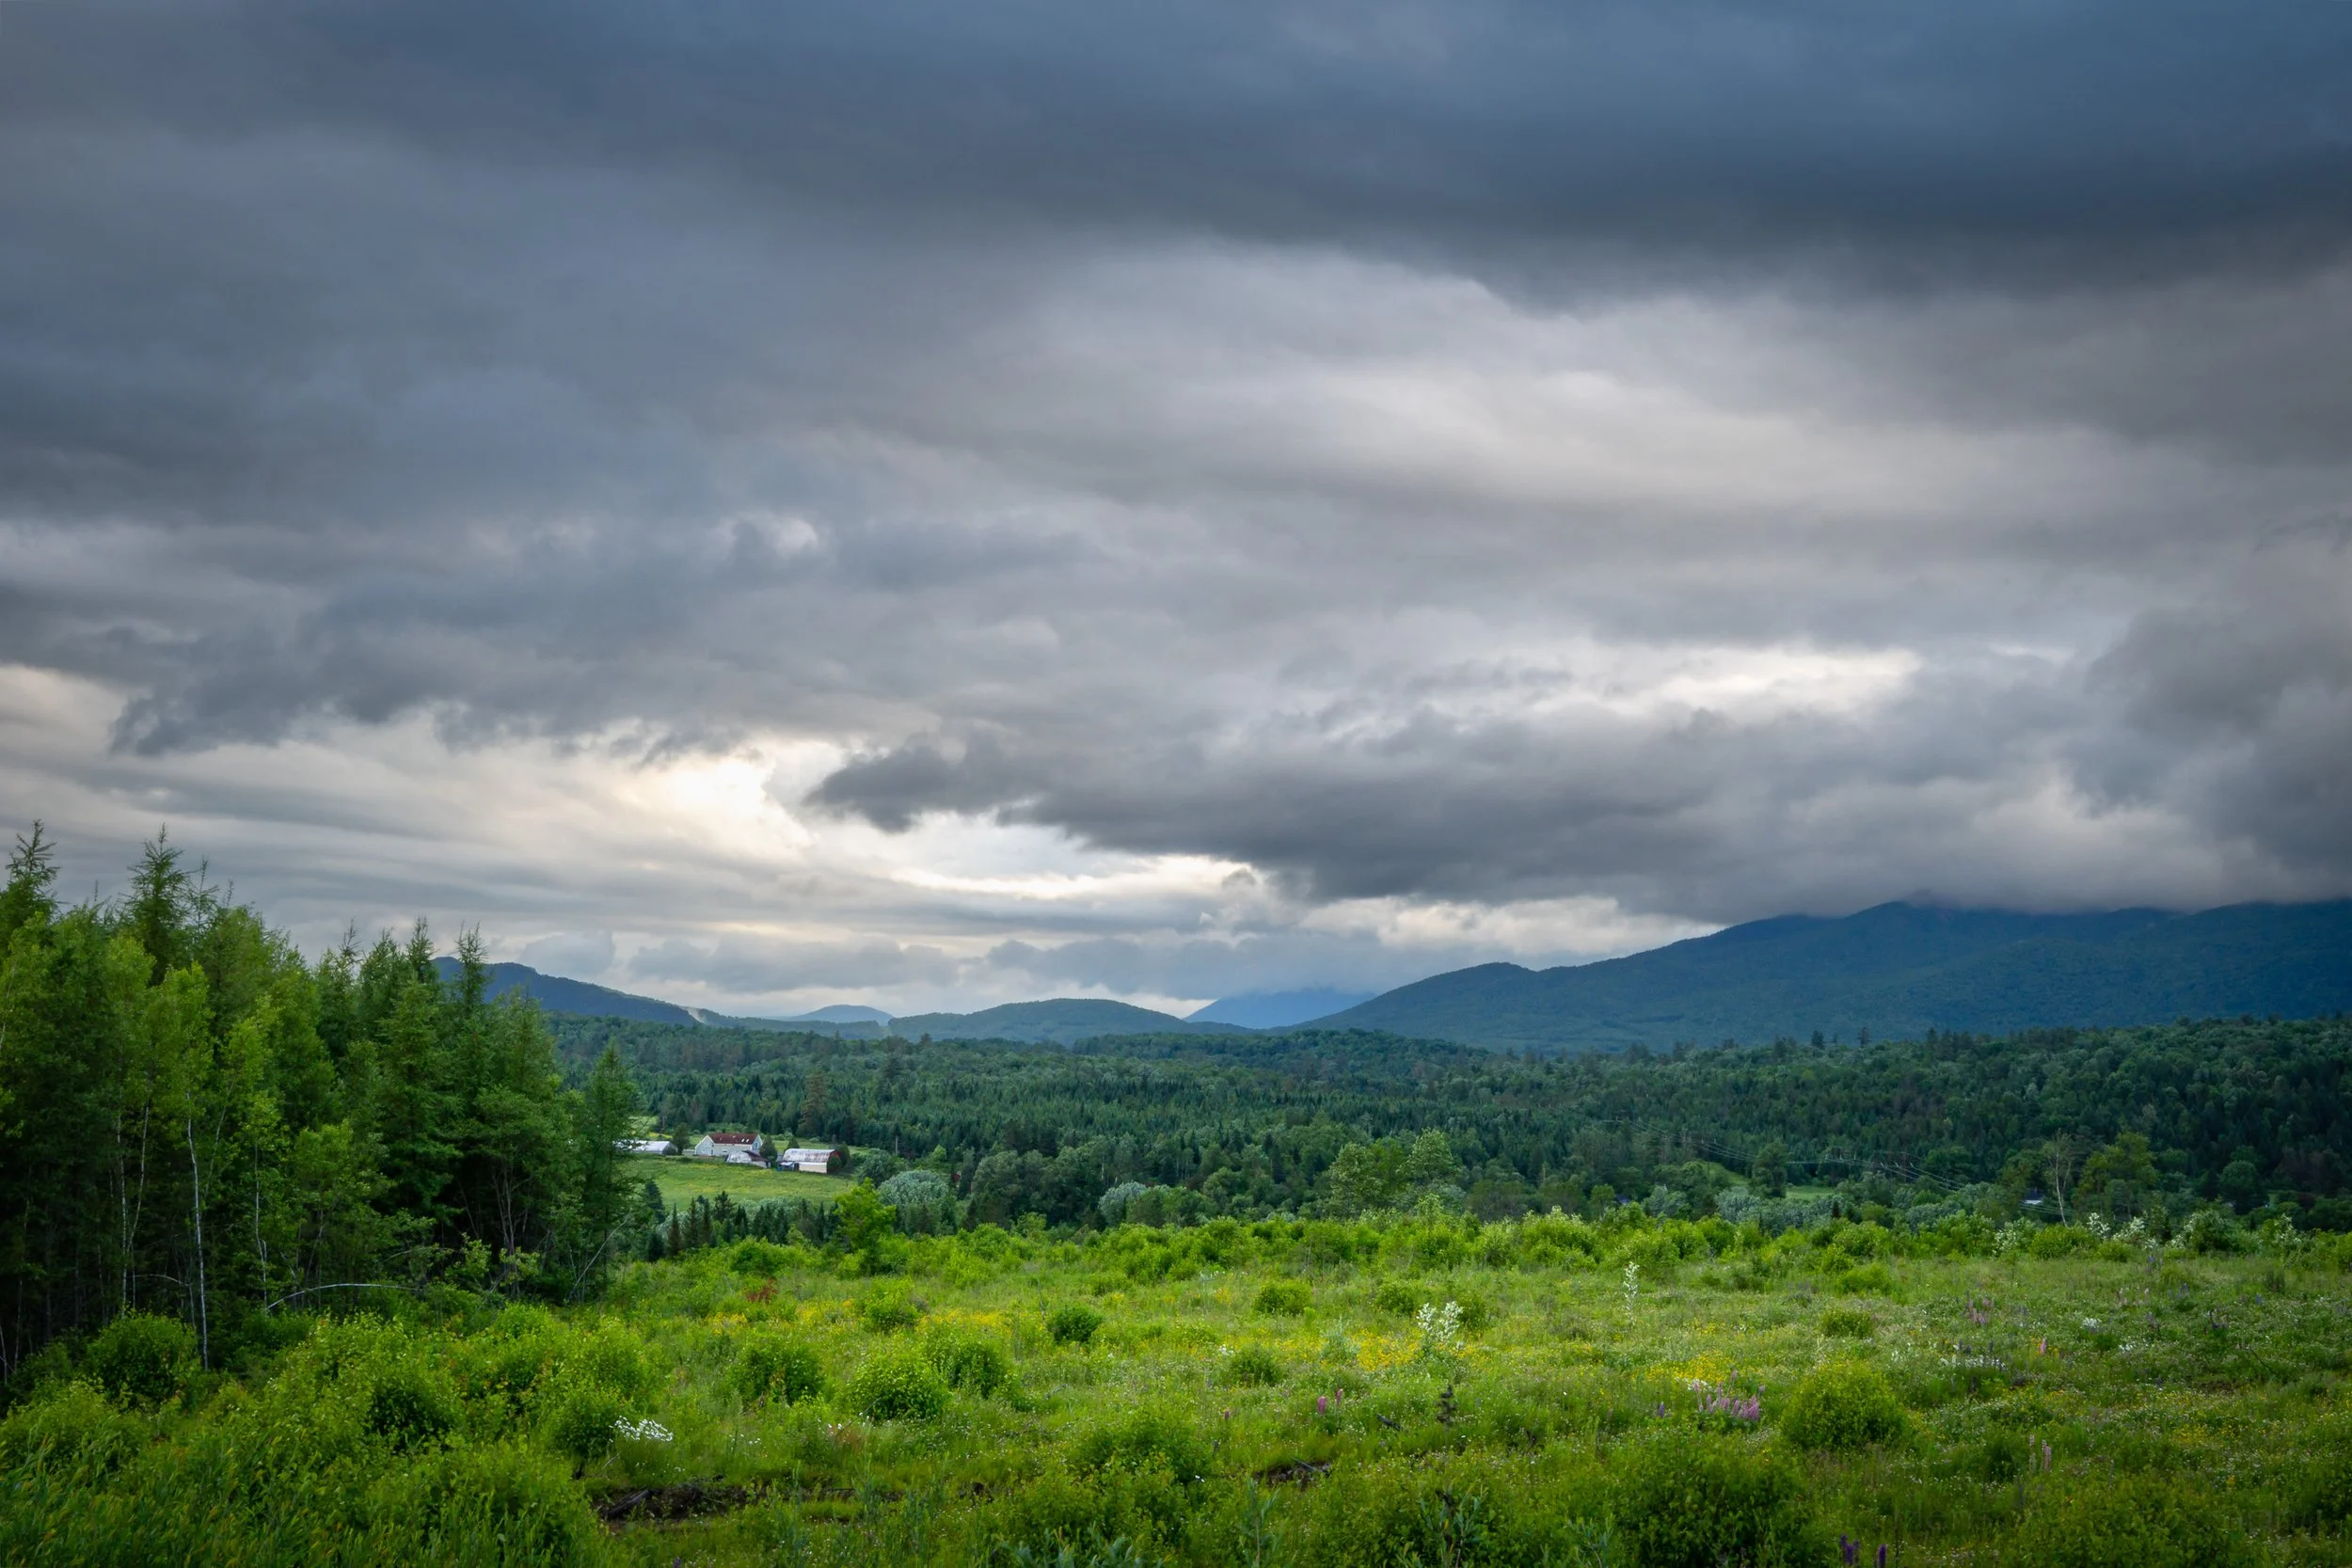
Fall foliage along the marsh

We can learn much from our mistakes, so I think it’s very important to acknowledge them. Today we take a look at a situation where autofocus can fail us. Autofocus works best when there is some obvious contrast it can latch onto. It can struggle when you have a busy background, especially with a subject that blends into the background.

Today’s scene is of some trees and fall foliage along the edges of a marsh. I was immediately drawn to the lighter colored bare trees in the middle that, to me, stood out nicely against the colors of the foliage in the background and the darker brush in the foreground. However, my autofocus system with whatever settings I had, chose to latch onto the background trees with the colorful foliage, leaving the main focus, those white trees, slightly out of focus. I like the composition and I like how it looks when viewed small. But when you zoom in or attempt to print this large enough the focus issue becomes far more apparent.

Mistakes I Made

So, what did I do wrong?

To set the scene, I was shooting with my 200-400mm lens, a heavy and bulky lens. This lens is long enough it can be prone to vibrations when shooting with too slow a shutter speed. Additionally, I didn’t want a lot of movement in the trees and leaves. To keep the shutter speed from dropping too low I ended up using a larger aperture than I’d perhaps have preferred, at f/5.6. The trees weren’t all that far apart, but at 200mm f/5.6 can be shallower than you think. But I was ok with the colorful trees in the background being a little out of focus provided I could capture the lighter colored foreground trees in focus. In fact, that might even make them pop out a little more against the background. Granted, if I’d had a wider angle lens I’d likely have used a smaller aperture. But you work with what you have.

Speaking of working with what you have, at 200mm I couldn’t capture what I wanted of the scene. So I chose to create a stitched panorama and shot a sequence of 9 images in a 3x3 grid to capture the entire scene I was interested in. Here’s where one of my mistakes came in, though in the end it was a minor one. When shooting panoramas it’s best to find the appropriate exposure settings for the overall scene and then shoot in manual exposure mode so it doesn’t change from shot to shot. I forgot to do this. I was shooting in Aperture Priority mode which kept the aperture fixed at f/5.6. But the shutter speed varied from 1/200 to 1/500 second. Thankfully, the software does a good job of equalizing and blending exposures when you make the mistake I did.

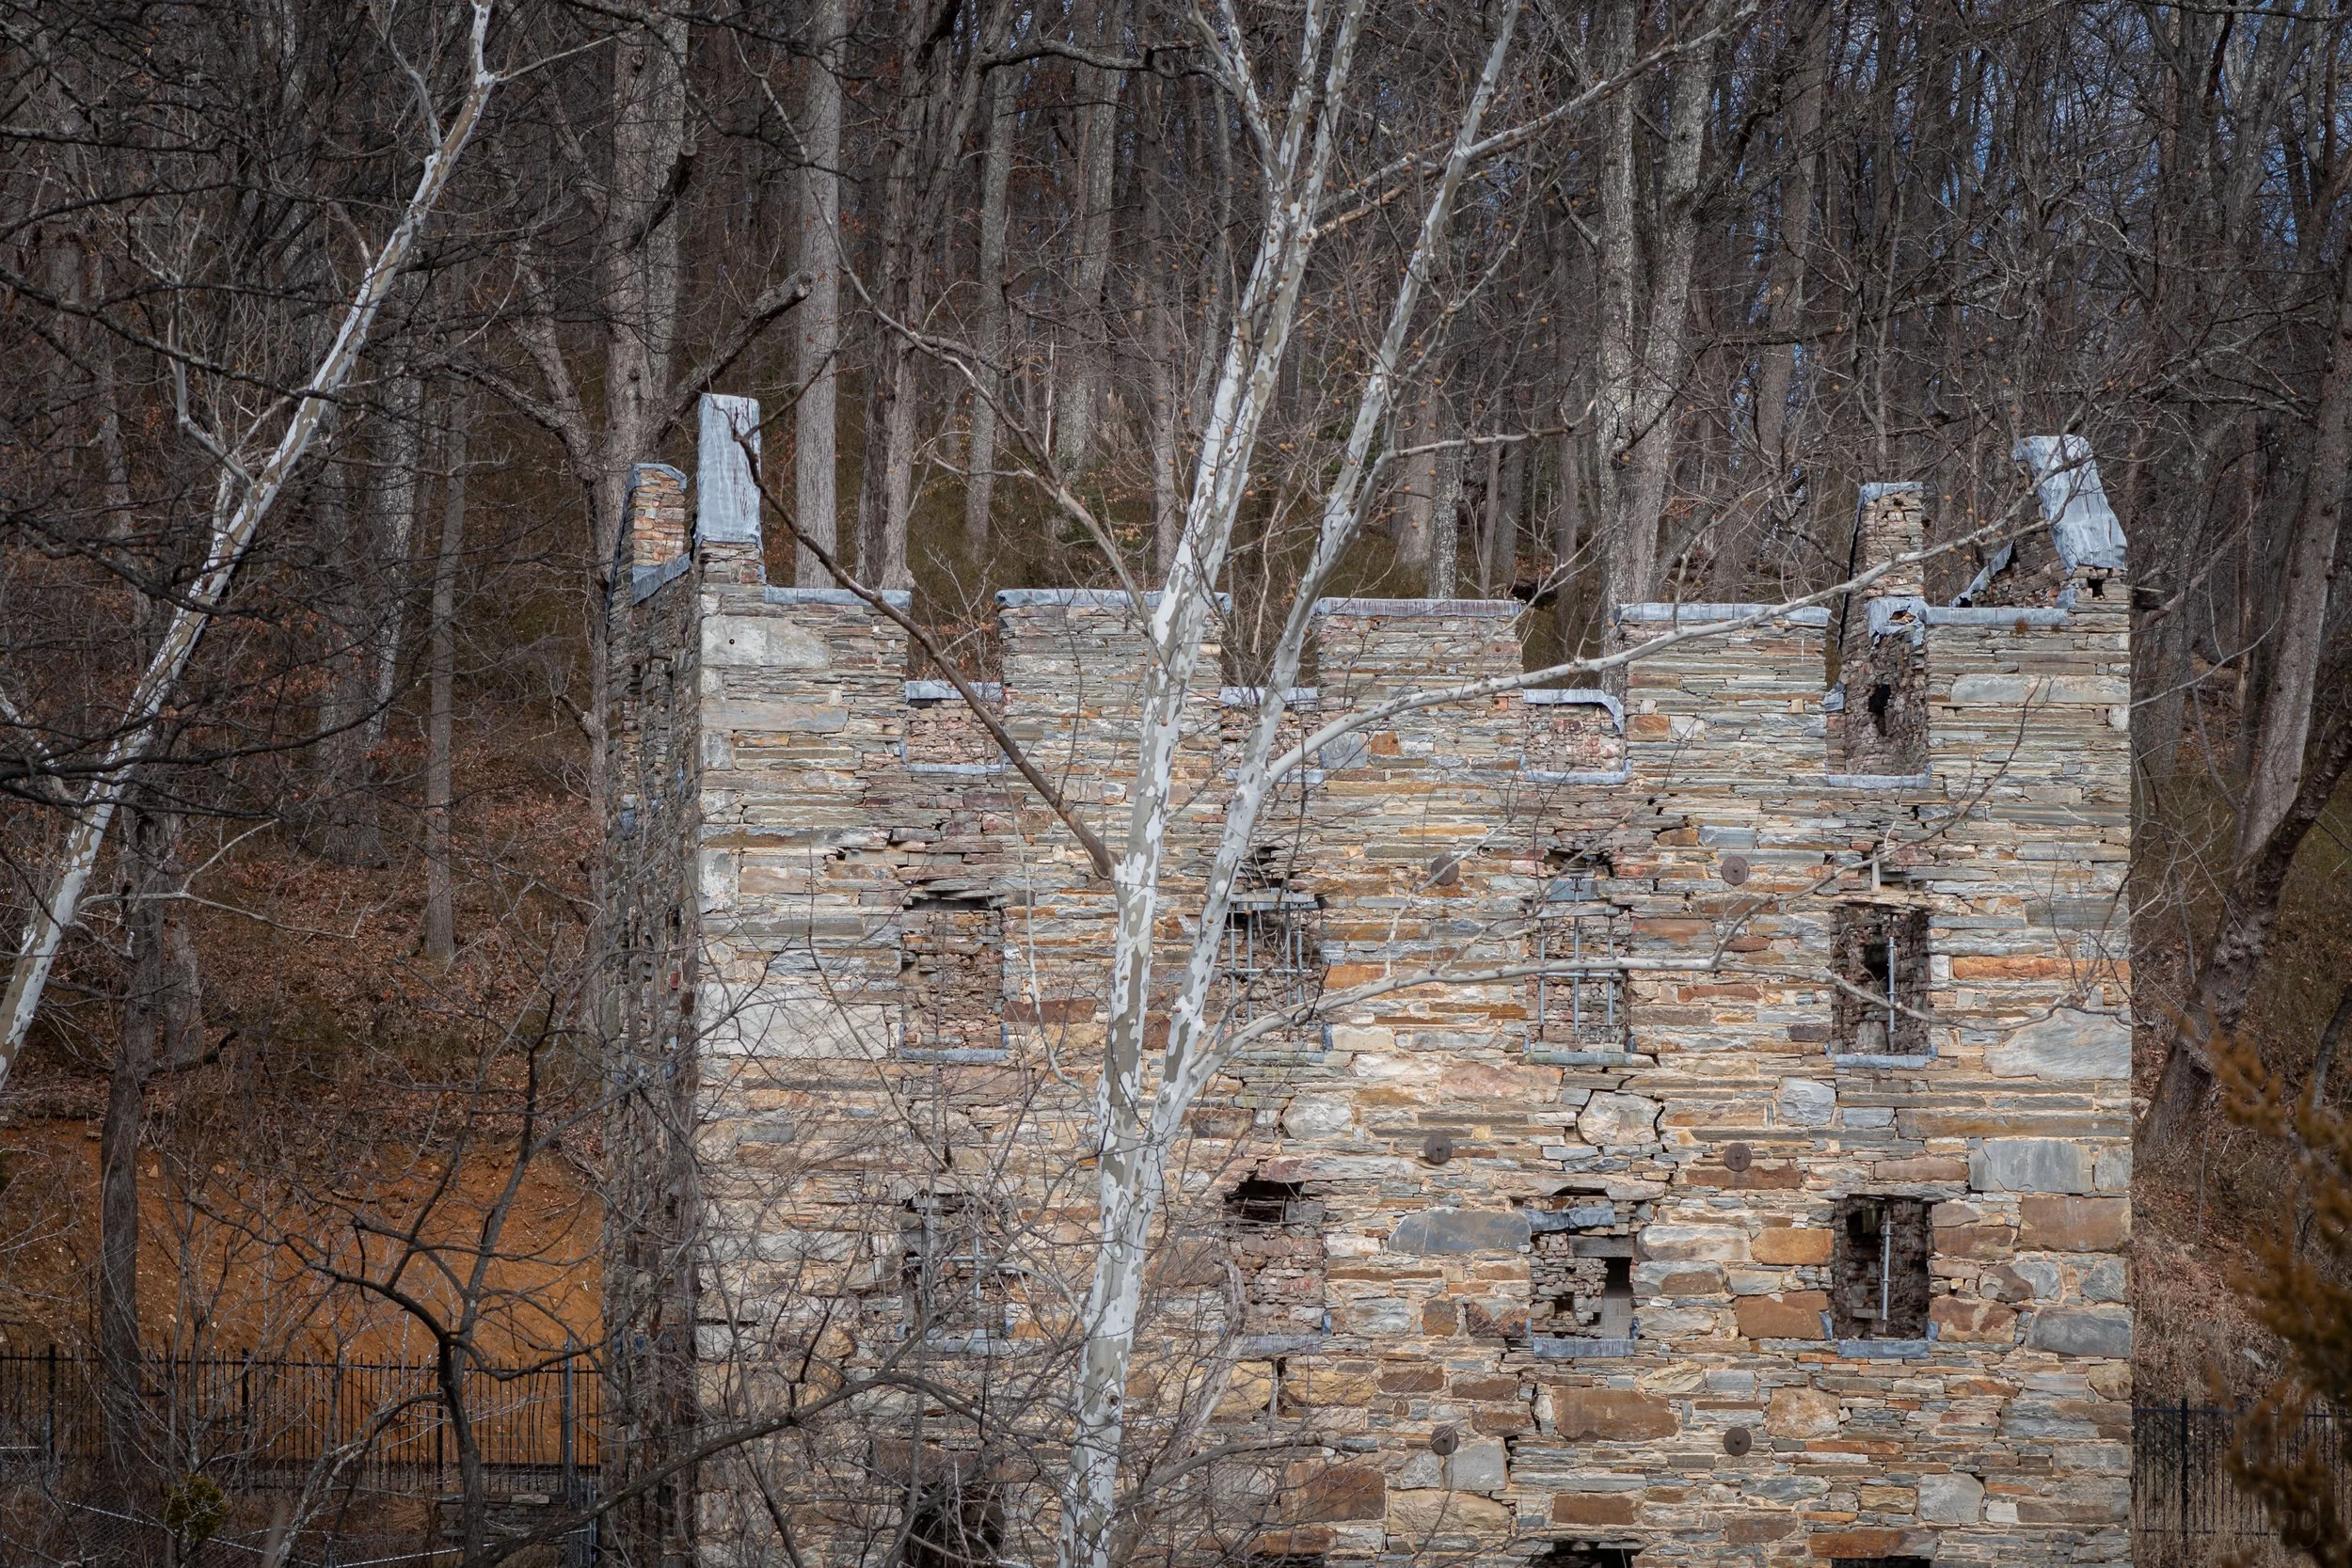
The biggest mistake I made was blindly trusting my autofocus. I should have known that a busy scene like this had risks. I should have looked closely at the scene on the LCD, zooming in to verify the focus was where I wanted it. But I didn’t. I picked a tree, hit the autofocus button, locked in that focus, then shot the pano. As mentioned, the autofocus latched onto the colorful trees in the background and not on the foreground trees I wanted in focus. I’ve included a zoomed in closeup that might let you better see this. On a small screen you may never know my focus was off, but view on a large enough screen, or on paper, and it stands out.

A zoomed in view to better see how the foreground tree is out of focus while the background trees are in focus.

Lessons Learned

So what could I have done to rescue this image?

The most important thing I could have done was viewing the images on the LCD after creating them, or using live view mode before shooting, and really zooming into the scene to be sure I had the focus right. And if autofocus wasn’t working I could have switched to manual focus and fine tuned it. Live view can work very well for this because you can zoom in and see how manually adjusting the focus affects the look of what you’re trying to focus on.

Another option I had was to stop down my aperture more, perhaps to f/11, to give me a bit more depth of field. Perhaps I could have chosen an aperture where almost the entire scene was in focus, which would have prevented the problem from happening in the first place. But to do so I might have had to raise the ISO to give me a fast enough shutter speed to prevent too much movement in the leaves and any problem from vibration within the lens. Doing that could have introduced digital noise into the photo, some of which might have been dealt with using noise reduction in software. There are always trade offs when shooting, and this is an example of what some of those trade offs are. There’s no one right answer, it all depends on what you’re trying to do. And of course, what you happen to think to do while in the field.

The other thing I should have done was to set the exposure manually. This is almost always preferred when shooting for a stitched panorama. The software is pretty good at dealing with issues here, so it’s not quite as critical as it once was, but still, it’s always preferred to get the best shots possible while in the field instead of relying on software to save you after the fact.

I share my mistakes in hopes they might help you avoid similar ones. And also perhaps to provide a little entertainment if you’ve made similar mistakes yourself. No need to beat yourself up. Get a good laugh at what you’ve done and then try your best to learn from your mistakes so you can do a better job next time (though I have to admit I’ve made this same mistake many times before). And finally, never let your mistakes take away from the enjoyment of getting out there and photographing. If this isn’t fun it isn’t worth doing.


Do you enjoy these posts?

Sign up to receive periodic emails with updates and thoughts. Don’t worry, I won’t spam you. And please consider purchasing artwork or products from my online store, and using my affiliate links in the sidebar to the right when shopping online.

I appreciate your support!


Lesson Learned with Opteka Fisheye Lens by Todd Henson

This is how an image with this lens should look.

I believe it’s important to admit to our mistakes, that it’s a big part of how we learn and grow. And so this is my time to admit to you what is a slightly embarrassing mistake on my part. It’s the sort of very simple mistake you’d think I’d no longer make. And yet… here we are. 😁

I’d decided to take a single lens, my Opteka 6.5 mm Fisheye lens, out for a hike through the woods and see if I could learn to better see through this focal length and perspective. What’s funny is the entire time I kept thinking something just isn’t right with the photos I’m creating. And yet I didn’t figure out what until we were almost at the end of our hike. That’s when I realized the black bars on the left and right side of EVERY SINGLE photo I created were caused by the incorrectly attached lens hood! I’d spent the entire day shooting with the lens hood on SIDEWAYS, creating these vertical black bars to the left and right of each and every photo. And let me tell you, I felt pretty stupid when I realized what I’d done. But I also had a good laugh about it. These things do happen. They key is learning from them.

An incorrectly installed lens hood can be seen by the lens. That’s what the black bars are on each side.

Making the best of a bad situation, I can simply crop the photo into a square format. 😁

This sort of problem is very unlikely to happen with most of the lenses from major manufacturers. They tend to build lens hoods that only snap on in the correct orientation. But this lens was not from a major manufacturer. It was a very low cost fisheye lens, something to let me dabble in fisheye photography without the much larger costs from the big brands. Fisheye photography isn’t something I do often so I wasn’t sure I’d enjoy it enough to warrant the higher cost. But sometimes you do get what you pay for, and opting for lower cost alternatives can come with compromises in quality. In this case it came with a lens hood that can be snapped in place just as easily sideways as it can correctly.

I’ve included some photos to give an idea of what it looks like and why it’s a problem. The 6.5 mm fisheye lens is such a wide angle it can almost see around corners. The camera’s sensor is rectangular and in a horizontal orientation. So the correct way to install the lens hood is with the larger petal shapes on the top and bottom, where the sensor is longer and there’s more space above and below it, and the smaller ones on the sides where the sensor is shorter and closer to the edge of the frame. This will properly provide a (very) small amount of shade and not obstruct the sensor. But putting the lens hood on sideways causes the vertical bars on the left and right and turns the photo into something closer to a square.

Here’s the lens hood that, frustratingly, can be installed incorrectly just as easily as correctly.

This shows the lens hood incorrectly attached to the lens. Notice the vertical black bars on the left and right where the wider petals of the lens hood shade the sides of the lens. Because the camera sensor is rectangular and oriented horizontally, these shaded regions will be seen by the sensor and turn into black bars in your photos.

Here I’ve correctly attached the lens hood, with the larger petals at the top and bottom. Notice the darker bars now create a horizontal rectangular shape that matches the sensor in the camera, so the lens hood doesn’t obstruct anything or appear in the image.

So one of the lessons here might be to better learn your gear, its strengths and weaknesses, and how best to deal with them. And if you have a strange feeling that something just isn’t right maybe put a little extra time into trying to figure out why instead of just continuing on as you are. Maybe you’ll find the incorrectly attached lens hood faster than I did and end up with fewer obstructed photos.

I hope you’ve enjoyed this look at a slightly embarrassing mistake I made. And perhaps it’ll be enough to keep you from making a similar mistake.


Do you enjoy these posts?

Sign up to receive periodic emails with updates and thoughts. Don’t worry, I won’t spam you. And please consider purchasing artwork or products from my online store, and using my affiliate links in the sidebar to the right when shopping online.

I appreciate your support!


Photo Failures: Smoke & Clouds by Todd Henson


This photo is a failure. Can you spot the flaws?


Let me start off by saying I like this photo. I was hiking with my father earlier this year before all the lockdowns and closures, and I was drawn to the pattern of the clouds and smoke in the sky and their reflections in the pond, and how they framed the tree on the far shore. And I think it works reasonably well processed in black & white. I debated posting it with a story about my thoughts when creating it, but in the end I decided to use it as an example of a photo failure.

Failure can be a strong word. Whether something is a failure often depends on how it will be used. This photo might work perfectly well displayed at relatively small sizes online. And for that purpose it might be a success. But problems may show if I try to print this beyond a certain size. And each time I view the photo I keep seeing, and remembering, my failures during its creation which led to what I currently see as a flaw in the photo. In the future, perhaps, my views might change, or I may reprocess the photo in a way that satisfies me. But for now, I’ve put it in my failures bucket.

Why? What’s wrong with the photo? What don’t I like about it? Can you guess? It might not be overly obvious at these smaller sizes.

And more importantly, what don’t you like about it? Or do you like it? Even though I currently consider it a failure I do still like it.

My issue with this photo revolves around focus. I was using my 105mm macro lens and just prior to noticing this scene I’d been photographing some lichen closeups. When I finished with the lichens my aperture was wide open, all the way to f/2.8. I’d done this because I was looking for very shallow depth of field, trying to focus on very small portions of the collection of lichen. Then I stood up and caught sight of the smoke and its reflection. I saw how it framed the tree and thought it looked interesting. So I walked down to the small dock on the pond and began photographing. Because I was using the 105mm I couldn’t fit the entire scene into a single photo, so I stitched together two photographs, one of the top of the scene and the other of the bottom. That’s no problem. I was hand holding but Lightroom does a great job stitching so I wasn’t worried.

The problem was I forgot to check my aperture setting before photographing this scene. Remember, I’d been working a macro subject, then got right up and began photographing this with the same settings. I pictured this scene as being completely in focus, meaning I needed a smaller aperture. But I had the lens wide open, which creates a shallower depth of field. Not only that, but it appears I didn’t focus on the main tree, instead focusing on the line of background trees. That means the shoreline and the tree are all slightly out of focus. And because I know this that’s what I notice each time I view the photo.

As I said, I may try reprocessing this photo at some point, see if I can come up with some way of getting around the focus issue. Maybe it’ll become part of another project, perhaps composited with other photos. Maybe I’ll get used to it or come to like the shallow depth of field and choice of focus point. Or perhaps it will remain in my failures bucket, a reminder to remember to check my settings before moving from one subject to another.

I hope you’ve enjoyed this little exploration of making and, hopefully, learning from mistakes. Failures are not a bad thing. They provide us the opportunity to learn, and through learning and practice we can better our craft and our artwork. Thanks much for reading!


Do you enjoy these posts?

Sign up to receive periodic emails with updates and thoughts. Don’t worry, I won’t spam you. And please consider purchasing artwork or products from my online store, and using my affiliate links in the sidebar to the right when shopping online.

I appreciate your support!