Techniques

Fundamentals of Photography with John Greengo by Todd Henson

This post contains affiliate links and I will be compensated if you make a purchase after clicking on my links. This is at no extra cost to you.

Fundamentals of Photography with John Greengo. Image credit: CreativeLive

Fundamentals of Photography with John Greengo. Image credit: CreativeLive

Are you new to photography? Interested in learning how to master your new camera and use it to begin creating beautiful images? Or perhaps you already know a bit about photography and would like a refresher to reinforce various topics? If so, check out CreativeLive’s class, Fundamentals of Photography, taught by John Greengo.

For many years John Greengo has taught his Fundamentals of Photography class, often adding or updating content, especially if anything new has happened in the world of photography. I’ve purchased two versions of this class in the past (in 2010 and 2012), and still go back to the lessons from time to time. John is a great teacher and he creates amazing visuals that help explain and reinforce the topics he teaches. (The visuals and examples in this post are my own.)

Selection of SLR lenses

In the class, John covers a wide range of topics. He talks about the different types of cameras out there today and how each work. He explains each part of a camera system, including the digital sensor and the differences between sensors, and camera lenses in their different forms. He explains how light works and how the camera captures it.

John teaches about exposure, and how it is affected by choices of shutter speed, aperture, and ISO. He explains each of these topics with visuals that really help you grasp the concepts. Examples of this are how to use aperture to get a shallow depth of field or a large depth of field. He talks about how shutter speed will affect the look of your image, allowing you to freeze the action or create motion blur to show the action. He explains ISO and how it controls how sensitive the sensor is to light.


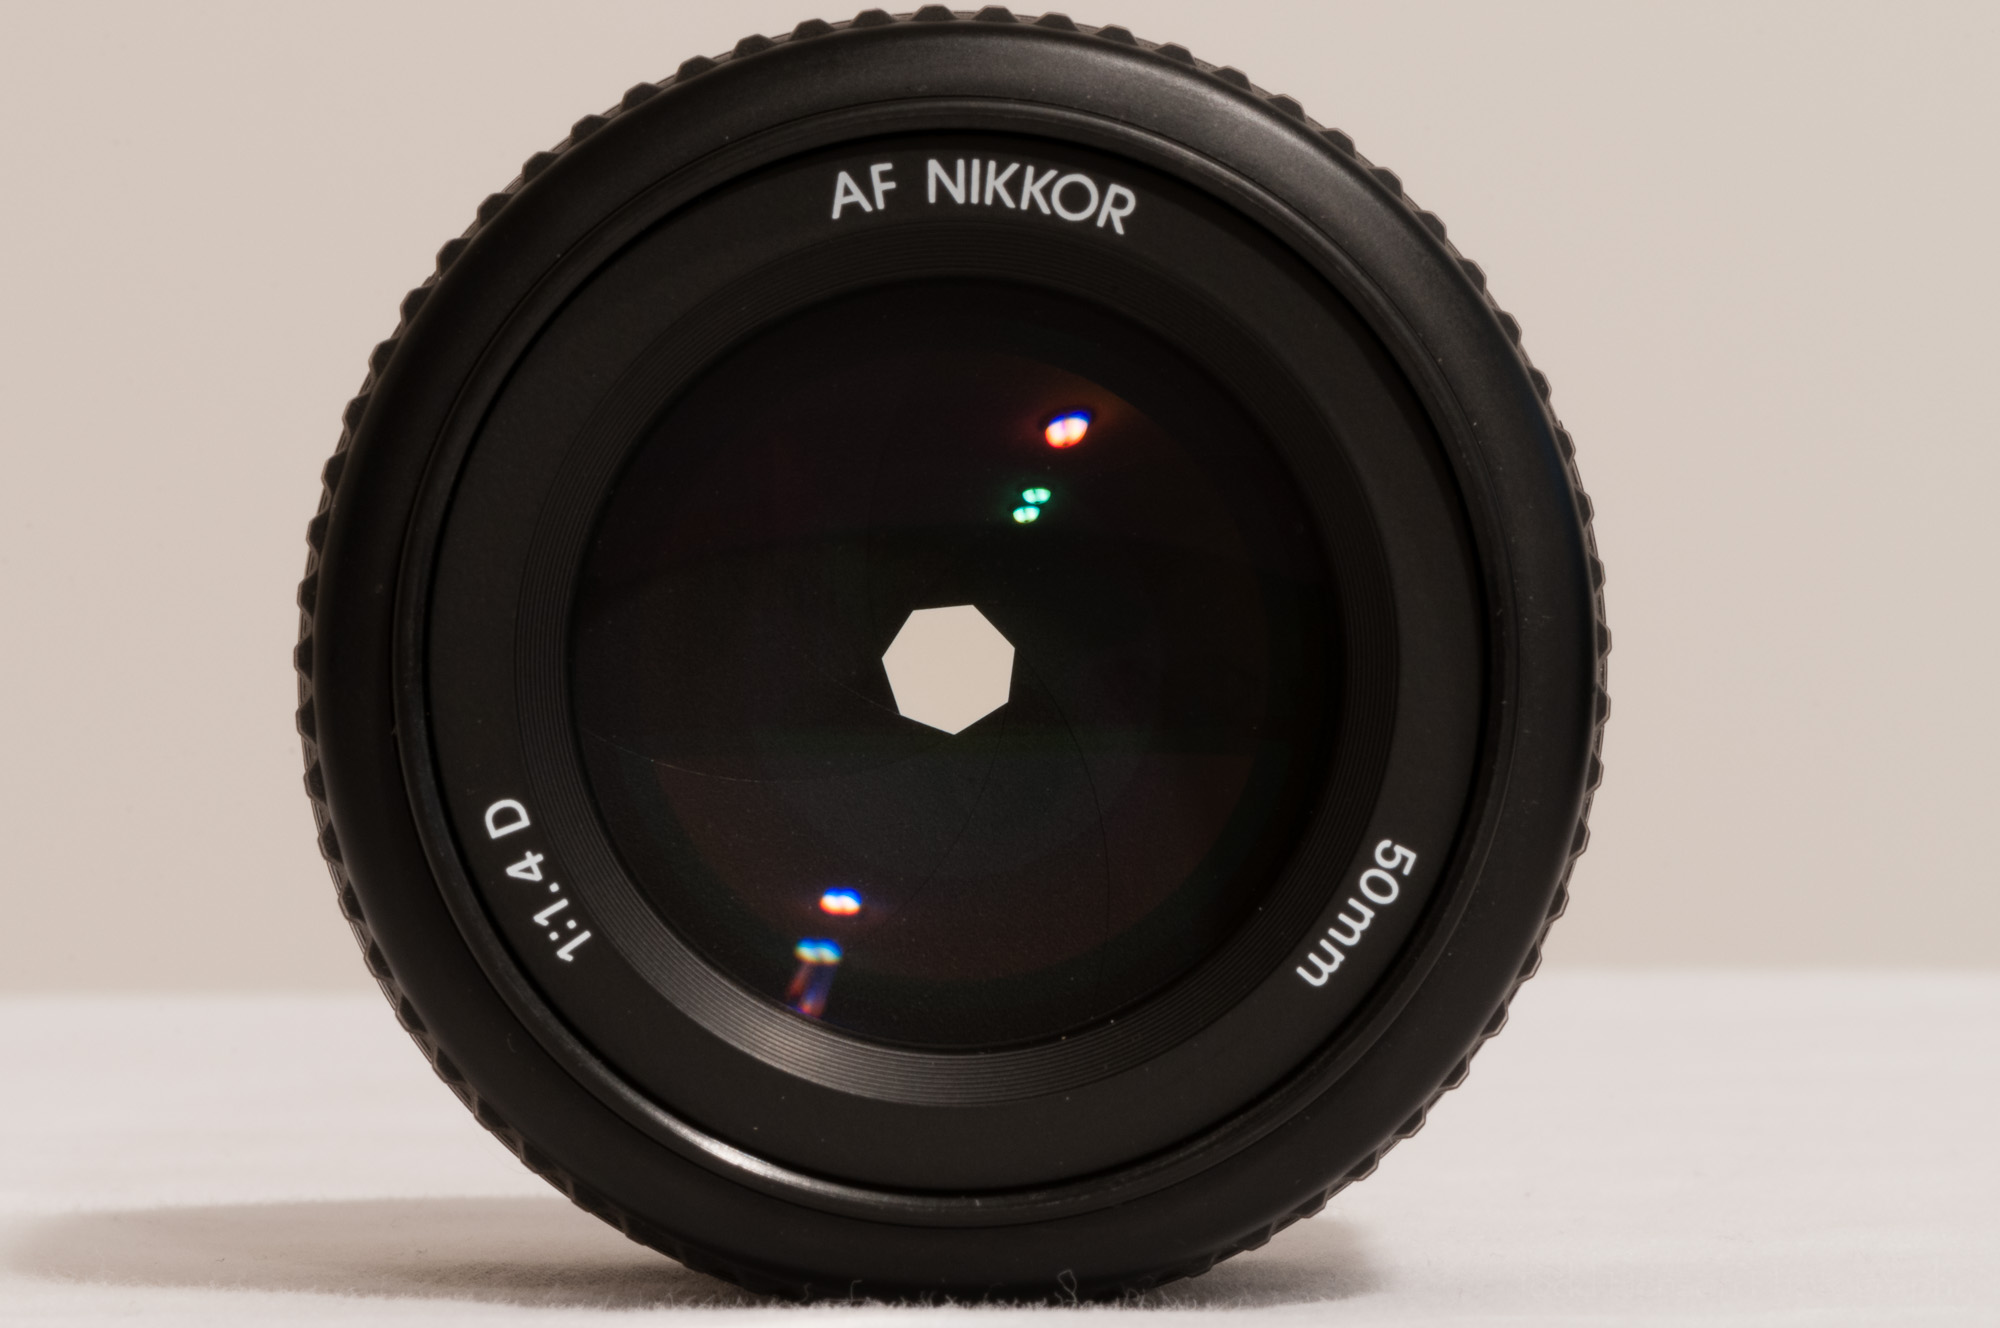
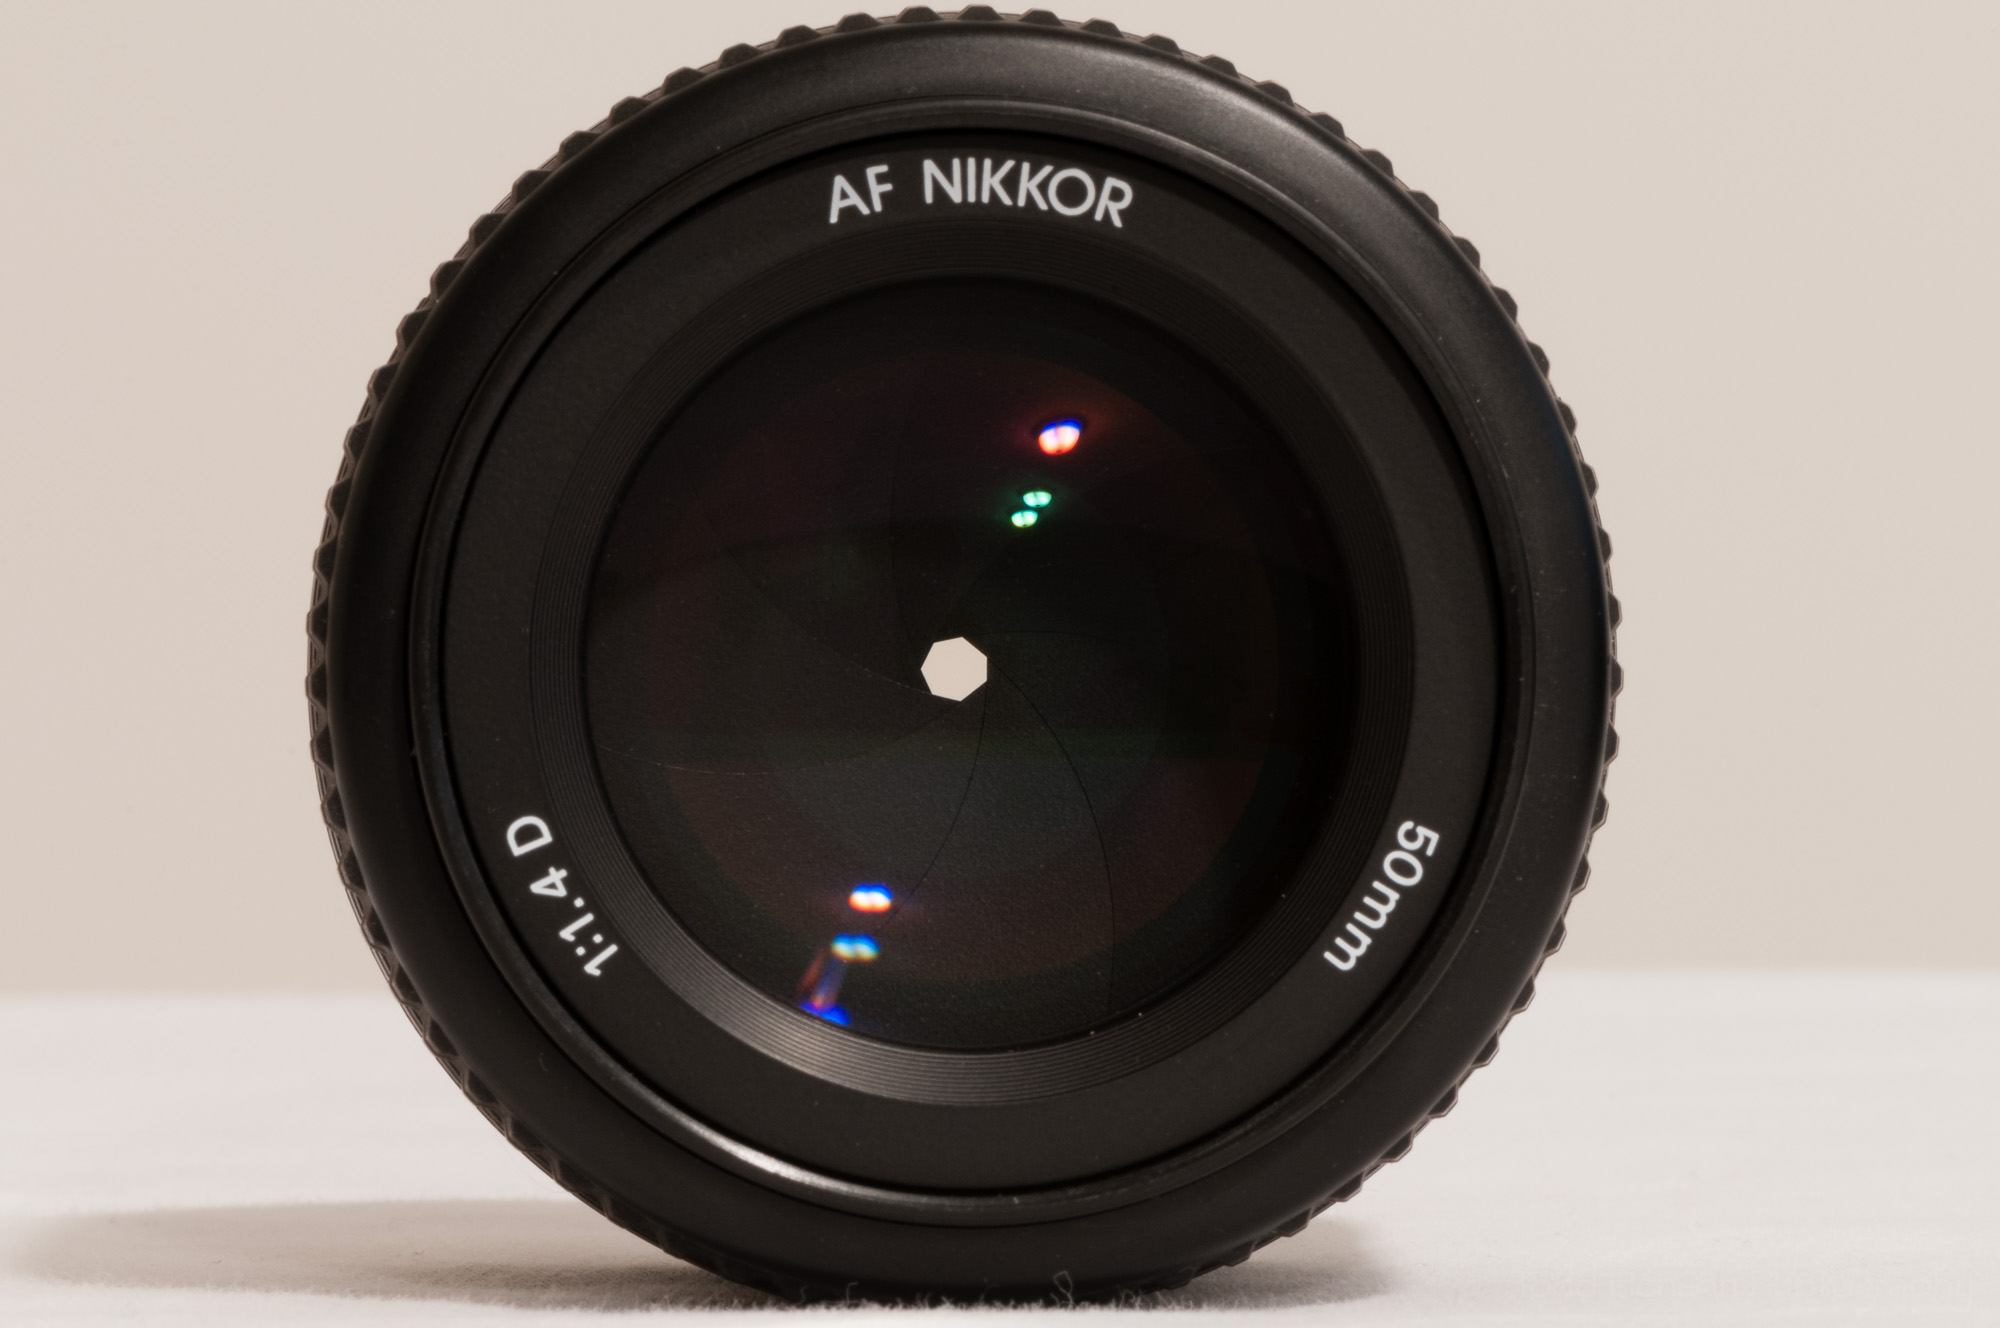
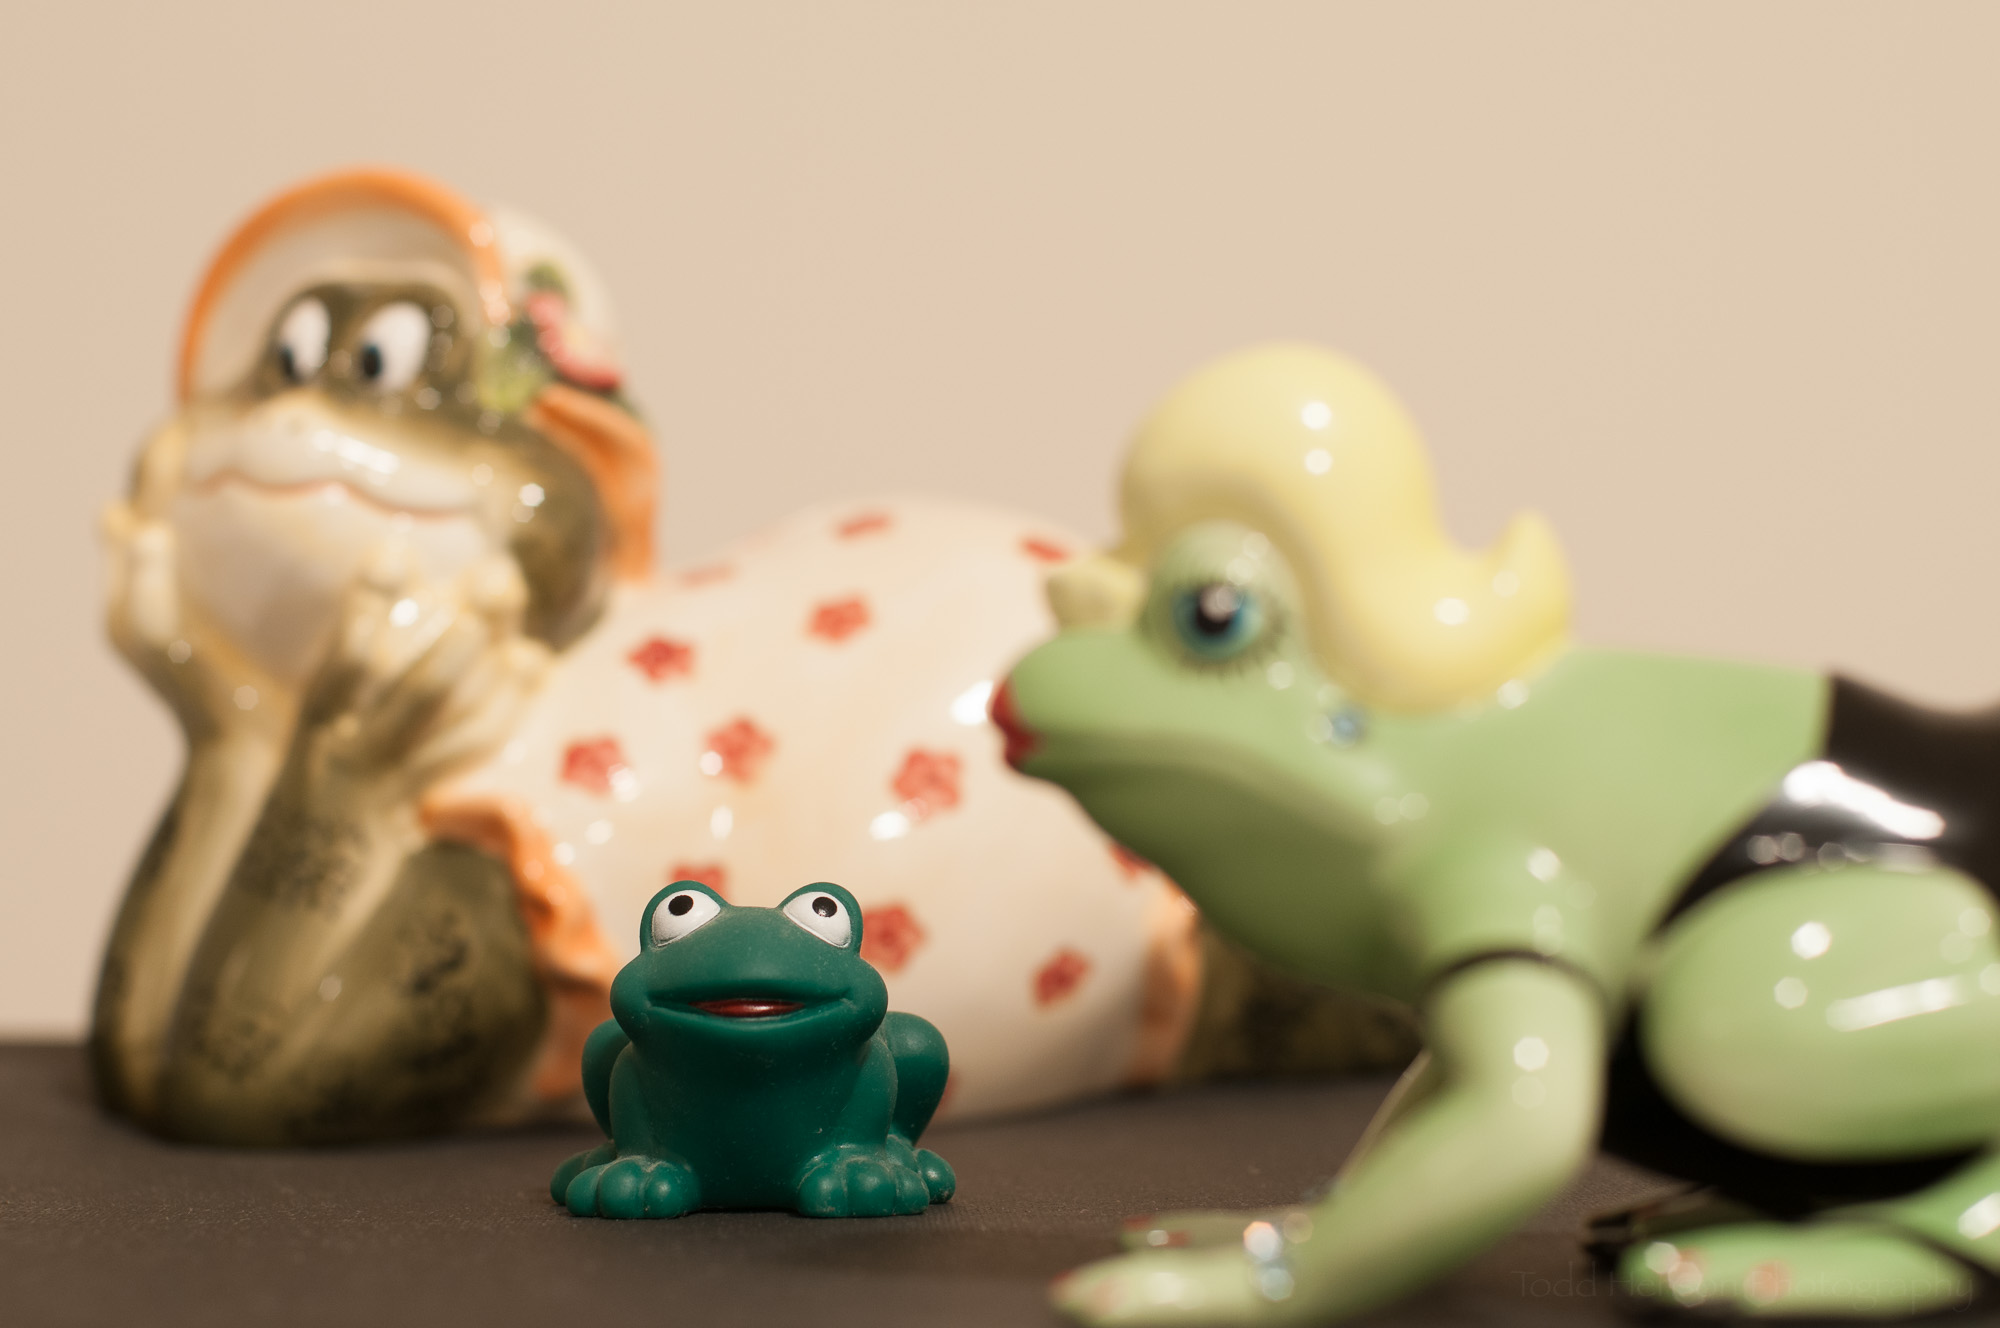
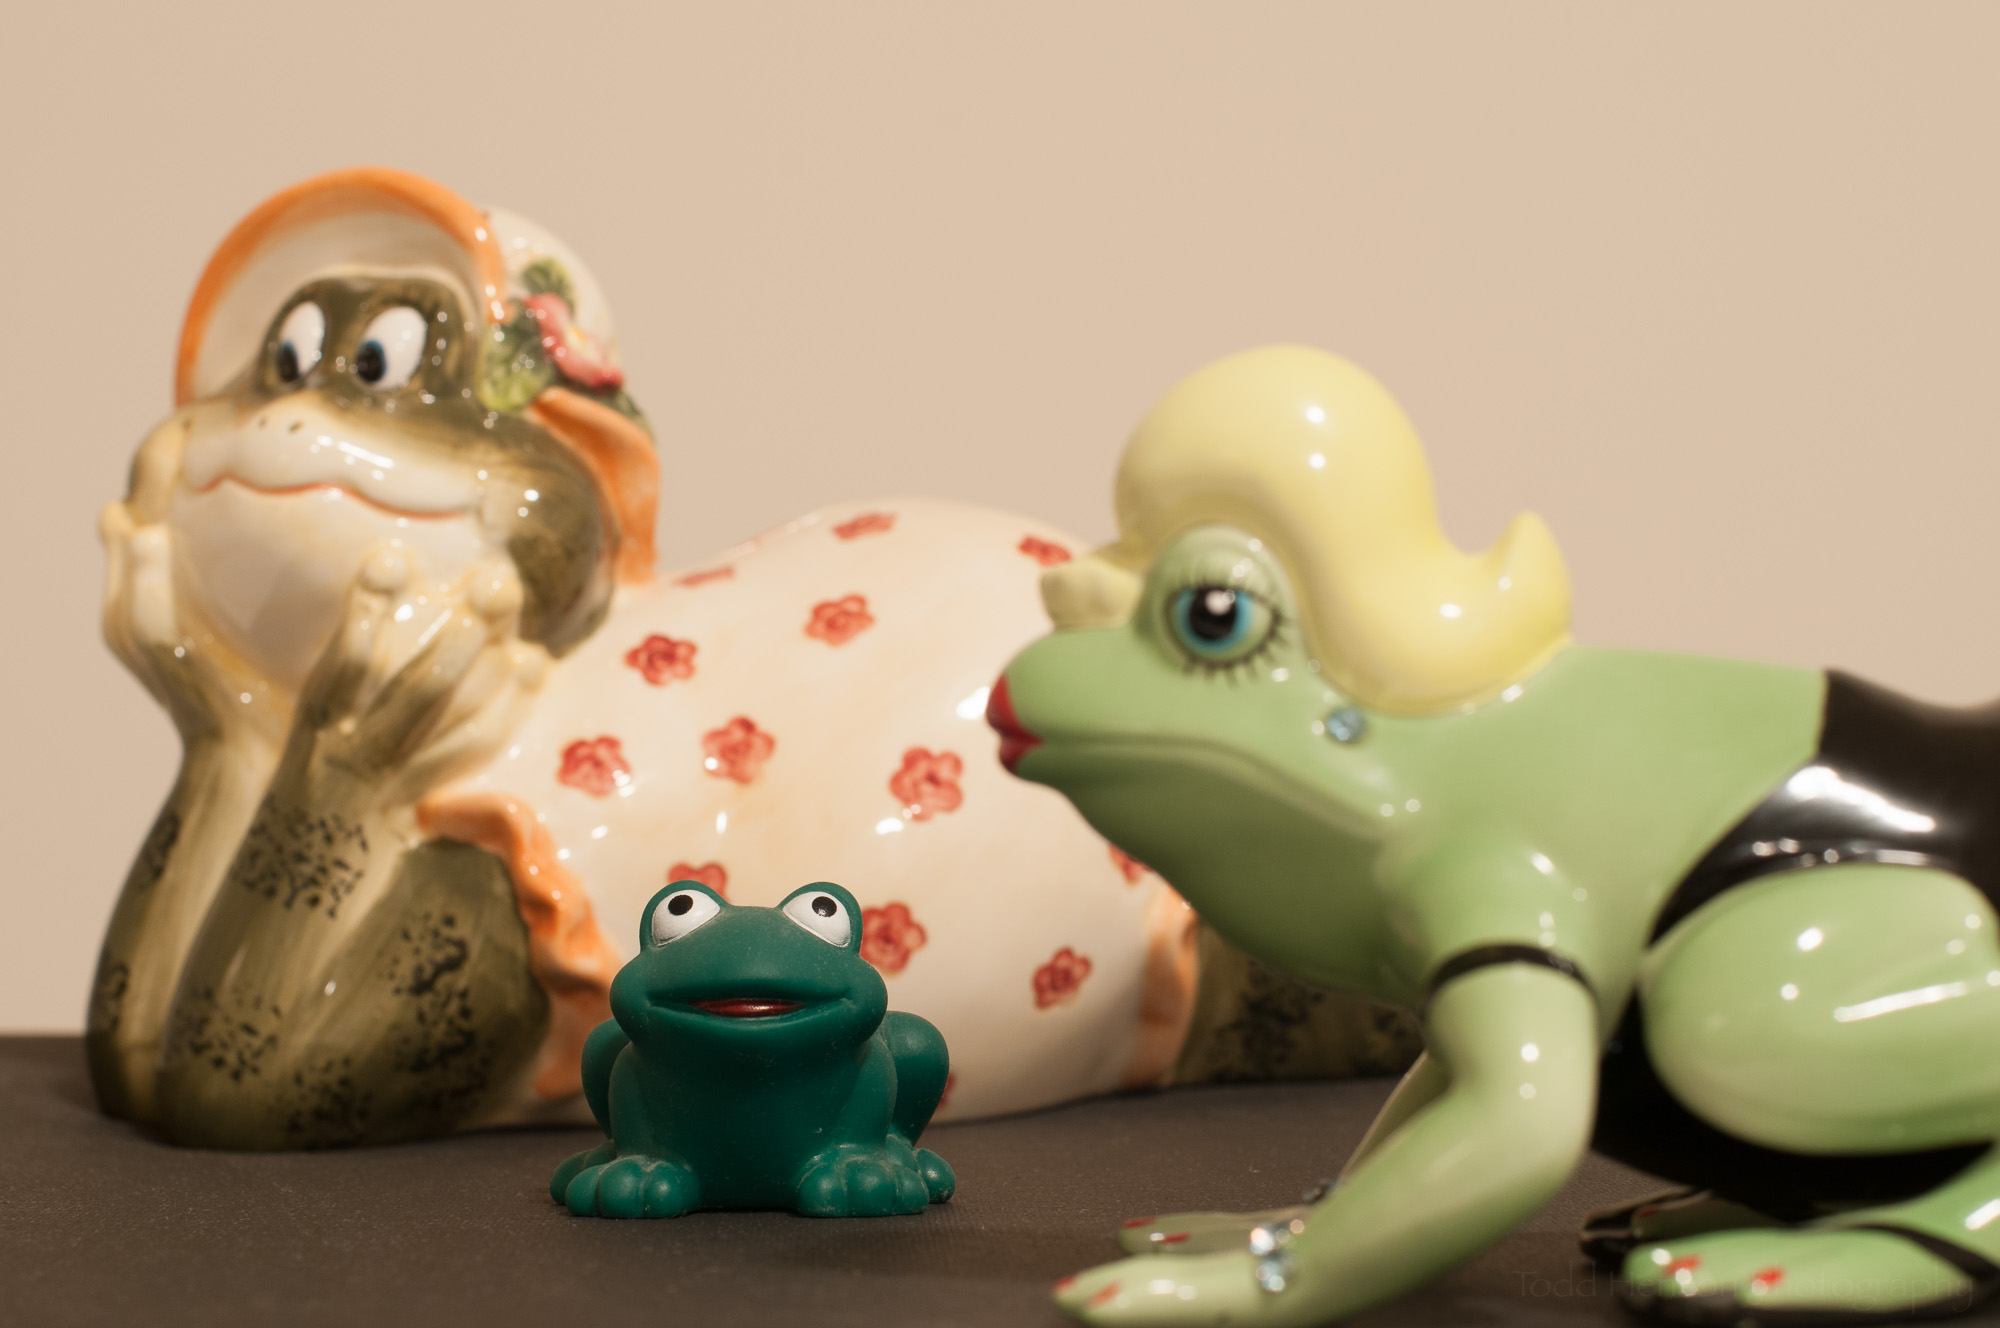
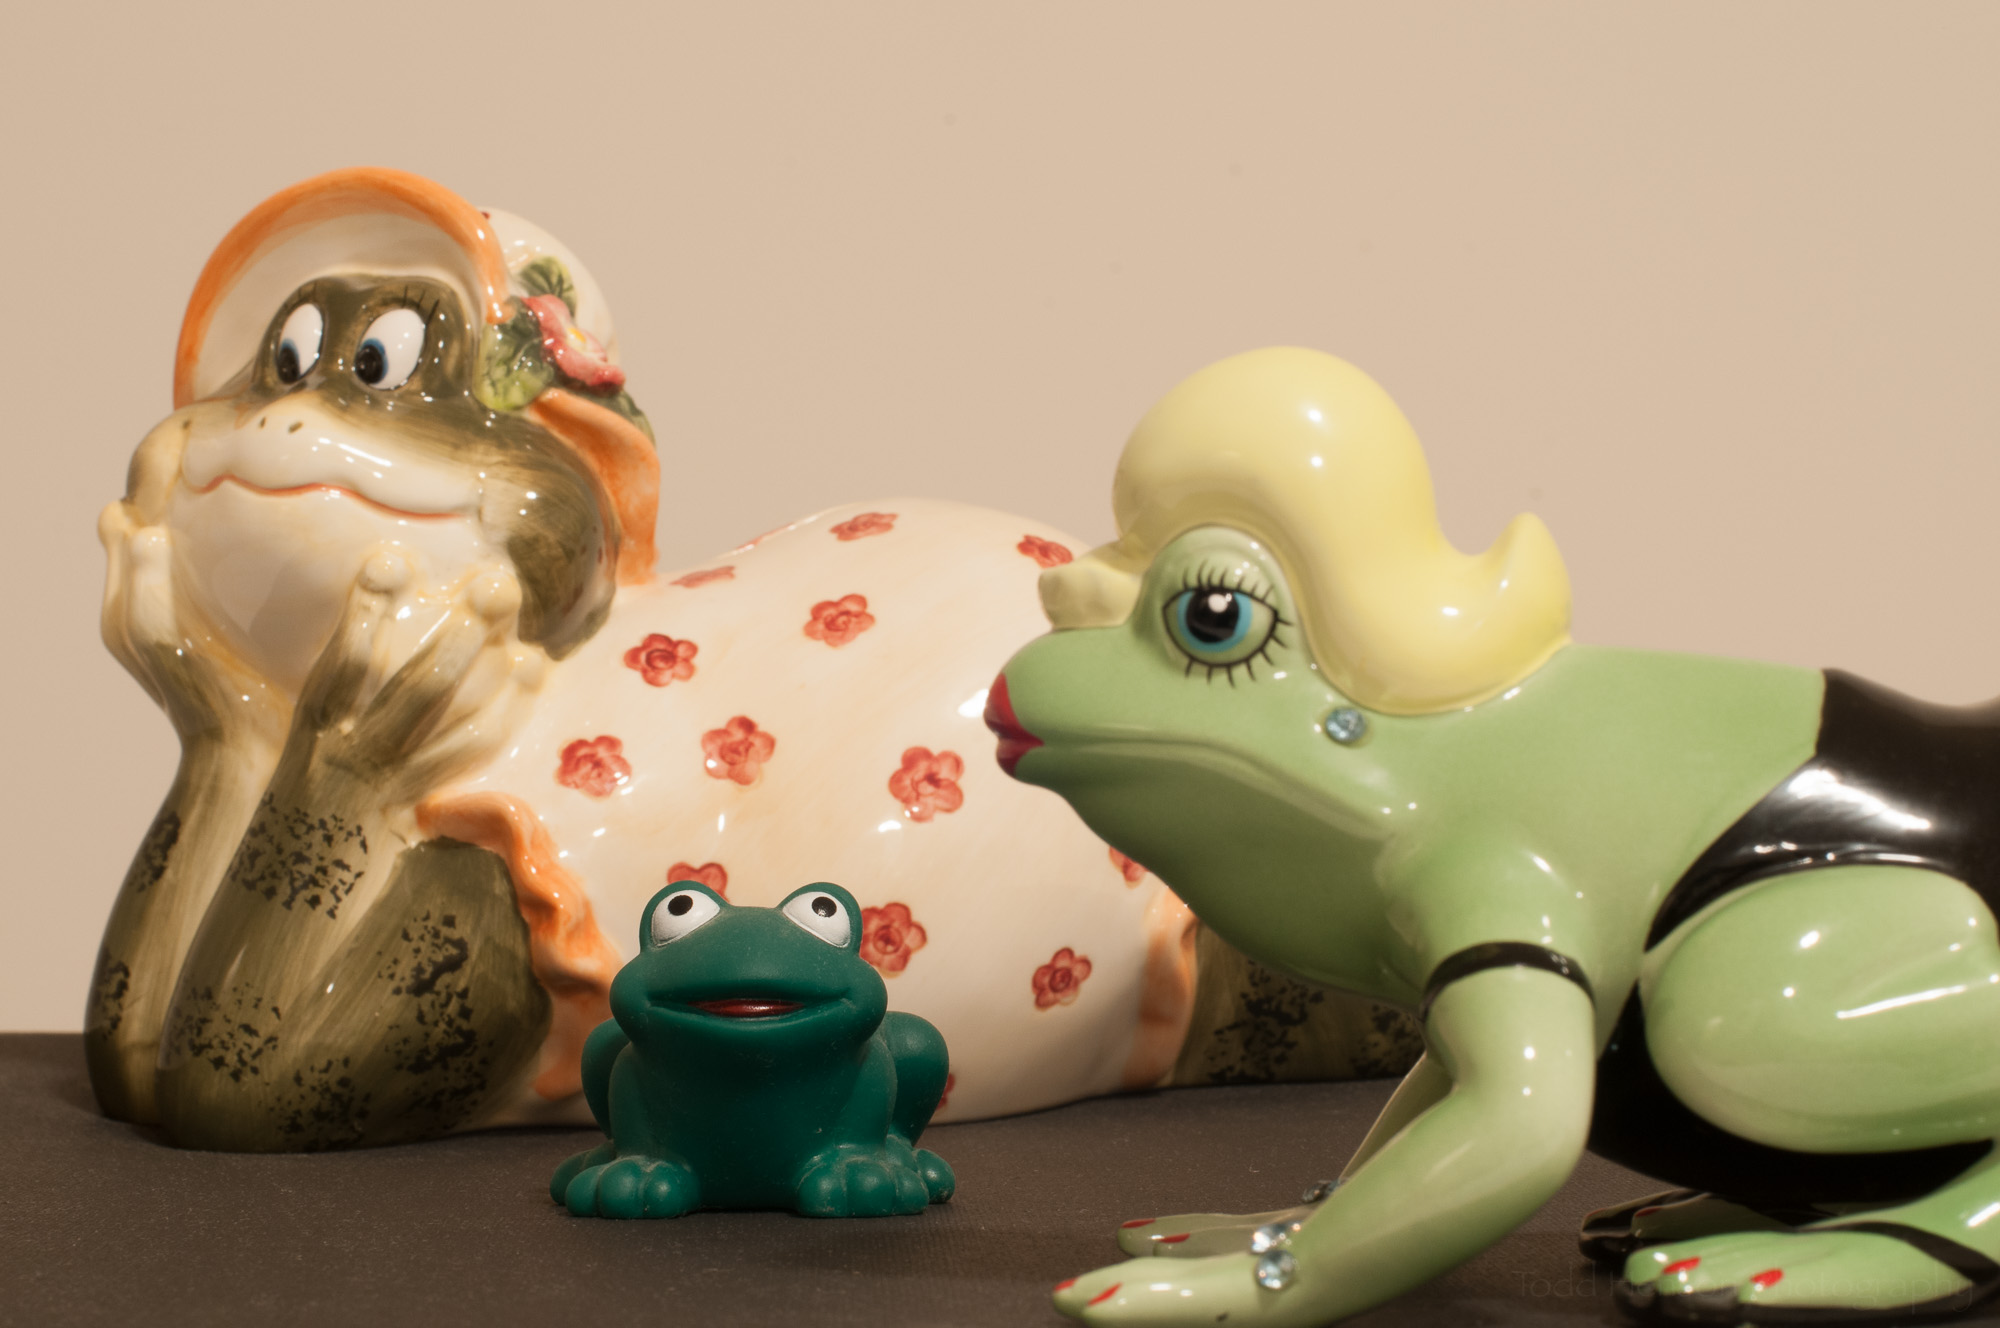
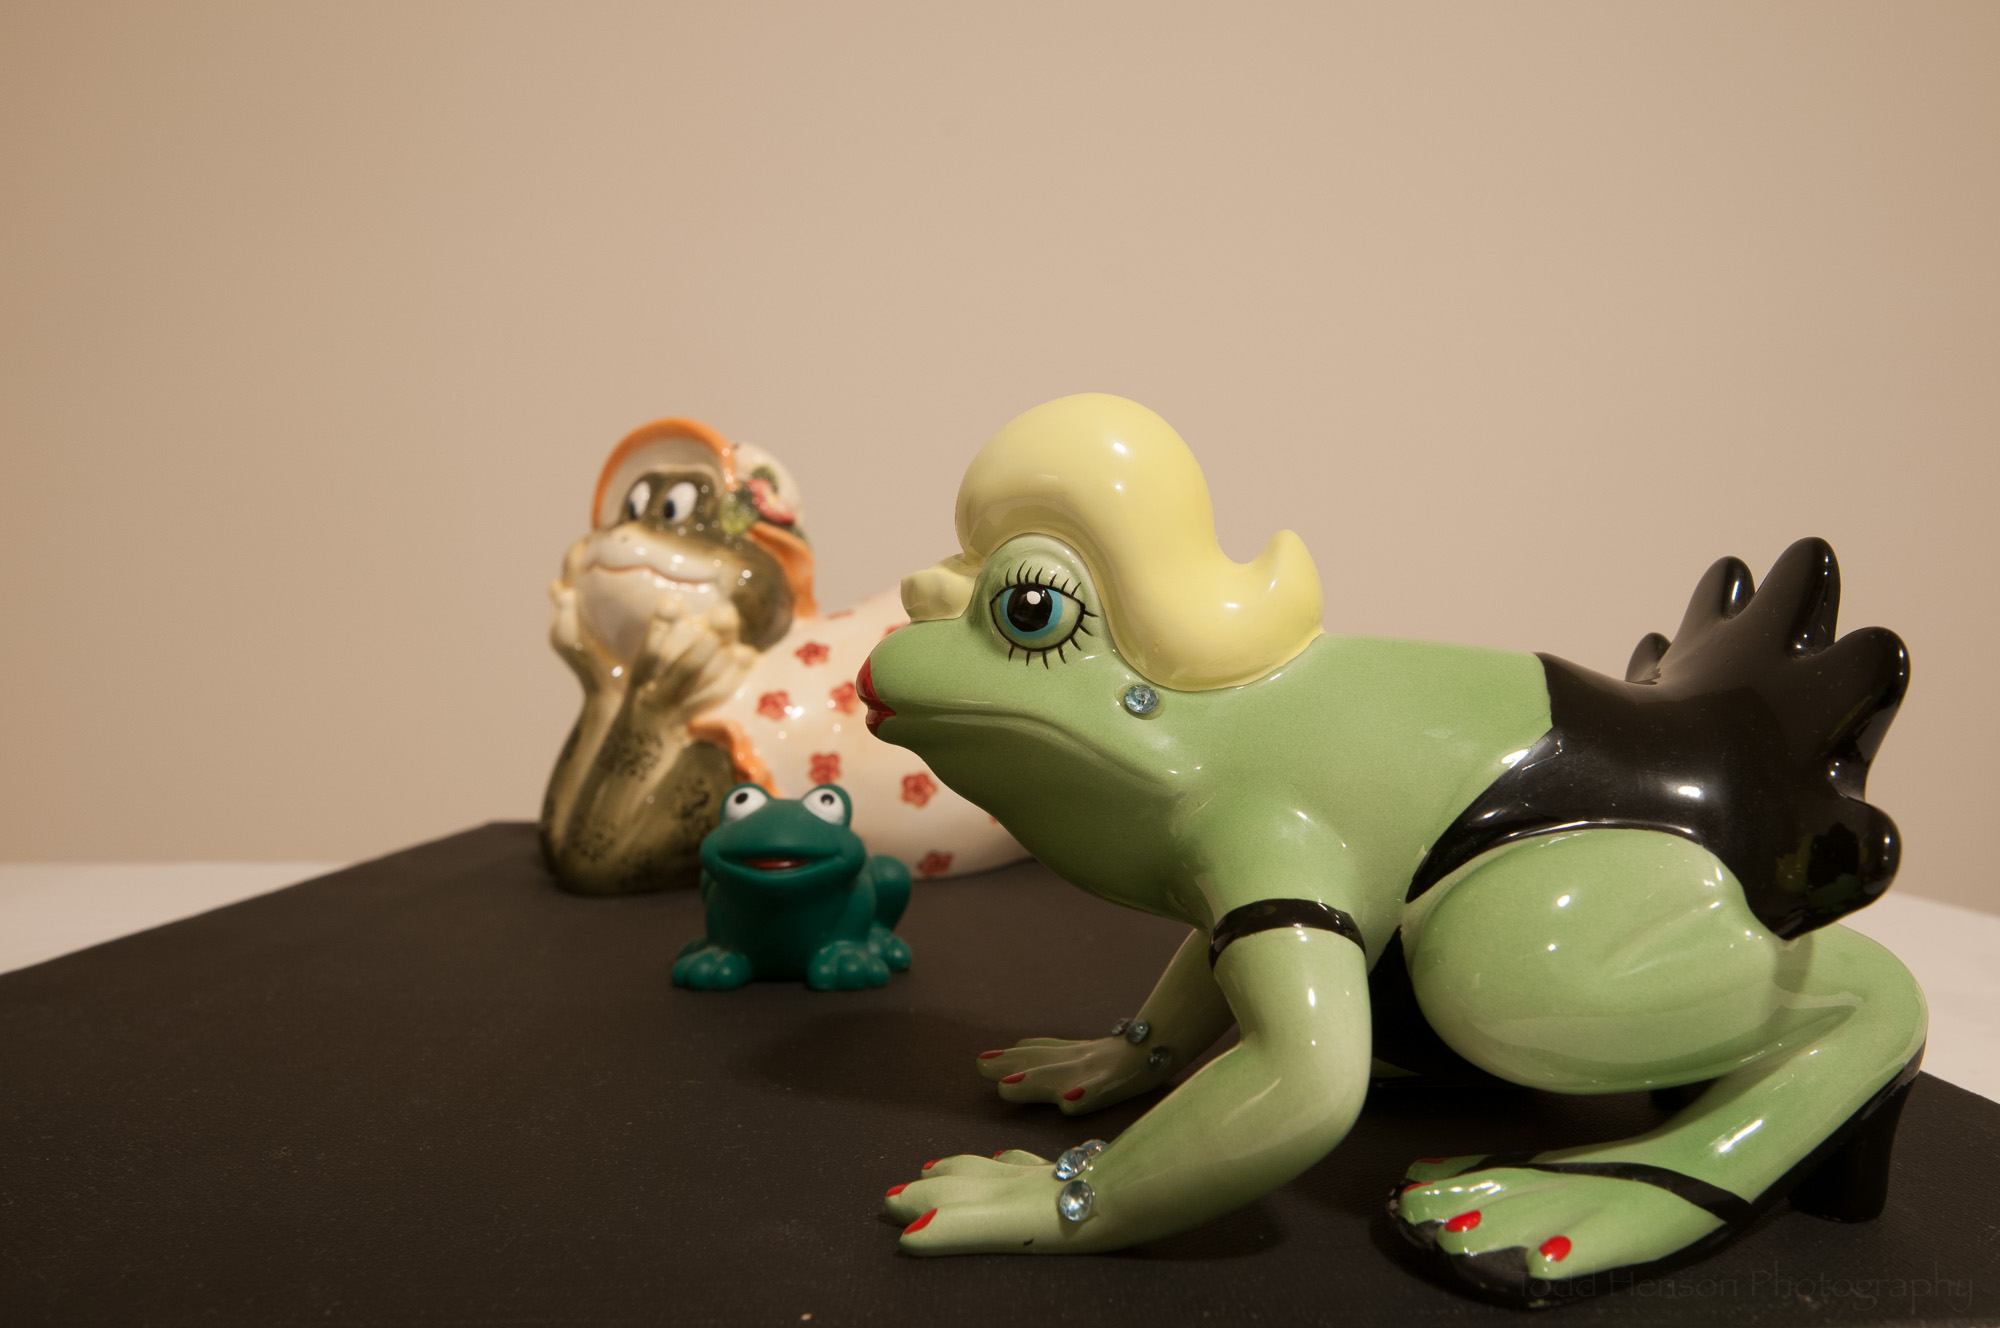
Example: Aperture and Depth of Field

The images of the lens below show the actual, physical, opening of the aperture at 4 different f-stops: f/1.4, f/4, f/8, and f/16. For this particular lens, a 50mm f/1.4 Nikkor lens, the largest opening possible is f/1.4 and the smallest opening possible is f/16. Click on the arrows on either side of the image to display to the next image.

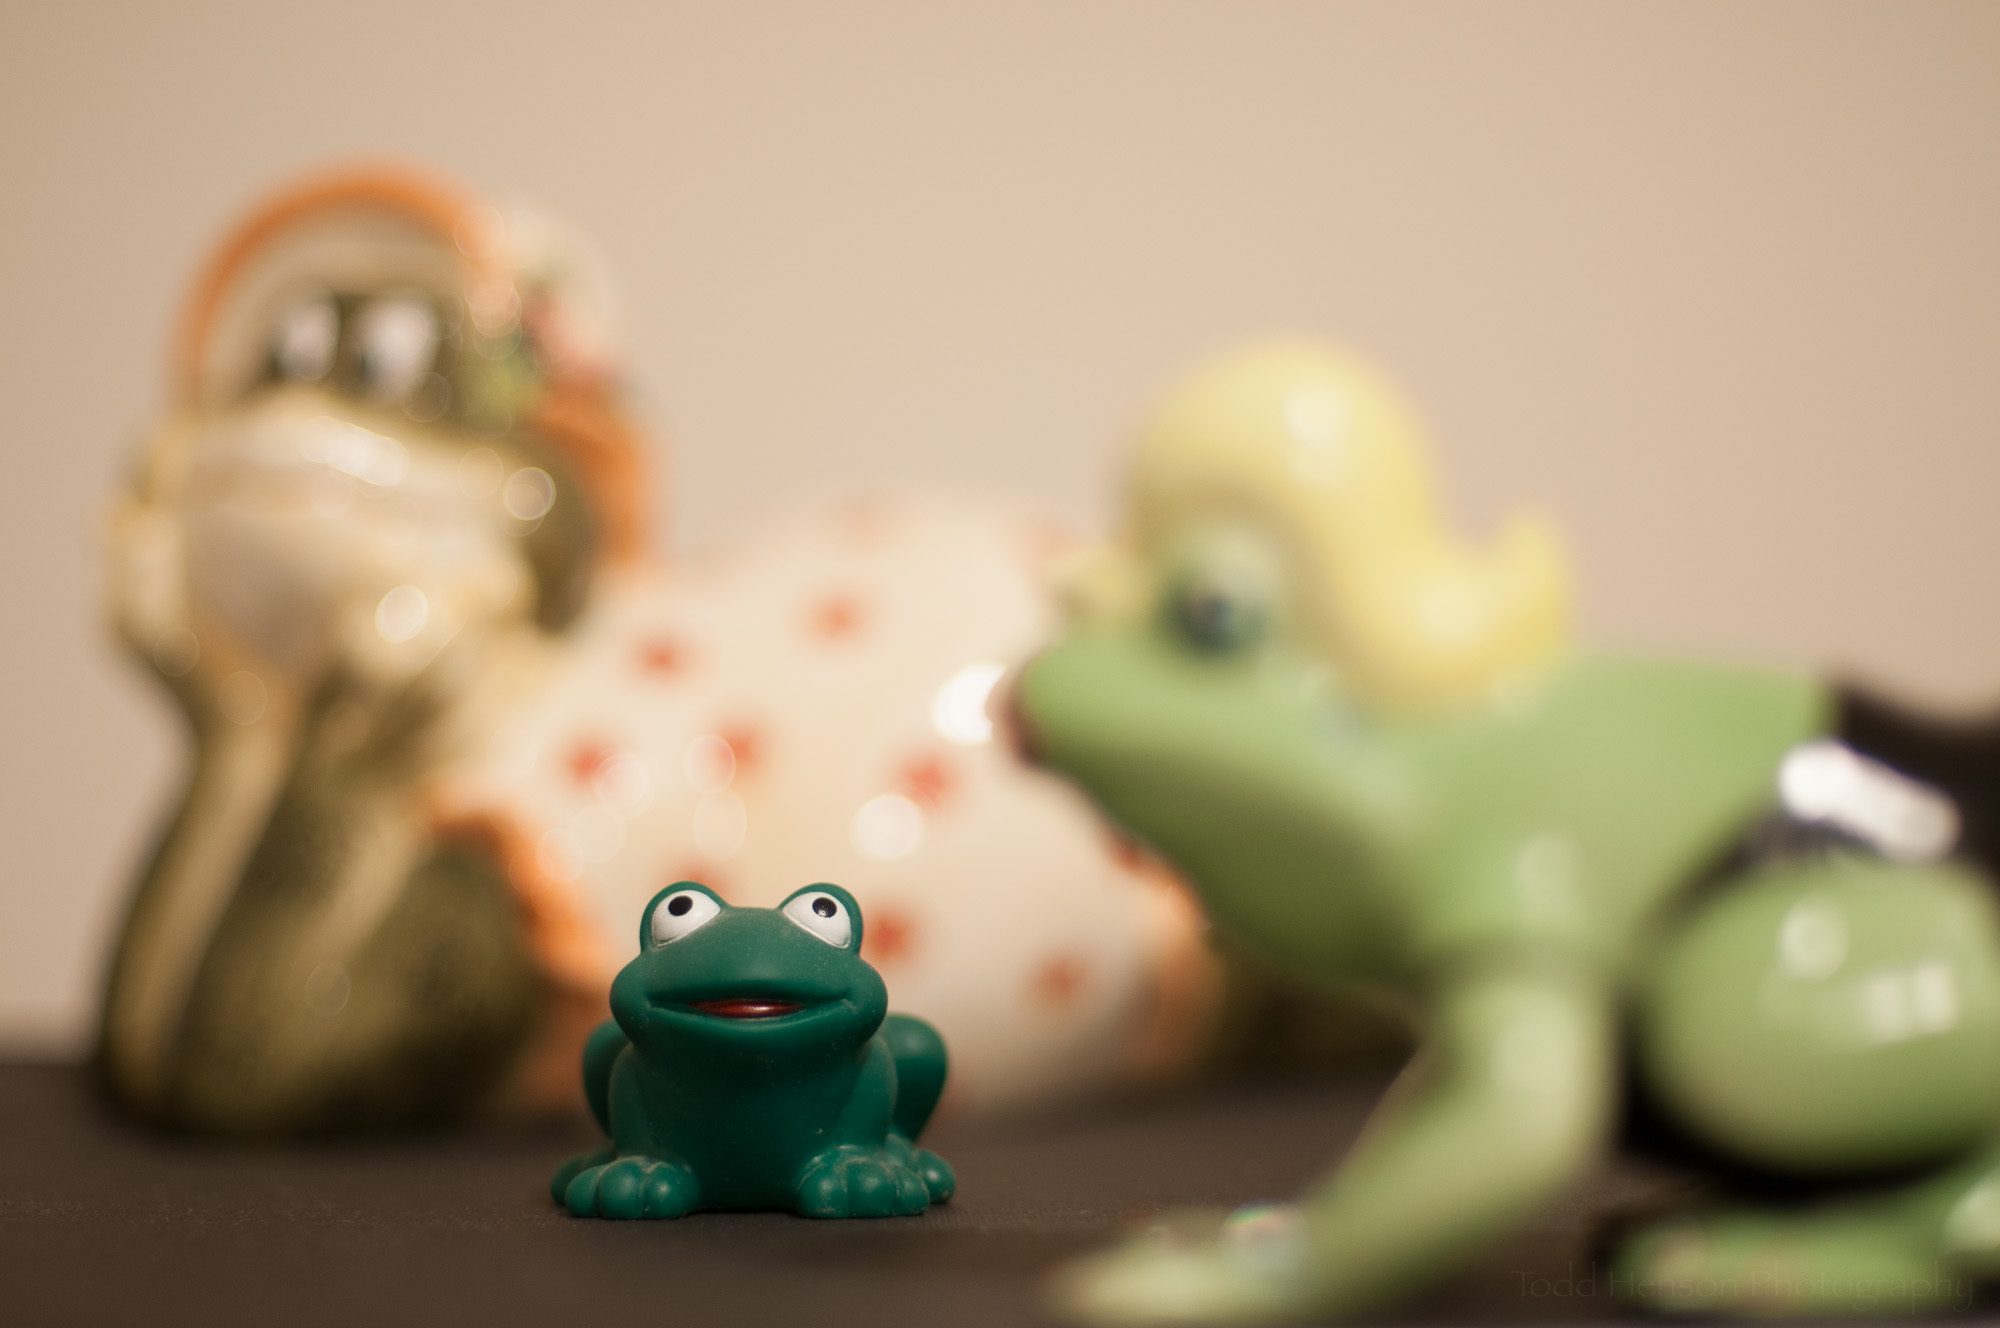
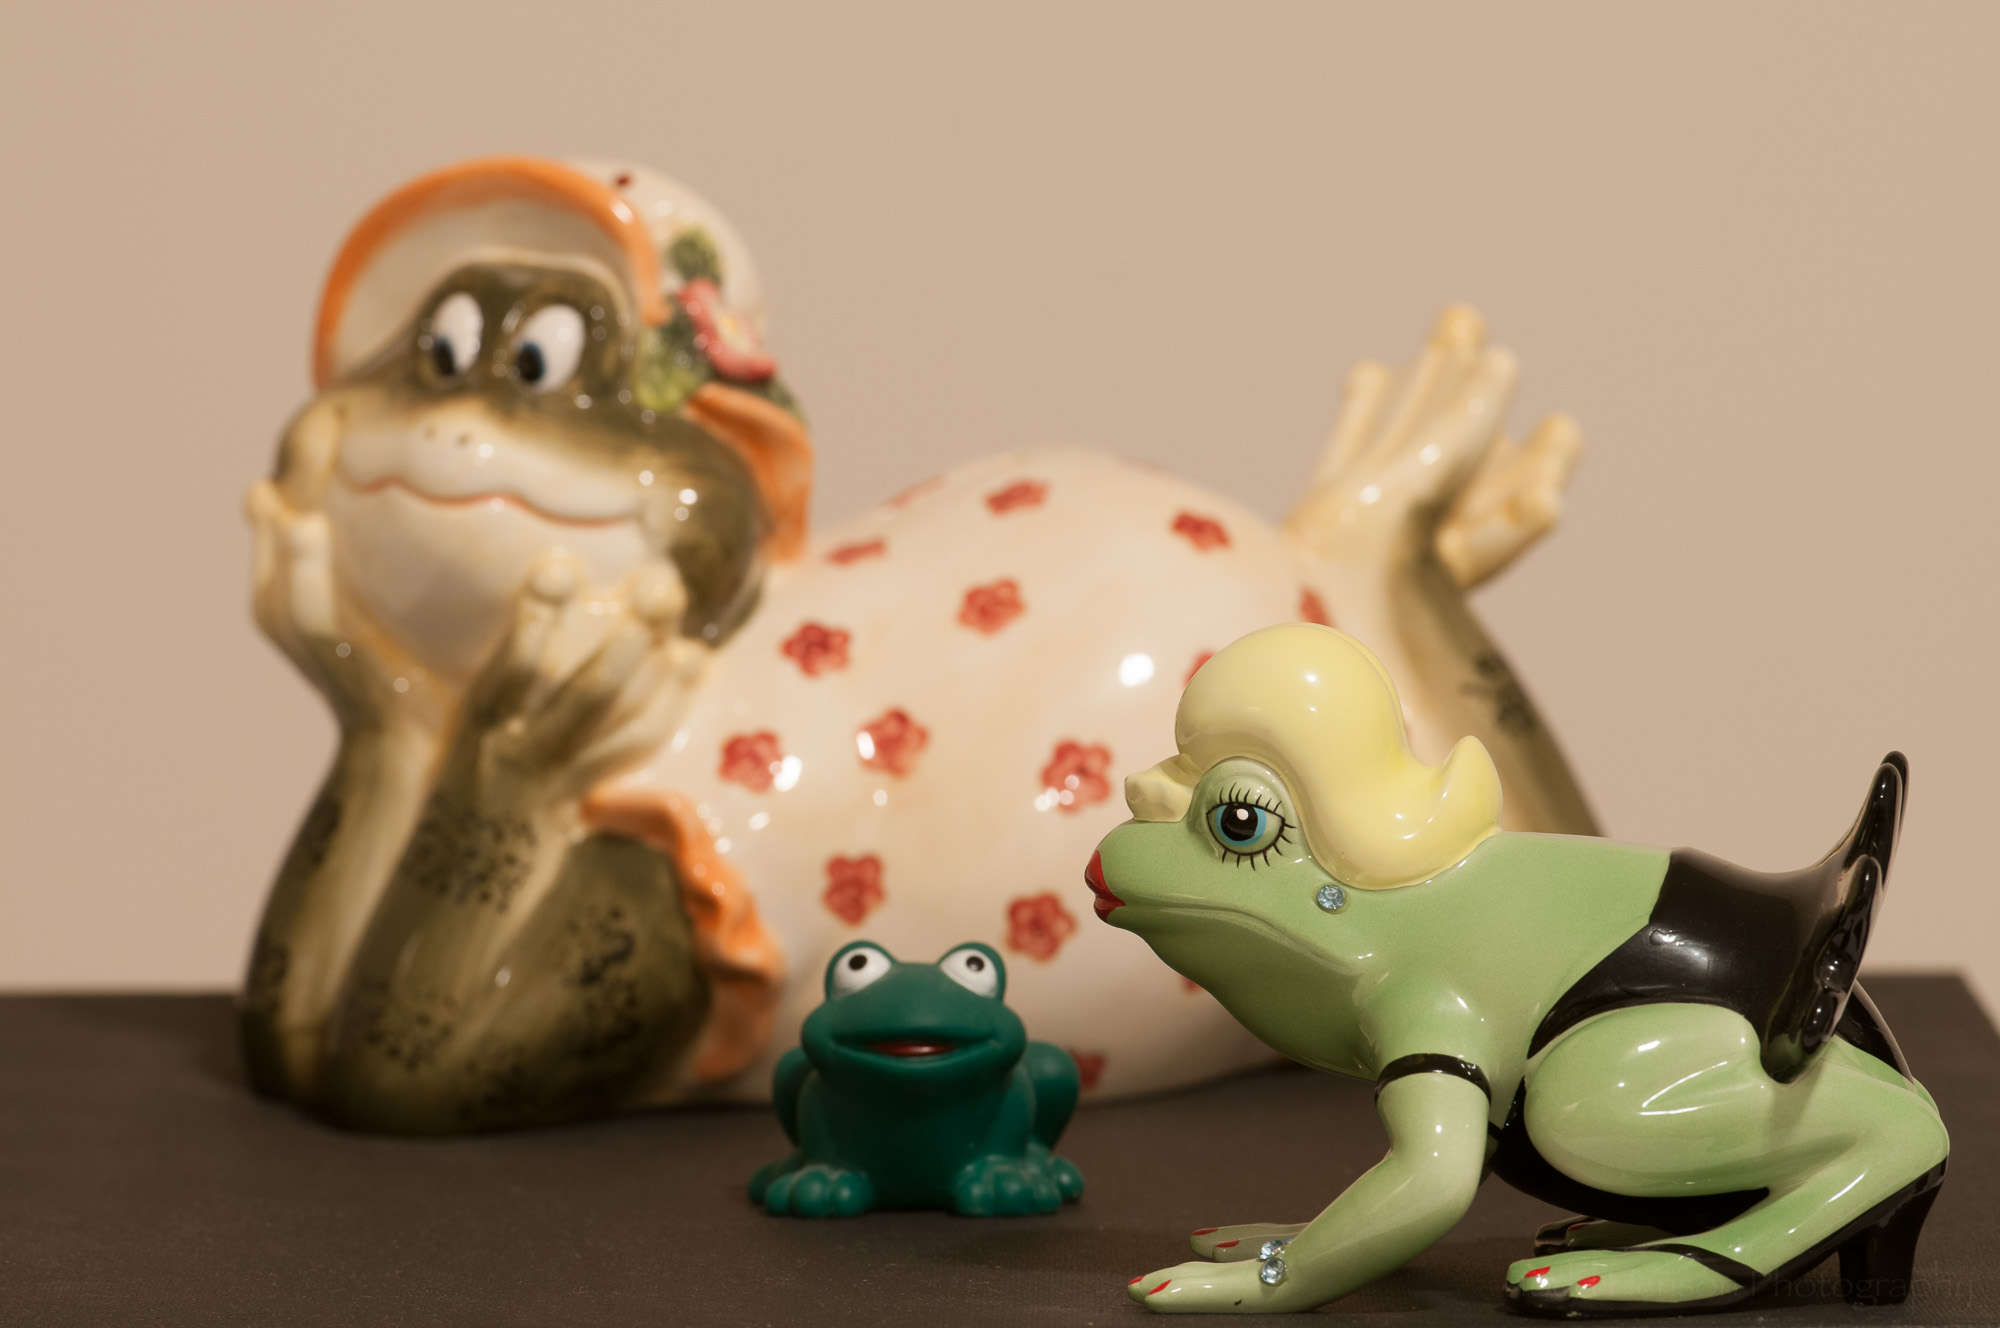
The images of the frogs below show the depth of field for each of the apertures above. The depth of field is the area most in focus. In each image I focused on the eyes of the middle frog.

Notice at f/1.4 there is very little depth of field, meaning there is a lot of the image that is out of focus. Notice how at f/4, then f/8, and finally f/16, that more and more of the image is in focus.

Look at the images of the lens above again. Notice that f/1.4 is the largest opening and created the least depth of field (had the least in focus). Notice that f/16 is the smallest opening and created the largest depth of field (had the most in focus).


Example: Focal Length and Perspective

The images below were created at 2 different focal lengths. I attempted to keep the compositions as close as possible.

The first image was created using a wide angle lens at a focal length of 16mm. The front of the lens is very close to the foreground frog. Notice how large the foreground frog is in relation to the background frog. Notice how far away the background frog looks. Short focal length lenses (wide angle lenses) can stretch out the landscape, making objects in the foreground appear larger and making objects in the background appear smaller.

The second image was created using a telephoto lens at a focal length of 200mm. Notice how much larger the background frog is in relation to the foreground frog. Notice how much closer the background frog seems than in the wide angle image. This is called compression. Longer focal length lenses (telephoto lenses) compress the foreground and background, bringing the background objects closer to the foreground.

These images are an example of why it can still be very useful to move back and forth in a scene and not just rely on zooming your lens to fit the scene to the lens. Instead, visualize how you'd like the image to look.

Do you want to emphasize the foreground and minimize the background? Then use a wide angle lens and get close to the foreground object.

Do you want to emphasize the background, making it seem very large? Then use a telephoto lens. You can then move closer or further from the foreground object depending on how large you what that to be in the frame.


In addition to the more technical topics, John also talks about composition and design, about how to create pleasing images, how to add drama and evoke emotion in the viewer. He has had a long and successful career in photography, and has worked with other well known photographers, such as Art Wolfe. John is very good at taking what he’s learned and passing that on to his students through the videos and visuals.

Fundamentals of Photography is a long class full of content. It is first broadcast live over several days, usually close to 5 or 6 hours a day. One of the nice things about purchasing the class is being able to watch it later at your own pace. You can take one topic at a time, watch the videos, experiment with your camera, really understand the topic. Then move on to the next topic.

If you’re new to CreativeLive, check them out. They are an online education company that broadcasts classes on a whole range of topics. The classes are free to watch during the live broadcast and from time to time when they rebroadcast the class. They are always broadcasting something. If you like the class you can purchase it, letting you stream the class anytime, and also letting you download the videos and other content to your computer to watch offline anytime you want. Some classes have extra content only available when you purchase. I have purchased dozens of classes over the years, and likely will continue to. CreativeLive offers a fantastic platform for learning. Their topics cover not just photography & video, but also art & design, music & audio, craft & maker, and money & life.


Eastern Box Turtle Along A Paved Path by Todd Henson

Eastern Box Turtle on pavement shot from ground level.

Any day I can photograph an Eastern Box Turtle is a good day. This particular turtle was along the side of a paved trail in a local wildlife refuge. It used to be a road, but is now just part of the trail system.

We found the box turtle stopped maybe 6 feet from the edge of the pavement. There were trees on either side, and a stream nearby that passed under the road. This was a perfect environment for the turtle.

To capture these images I used a long telephoto lens to help blur the background. I wanted to look right at the turtle, from its perspective, so I set aside the tripod and instead lay down on my stomach on the pavement with the camera in front of me resting on the ground.

Closeup of Eastern Box Turtle

Then I slowly crawled forward to get as close as I could but still capture the entire turtle in the frame. I moved in a little closer to capture the closeup image. I love the eyes on this turtle, all the colors and patterns.

One of these days when I find a turtle like this I want to stick around long enough for the turtle to get used to me and begin walking. But this part of the trail was somewhat busy and I didn’t want to attract too much attention to the turtle, or agitate it. So I moved on after capturing these images.

For another example of this technique check out my post about photographing a green frog where I show images shot from different perspectives. As with that photo, I think I could have stopped down the aperture a bit more to capture just a little more depth of field, putting more of the turtle in focus. I often gravitate to the wider apertures, which limit depth of field and create nice blurry backgrounds. But sometimes more depth of field can also be a good thing, even when shooting these animal portraits.


Do you enjoy these posts?

Sign up to receive periodic emails with updates and thoughts. Don’t worry, I won’t spam you. And please consider purchasing artwork or products from my online store, and using my affiliate links in the sidebar to the right when shopping online.

I appreciate your support!


Examples of Using a Polarizing Filter with Water Lilies by Todd Henson

Example showing maximum and minimum effect using a polarizing filter with a purple water lily.

Do you use polarizing filters? I hope to convince you that polarizing filters can help you enhance your photographs. The effects can be dramatic, but they can also be subtle. It’s those subtle differences that can really make a photograph sing.

I don’t want to get too deeply into the technicals of how polarizing filters work. But at a simple level they just control how much polarized light reaches the camera’s sensor. You put the polarizing filter on the front of your lens. You then rotate the filter to control how much polarized light reaches the camera. 

What this means in the real world is that polarizing filters can:

  • reduce reflections and glare on water and other surfaces, such as leaves

  • saturate colors, like the greens of foliage and the colors of flowers

  • darken skies, turning them a deeper blue

  • slightly reduce the amount of light reaching the camera.

Today we’re looking specifically at using a polarizing filter when photographing water lilies. This is great both because it can reduce reflections and glare and will help saturate the colors of the flowers and lily pads. A potential disadvantage is that a polarizing filter does reduce the amount of light reaching the camera, sometimes forcing you to use a slower shutter speed. So watch your shutter speed and if it gets too slow then increase your ISO or open up your aperture.

Purple water lily. Left: maximum effect from polarizing filter. Right: minimum effect from polarizing filter.

As you can see in the first example above, the effect can be dramatic. The purple water lily on the left has the polarizing filter set to full effect, reducing the reflections as much as possible. The same lily is shown on the right with the polarizing filter set to minimum effect, letting us see the reflections.

It’s not necessarily that one photo is better than another. But the polarizing filter lets us control the look of the scene, it lets us control what we emphasize. In this example I prefer the left image where the polarizing filter has reduced the reflections. This darkens the water and helps the water lily pop off the surface. I also like the brighter tones of the green stem.

Pair of Arc-en-Ciel water lilies. Left: maximum effect from polarizing filter. Right: minimum effect from polarizing filter.

In the second example, of a pair of Arc-en-Ciel water lilies, the effect from the polarizing filter is more subtle. Again, the image on the left is at full effect and the image on the right is at minimum effect. The polarizing filter reduced glare off the water which darkened the water. I like this effect as it helps draw your eyes to the lighter colored flowers. You can see subtle differences in the flowers and lily pads.

Pink water lily. Left: maximum effect from polarizing filter. Right: minimum effect from polarizing filter.

The third example shows how the polarizing filter can affect colors, in particular the greens of the lily pads. The left image is at full effect. It reduces the reflections but does not eliminate them. But notice what it does to the greens of the lily pads.

The left image, with full polarizing effect, has beautiful green lily pads. The right image, with minimum polarizing effect, has lily pads with more blue in them. Which do you prefer? The polarizing filter lets you adjust the effect to serve your own taste.

I decided to take the third example a step further. I prefer the look when the polarizing filter is set to full effect. However, I really like the reflection of the water lily in the water and the polarizing filter tends to reduce this effect.

To deal with this I loaded both images into Adobe Photoshop as separate layers. I chose the fully polarized image as the primary image, then using a layer mask I slowly painted in the reflection from the less polarized image. This gave me the best of both worlds. I have the richer colors of the polarized image and also the more pronounced reflection of the water lily from the less polarized image. It’s a subtle difference, but again, these subtle differences can help enhance your photographs.

Pink water lily with maximum polarizing effect. I like the saturated colors of the green lily pads and the flower.

Pink water lily with minimum polarizing effect. I like the enhanced reflection but not the glare on the lily pads.

Pink water lily composite. Combined the color saturation of the maximum polarization version with the reflection of the minimum polarization version.


Do you enjoy these posts?

Sign up to receive periodic emails with updates and thoughts. Don’t worry, I won’t spam you. And please consider purchasing artwork or products from my online store, and using my affiliate links in the sidebar to the right when shopping online.

I appreciate your support!