This post contains affiliate links and I will be compensated if you make a purchase after clicking on my links. This is at no extra cost to you.

Michael Kenna: Images of the Seventh Day
I’m always looking for new sources of inspiration, and books often fill that role. I find it hard to imagine a better source of inspiration than the photography book, Michael Kenna: Images of the Seventh Day, a book published for the 2010 exhibition, covering photographs from 1974 to 2009. Michael Kenna’s work is just remarkable. His work has a look that is all his own. You know a Kenna photograph when you see it.

Misty, smokey factories, and wispy blowing clouds above sand dunes
“I prefer the power of suggestion over description.”
Kenna’s photographs are black and white. The scenes are often misty, foggy, snowy, smokey, or captured at night. The light is usually very soft, early or late light. He creates landscapes of such beauty, often a strip of light sandwiched by layers of darkness, such as dark sky, light horizon, and dark foreground. Patterns play a large part in his images. Rows of manicured trees. A group of chairs at a beach. But there’s also motion, of clouds, fog, or water. He doesn’t include people in his images, but often photographs elements created by humans, such as factories, city streets, docks at the edge of a body of water, statues, or a well-cared for garden. He sometimes photographs a passing bird.
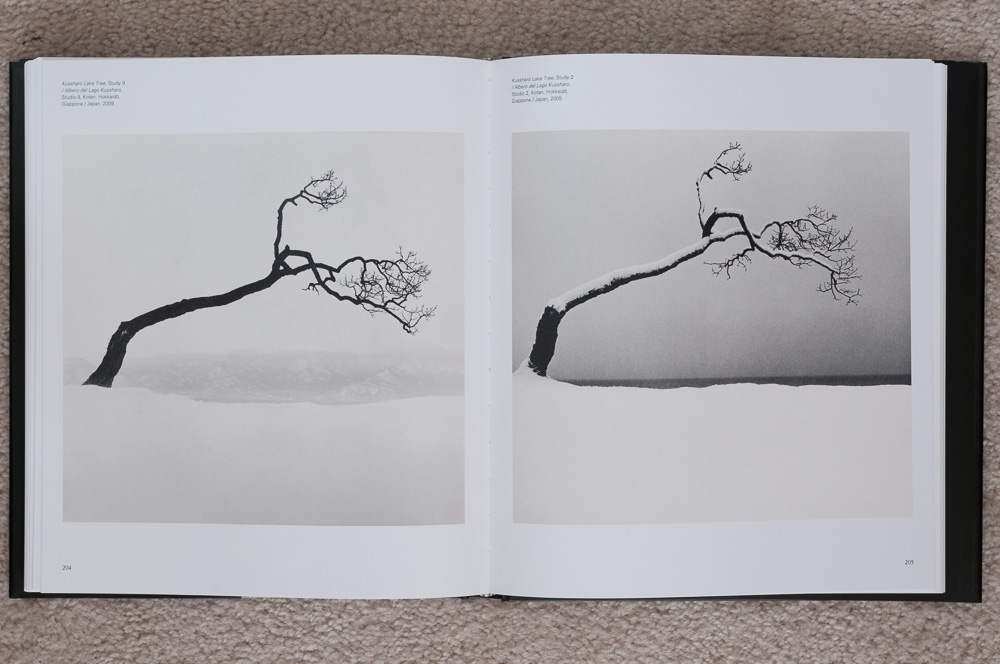
Very simple studies of form
There is a beautiful interplay of light and dark in his images, sometimes light on dark, other times dark on light. I find many of his images relaxing. Some are simple with few elements, maybe just a tree against a field of snow. They are often soft, quiet, contemplative. Other times they are more moody, lonely, leaving the feeling of walking through a town where the only other living thing is a lone bird flying by.

Objects and abstracts
In addition to the wide range of images, the book also includes a few introductory essays and a biography at the end. The essays are written in both Italian and English. They are worth reading.
“Misty, uncertain, sad locations with never any sunlight, not even for places, countries or subjects normally bathed in a blinding, deadly kind of light.”
“He prefers the dawn, grey skys, nighttime, cold seasons, fog and hostile climates.”
Michael Kenna was born in Widnes, England, in 1953. He dreamt of being a painter, but while attending art school and college he began studying photography, as he had doubts he could make a living as a painter, and with photography he could at least do commercial and advertising work. Thankfully, he didn’t give up on artistic pursuits, and eventually found a way to make a living producing the kind of work featured in this book. He later moved to the United States, and began traveling all over the world, producing amazing images everywhere he went. His art extends from the camera into the darkroom, where he personalizes the work, and finally to the printing stage, where the photographs are given life.

The book is a very nice hardcover edition published by Skira. It measures about 9 3/4” x 11 1/4” and a little over 1” thick, and has 272 pages. The book is bound well with good quality paper. The essays are printed on matte paper with a light tan color. The photographs are printed on white paper with a smooth satin finish. Some pages are filled by a single image, others contain two smaller images. All images are accompanied by their title and the location and year they were created.
I strongly suspect this will not be the last book of Michael Kenna’s work I’ll own. I’ve seen several others that have caught my interest. If anything in this review has caught your interest then go find some Michael Kenna photographs to study and appreciate. Search the web, find an exhibition, check your local library, head to the bookstore, or check out amazon. If you have the opportunity, find a copy of Michael Kenna: Images of the Seventh Day. It is a beautiful book full of fantastic imagery.
Do you enjoy these posts?
Sign up to receive periodic emails with updates and thoughts. Don’t worry, I won’t spam you. And please consider purchasing artwork or products from my online store, and using my affiliate links in the sidebar to the right when shopping online.
I appreciate your support!