Reviews

Book Review - Genesis by Sebastiao Salgado by Todd Henson

This post contains affiliate links and I will be compensated if you make a purchase after clicking on my links. This is at no extra cost to you.

Front and back cover of Genesis by Sebastiao Salgado

Front and back cover of Genesis by Sebastiao Salgado

Genesis, by photographer Sebastiao Salgado, is a remarkable collection of black and white photography from all over the world. Salgado, along with his wife Lelia Wanick Salgado, began the Genesis project after having seen some of the worst of humanity while working on previous projects. He says he lost faith in humanity after constantly being exposed to such brutality and violence. But later, after returning to his family’s property in Brazil he and his wife set about restoring the property, regrowing forest that once grew there, and watched as over time wildlife also returned. They began to see the resilience of nature, how it can restore itself and thrive. Eventually this land was turned into a national park. This helped them overcome their loss of faith and provided the impetus for the Genesis project.

We understood the absurdity of the idea that nature and humanity can somehow be separated.
— Sebastiao Salgado

Genesis was an opportunity for them to travel the world and find places not yet ravished by modern human hands, places that still retained a natural vitality and grandeur. They visited peoples who still cling to older customs, though some have already begun to adopt aspects of modern society. They wanted to record what they could of these people before they had lost their traditional customs and way of living. They found wildlife and landscapes we imagine still exist but don’t often have the opportunity to see or experience. They captured all these things through photography to share with the world and show there is still beauty out there and things worth protecting and preserving.

Our mission was to seek out the land and seascapes, the animals and ancient communities that have escaped the long — and often destructive — arm of modern man.
— Sebastiao Salgado

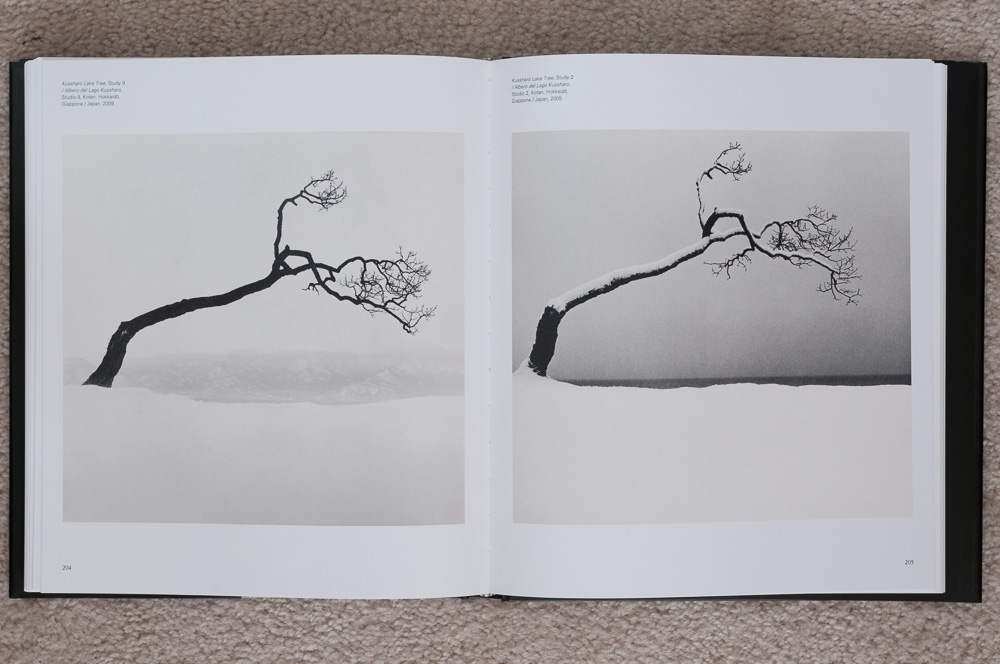
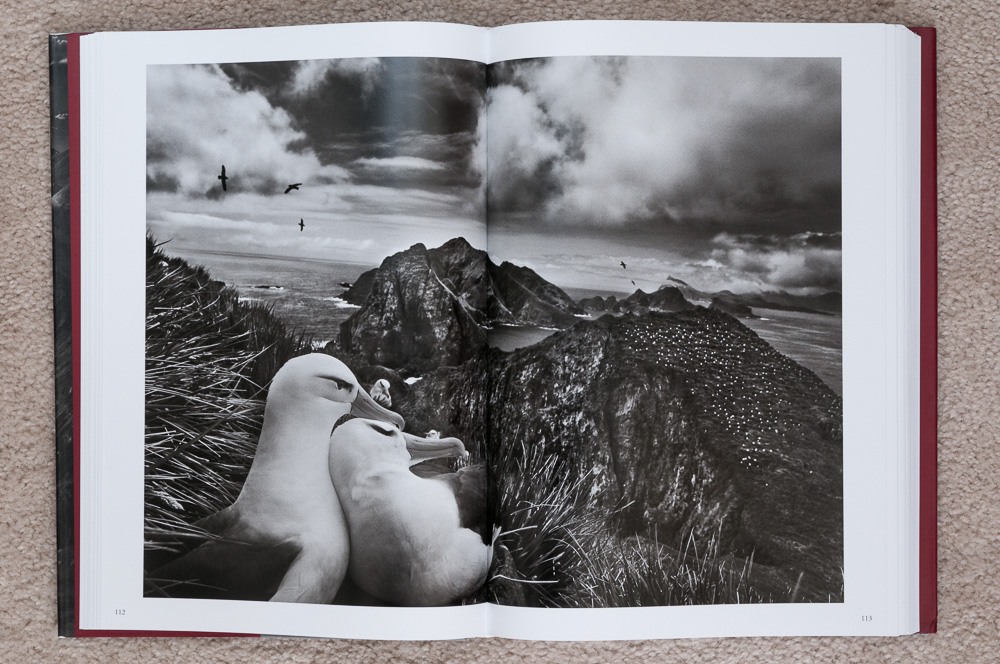
Salgado’s work is very striking, and very uniquely his own. The images are often full of contrast with very bold blacks and whites. The lighting is beautiful. He photographs both huge, wide angle, sweeping landscapes full of amazing detail and pattern, and also more intimate portraits of people and wildlife. He really brings to life the peoples, places, and wildlife he photographs, and the Genesis project allowed him a huge range of subjects and environments.

I wanted to examine how humanity and nature have long coexisted in what we now call ecological balance.
— Sebastiao Salgado

The book is split into 5 sections covering different regions of the world. Each section begins with a few pages describing their experiences in that part of the world, and some of the peoples, places, and wildlife they encountered. Following the text are a large number of images. Some are single page images, some span over both pages. And there are pages that fold out to show a larger number of smaller images from that region.

The book is broken into the following sections:

  1. Planet South (page 15) covers regions around Antarctica, “the coldest, driest, and windiest of the world’s five continents.”

  2. Sanctuaries (page 117) covers isolated islands such as the Galapagos, Madagascar, Siberut, and New Guinea.

  3. Africa (page 217) covers the tribes, wildlife, and landscapes of the African continent.

  4. Northern Spaces (page 319) covers the Arctic regions and northern continents.

  5. Amazonia and Pantanal (page 419) covers the Amazon and Pantanal regions of South America.

Genesis is a large and heavy hardcover book published by Taschen. It is around 520 pages long, most of which are images with a small number of pages of text at the beginning and between each section. It measures about 9 3/4” x 14” and is about 1 5/8” thick. It is taller than it is wide. This works well for portrait (vertical) oriented images, but means that landscape (horizontal) oriented images span over 2 pages and have a seam down the center. I do wish the book were wider to show an entire landscape image on a single page, but that would likely have created a much larger and more expensive book. The quality of the images more than make up for any distraction caused by the book layout. The paper is a nice smooth semi-gloss paper that really helps the images pop. Included with the book is a smaller booklet with information about all of the images. This is nice because it gives them more room to provide information than would be possible if they included it beside each image in the main book. It lets the main book remain almost completely images, with no distractions.

If you’re unfamiliar with Sebastiao Salgado’s work, go check it out. His work provides a source of inspiration for me with my photography, and hopefully can provide some inspiration to you, as well, whether in photographic pursuits or just remembering there are still wild and wonderful places left in the world. I’m very pleased to have Genesis in my collection of photography books.

In Genesis, I followed a romantic dream to find and share a pristine world that all too often is beyond our eyes and reach.
— Sebastiao Salgado

Do you enjoy these posts?

Sign up to receive periodic emails with updates and thoughts. Don’t worry, I won’t spam you. And please consider purchasing artwork or products from my online store, and using my affiliate links in the sidebar to the right when shopping online.

I appreciate your support!


Book Review - Michael Kenna: Images of the Seventh Day by Todd Henson

This post contains affiliate links and I will be compensated if you make a purchase after clicking on my links. This is at no extra cost to you.

Michael Kenna: Images of the Seventh Day

Michael Kenna: Images of the Seventh Day

I’m always looking for new sources of inspiration, and books often fill that role. I find it hard to imagine a better source of inspiration than the photography book, Michael Kenna: Images of the Seventh Day, a book published for the 2010 exhibition, covering photographs from 1974 to 2009. Michael Kenna’s work is just remarkable. His work has a look that is all his own. You know a Kenna photograph when you see it.

Misty, smokey factories, and wispy blowing clouds above sand dunes

Misty, smokey factories, and wispy blowing clouds above sand dunes

I prefer the power of suggestion over description.
— Michael Kenna

Kenna’s photographs are black and white. The scenes are often misty, foggy, snowy, smokey, or captured at night. The light is usually very soft, early or late light. He creates landscapes of such beauty, often a strip of light sandwiched by layers of darkness, such as dark sky, light horizon, and dark foreground. Patterns play a large part in his images. Rows of manicured trees. A group of chairs at a beach. But there’s also motion, of clouds, fog, or water. He doesn’t include people in his images, but often photographs elements created by humans, such as factories, city streets, docks at the edge of a body of water, statues, or a well-cared for garden. He sometimes photographs a passing bird.

Very simple studies of form

Very simple studies of form

There is a beautiful interplay of light and dark in his images, sometimes light on dark, other times dark on light. I find many of his images relaxing. Some are simple with few elements, maybe just a tree against a field of snow. They are often soft, quiet, contemplative. Other times they are more moody, lonely, leaving the feeling of walking through a town where the only other living thing is a lone bird flying by.

Objects and abstracts

Objects and abstracts

In addition to the wide range of images, the book also includes a few introductory essays and a biography at the end. The essays are written in both Italian and English. They are worth reading.

Misty, uncertain, sad locations with never any sunlight, not even for places, countries or subjects normally bathed in a blinding, deadly kind of light.
— Ferdinando Scianna
He prefers the dawn, grey skys, nighttime, cold seasons, fog and hostile climates.
— Pierre Borhan

Michael Kenna was born in Widnes, England, in 1953. He dreamt of being a painter, but while attending art school and college he began studying photography, as he had doubts he could make a living as a painter, and with photography he could at least do commercial and advertising work. Thankfully, he didn’t give up on artistic pursuits, and eventually found a way to make a living producing the kind of work featured in this book. He later moved to the United States, and began traveling all over the world, producing amazing images everywhere he went. His art extends from the camera into the darkroom, where he personalizes the work, and finally to the printing stage, where the photographs are given life.

The book is a very nice hardcover edition published by Skira. It measures about 9 3/4” x 11 1/4” and a little over 1” thick, and has 272 pages. The book is bound well with good quality paper. The essays are printed on matte paper with a light tan color. The photographs are printed on white paper with a smooth satin finish. Some pages are filled by a single image, others contain two smaller images. All images are accompanied by their title and the location and year they were created.

I strongly suspect this will not be the last book of Michael Kenna’s work I’ll own. I’ve seen several others that have caught my interest. If anything in this review has caught your interest then go find some Michael Kenna photographs to study and appreciate. Search the web, find an exhibition, check your local library, head to the bookstore, or check out amazon. If you have the opportunity, find a copy of Michael Kenna: Images of the Seventh Day. It is a beautiful book full of fantastic imagery.


Do you enjoy these posts?

Sign up to receive periodic emails with updates and thoughts. Don’t worry, I won’t spam you. And please consider purchasing artwork or products from my online store, and using my affiliate links in the sidebar to the right when shopping online.

I appreciate your support!


Panorama of Cruise Ships at Bar Harbor, Maine by Todd Henson

Final stitched panorama showing 3 cruise ships docked at Bar Harbor, Maine, in stormy weather.

The Story

Bar Harbor, Maine, is a popular tourist destination both by land and by sea. On one of the days my father and I spent in the area we saw three cruise ships docked at Bar Harbor. The day had been very drizzly, with clouds at low elevations, low enough they completely engulfed Cadillac Mountain. An overlook on one of the park roads offered a great view of all three cruise ships with parts of Bar Harbor peeking through the tops of the trees. Various islands could be seen further out and the clouds completely filled the sky.

It was a beautiful scene, and I wanted to capture as much of it as possible. The first images I created were with a wide angle lens, trying to get everything in. But then I had the idea to create a multi-image stitched panorama to capture more detail. Rain was moving back in, the winds were picking up, and fog was quickly coming in from the left, so I had to work quickly. I setup the tripod and fired off the shots. In the end I had 13 images to work with. I would later use Lightroom to stitch these together into the final panoramic image.

The final image has been scaled down in size to allow it to load quickly on the website, so it’s hard to appreciate the detail within it. Below, I’ve split the image into three to make it easier to see some of the details. I did have to crop in a little from the full image to split it into three without cutting into the middle cruise ship. Click on each of the three images to see a larger version of each.

The Technique

I set up my tripod, put the 70-200mm lens on my camera and positioned it vertically, set the focal length to 78 mm, and put everything into manual mode. This included setting the white balance (not in auto mode), setting the aperture, shutter speed, ISO, everything. This is done to assure the camera doesn’t change anything that will affect exposure from one image to the next. If the exposure changes between images then we won’t be able to cleanly merge them in software.

My tripod has a bubble level on the collar, where the tripod head mounts. I made sure that was level. This assured the base of the tripod was level and would help me create a level and even panorama. I also put a double axis bubble level on the camera's hot shoe. I used this to assure the camera was level. I was using a ball head, so it would be easy for the camera to not be level even though the base of the tripod was. I tightened the ball head, but loosened the panning base to allow me to rotate the camera left and right, keeping it level. Once I had everything level it was time to shoot.

One of the many tips I’ve picked up from others is to start and end a sequence of images that will all be used together, either for panoramas or HDR, with a photo of my hand. This way I know where the sequence starts and where it ends, making it much easier to pick out the images in Lightroom. I also try to shoot more than I think I’ll need to give me plenty of room to crop if needed, something that is almost always necessary with stitched panoramas.

I started from the left side and created the first image in the sequence. Then I panned the tripod head to the right. I made sure to have plenty of overlap between the first and second images to give the software enough information to line up the images correctly. I continued this process, creating an image, then panning between 1/3 to 2/3 of an image to the right, then creating the next image. In the end I used 13 of the images to stitch the final panorama. This created an image close to 80 megapixels in size using a 12.3 megapixel camera.

The Post-Processing

Post-processing the 13 raw images into the final panorama was actually very easy. In the past Lightroom needed to export the images to Photoshop to merge them. But the process is much simpler now that Lightroom has the ability to merge panoramas itself. You can still use Photoshop for more complicated or troublesome panoramas.

Step 1: Select All The Images

Step 1: Select all the images

The first step is selecting all the images in Lightroom that will be part of the panorama. This step shows nicely how I overlapped each photo, creating plenty of duplicate content that Lightroom used to properly stitch them all together.

Step 2: Click Photo Merge, Then Panorama

Step 2: Click Photo Merge, then Panorama

After all the images are selected, right click, then click on Photo Merge and select Panorama.

Step 3: Panorama Merge Preview

Step 3: Panorama Merge Preview

A window titled Panorama Merge Preview will pop up. It may take Lightroom a little time to create a preview of the panorama, depending on how many images you have and how large they are. You can see on the right of the window Auto Select Projection is checked, as is Auto Crop.

Step 4: Projections and Cropping

Step 4: Projections and Cropping

Once the preview is created you can try manually switching between the different projections to see if one does a better job than another, but in most cases Lightroom should be able to choose the best one automatically. You can also try checking and unchecking the Auto Crop box to see how well the images were stitched together.

Step 5: Click Merge

Step 5: Click Merge

I unchecked the Auto Crop box so you can see the difference. There isn’t much difference in this case, which is great. It means I did a good job of creating images with little distortion and I kept everything very level. You can see a little on the lower right and the upper left that gets cropped. If you prefer, you can use the Boundary Warp slider to warp the image to fill it all in, instead of cropping, but doing so does distort parts of the image. In some cases you won’t notice the difference, but in others the warp might be too obvious and distracting. In this case everything lined up so well I used the Auto Crop box. Click the Merge button when you’re ready for Lightroom to merge the images.

Step 6: Lightroom Creates The Panorama

Step 6: Lightroom creates the panorama

The pop up will disappear and you’ll be back in the normal Lightroom interface, but notice in the upper left corner the status bar showing it is creating the panorama.

Step 7: The Raw Stitched Panorama

Step 7: The raw stitched panorama

When Lightroom is finished it will display the final stitched panorama. Now all you need to do is apply any desired raw adjustments.

Step 8: The Final Adjustments in Lightroom

Step 8: The final adjustments in Lightroom

Here you can see my final image, after I finished adjusting the raw panorama.


Do you enjoy these posts?

Sign up to receive periodic emails with updates and thoughts. Don’t worry, I won’t spam you. And please consider purchasing artwork or products from my online store, and using my affiliate links in the sidebar to the right when shopping online.

I appreciate your support!