neutral density filter

Tips For Blurring Moving Water by Todd Henson

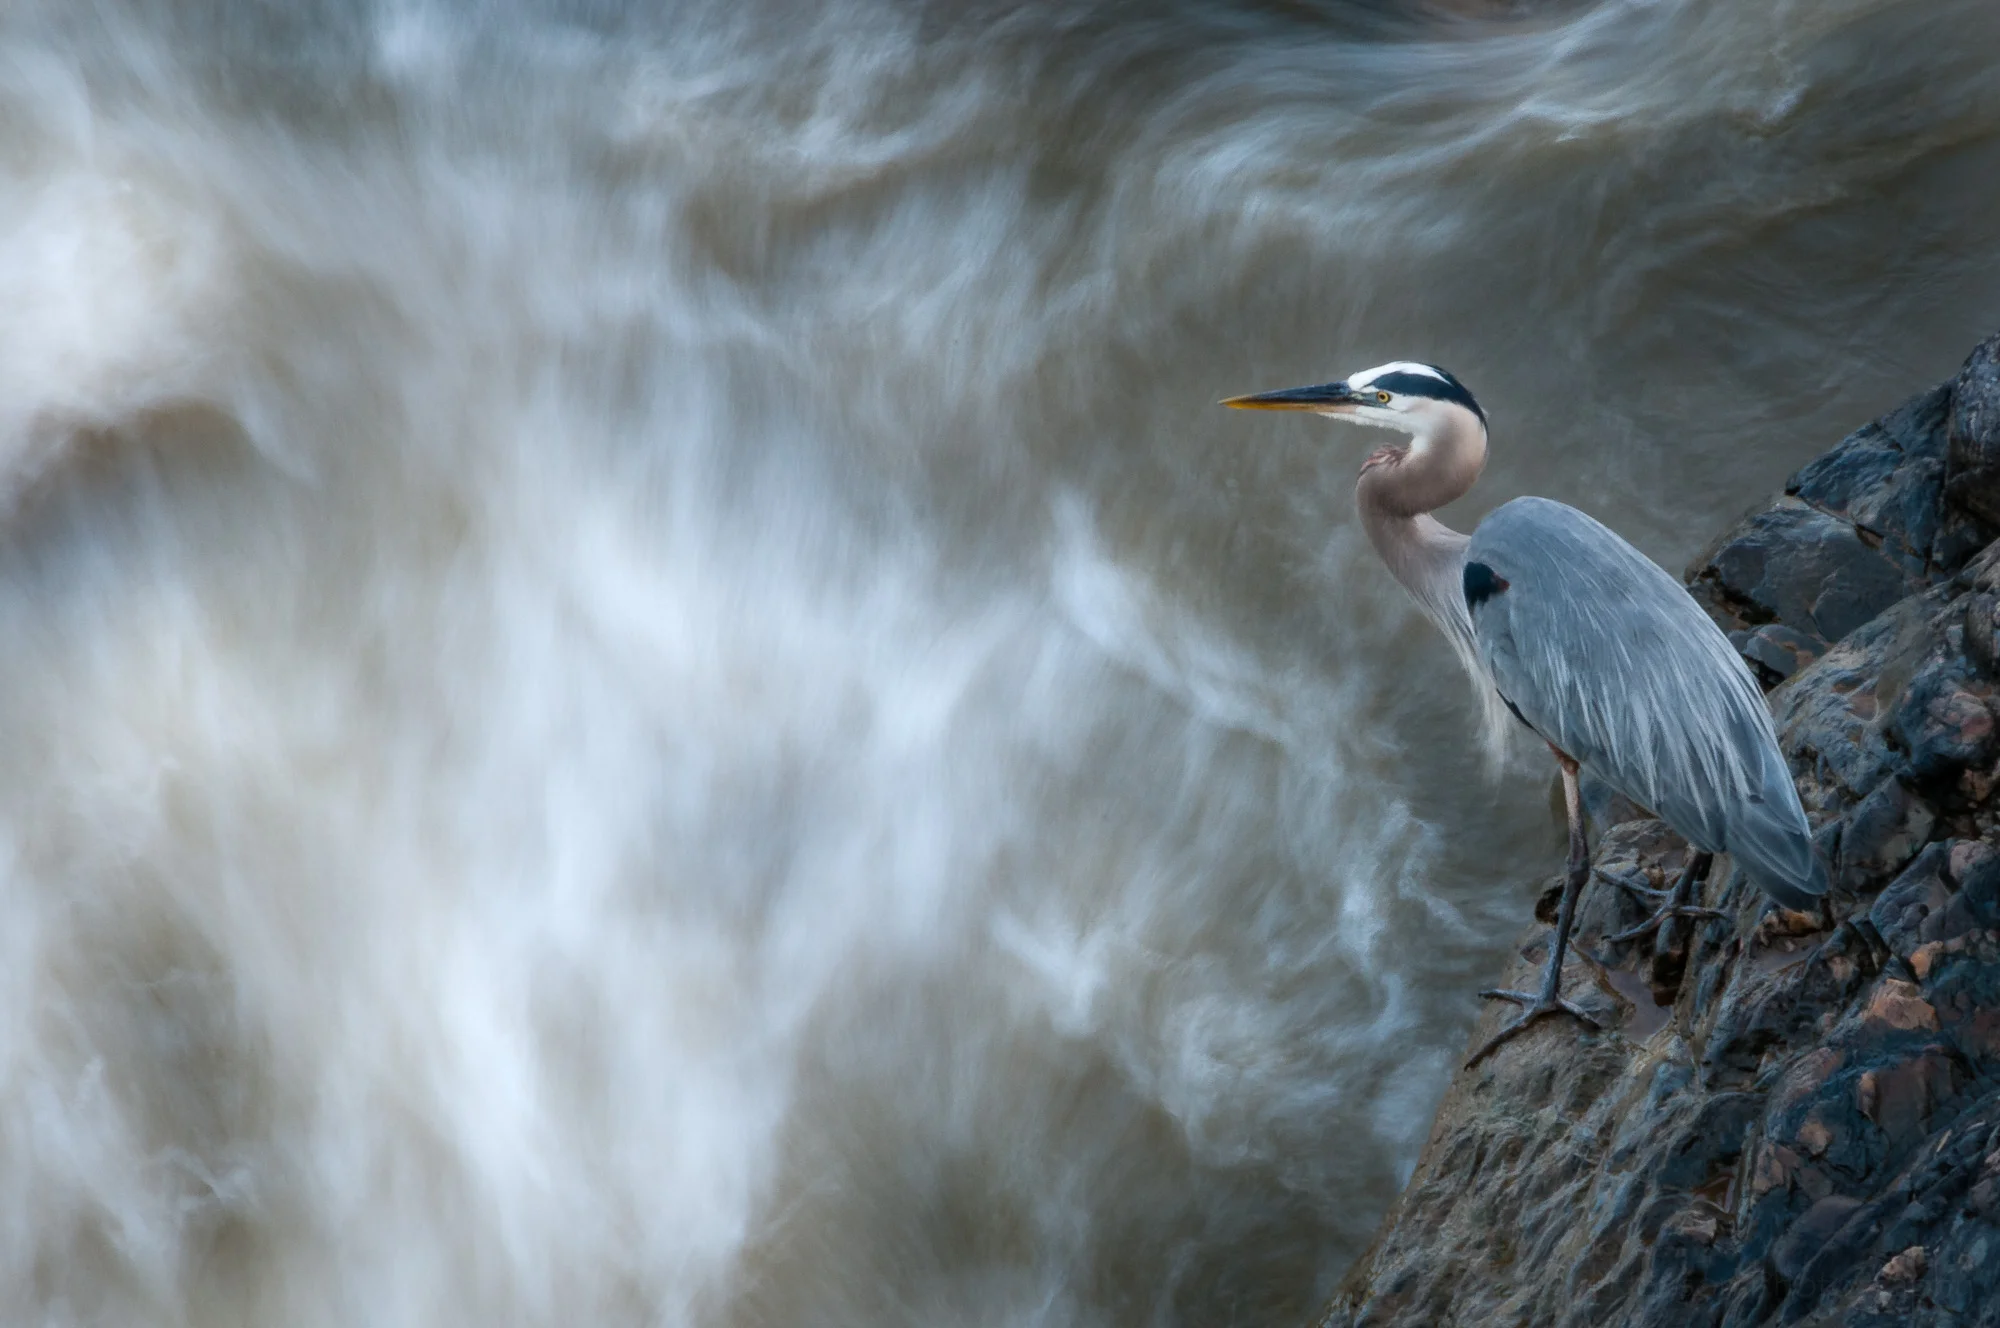
I’ve been asked in the past how to blur moving water from rivers and waterfalls in a photograph. It all comes down to shutter speed. The slower the shutter speed the more blur in the water. Below are a number of tips to help you do this. You don’t have to follow all of these tips to blur water. Pick whichever ones you’re able to use. Just realize some of them may not get the shutter speed as slow as you’d like. That’s when you may need to try the other tips.

Stabilize Your Camera

If you want a sharp image of everything but the water you’ll first need to stabilize your camera. The best way to do this is to put it on a good tripod. If you don’t have a tripod you can try resting the camera on something stable such as a stone wall or a large rock or tree. Just be careful not to let the camera drop.

Use a Remote Shutter Release or Self-Timer

To reduce the chance of introducing shake into the camera during the exposure it’s best not to press the shutter button with your finger to start the exposure. Two options for avoiding this are a remote shutter release, or setting the camera’s self-timer such that your exposure begins some number of seconds after you press the shutter button.

Using the self-timer is the least expensive option if your camera supports it, though you will lose a little flexibility in choosing exactly when to start the exposure.

There are two options for remote shutter releases: cable releases that attach to a special connector on your camera and wireless releases. At present I use a simple cable release that just presses and optionally locks the shutter. Some higher-end cable (and wireless) releases include intervalometer features which let you take a photo every so many seconds for some period of time.

Shoot Early, Late, or on an Overcast Day

It’s best if it’s not a bright sunny day as the sunlight can blow out the white highlights in the water. Try to photograph very early or very late, before the sun is up or after it has gone down. Or pick an overcast day when clouds will hide the sun. This reduces the quantity of light in the scene, reducing the chances of blowing out highlights, and requiring a longer exposure in your camera, increasing your chances of blurring the water.

This was shot on an overcast morning. Less light meant a longer exposure. ISO 200, aperture f/36, shutter speed 15 seconds.

Adjust Your ISO

Set your ISO to the lowest setting your camera allows. The ISO controls how sensitive your camera’s sensor is to light. The lowest setting, for example, 100 or 200, will require more light to make an exposure. Your camera will need more time to collect more light which will help you achieve the slow shutter speed you’re after.

Stop Down Your Aperture

Stop down your aperture as far as you can. To do this use a larger f-stop number, such as f/16, f/32, etc. This closes down the aperture, making a smaller opening that light will need to travel through, requiring more time for the camera to gather enough light to make the exposure. This lets you shoot using slower shutter speeds. Be aware, though, that the very smallest apertures can cause diffraction, which may reduce the sharpness of your photo. If this happens you’ll need to open up the aperture just a bit.

A wider aperture results in a faster shutter speed allowing you to see more detail in the water. ISO 200, aperture f/4, shutter speed 1/50 second.

A smaller aperture results in a slower shutter speed allowing you to blur the water. ISO 200, aperture f/11, shutter speed 1/8 second.

A wide aperture results in a faster shutter speed, freezing action and showing more detail in the water. ISO 320, aperture f/6.3, shutter speed 1/1250 second.

A small aperture results in a slower shutter speed, helping convey action by blurring the water. ISO 320, aperture f/25, shutter speed 1/60 second.

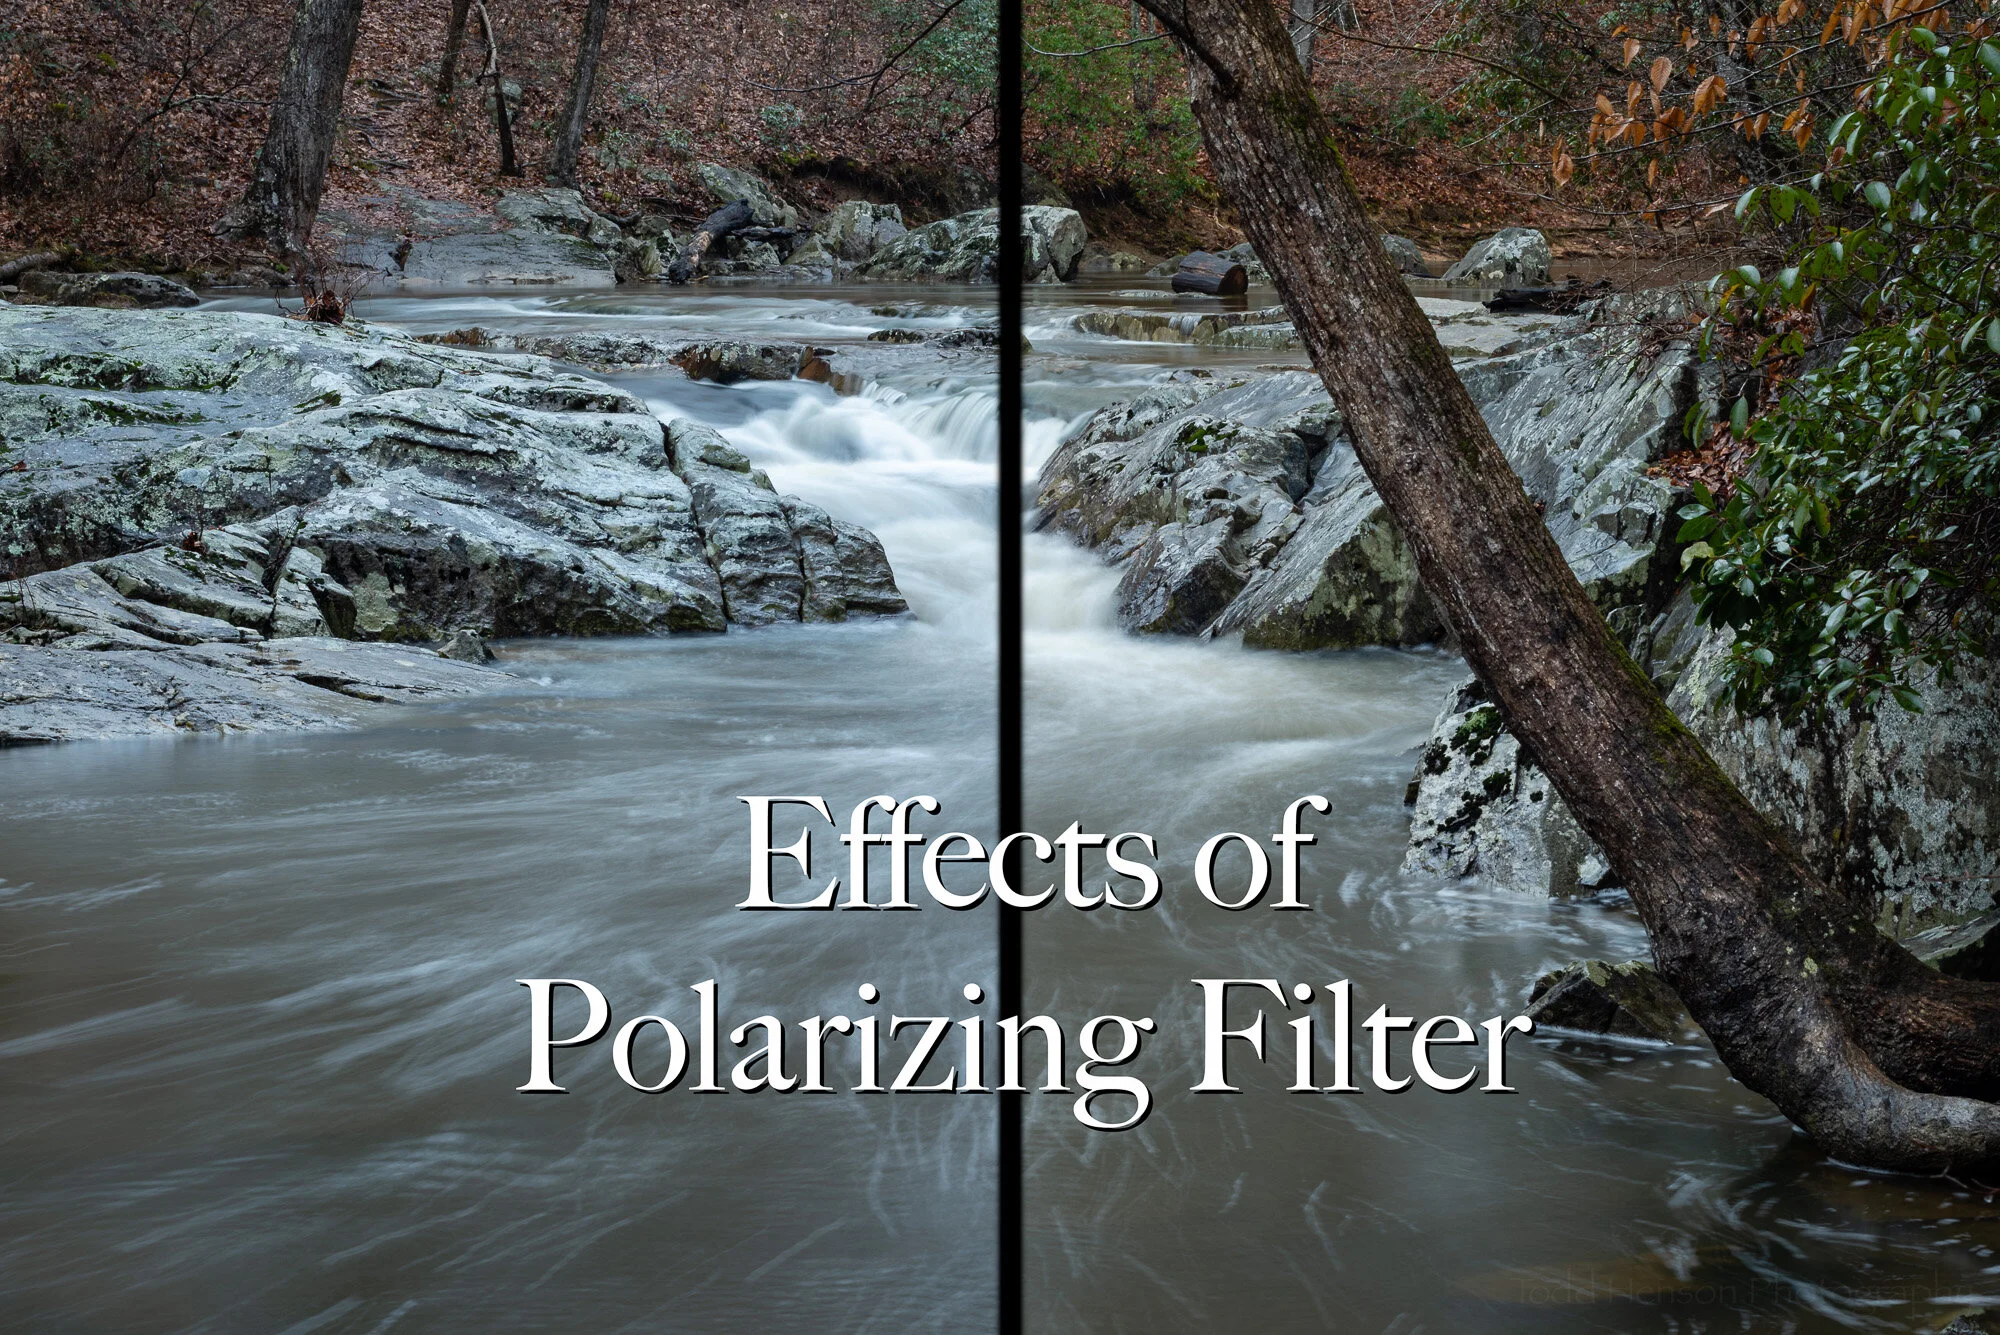
Use a Polarizing Filter

If everything above still isn’t enough to slow the shutter speed down enough to create the blur you’re after then you may need to resort to filters that fit over your lens. The first to try is a polarizing filter if you already have one.

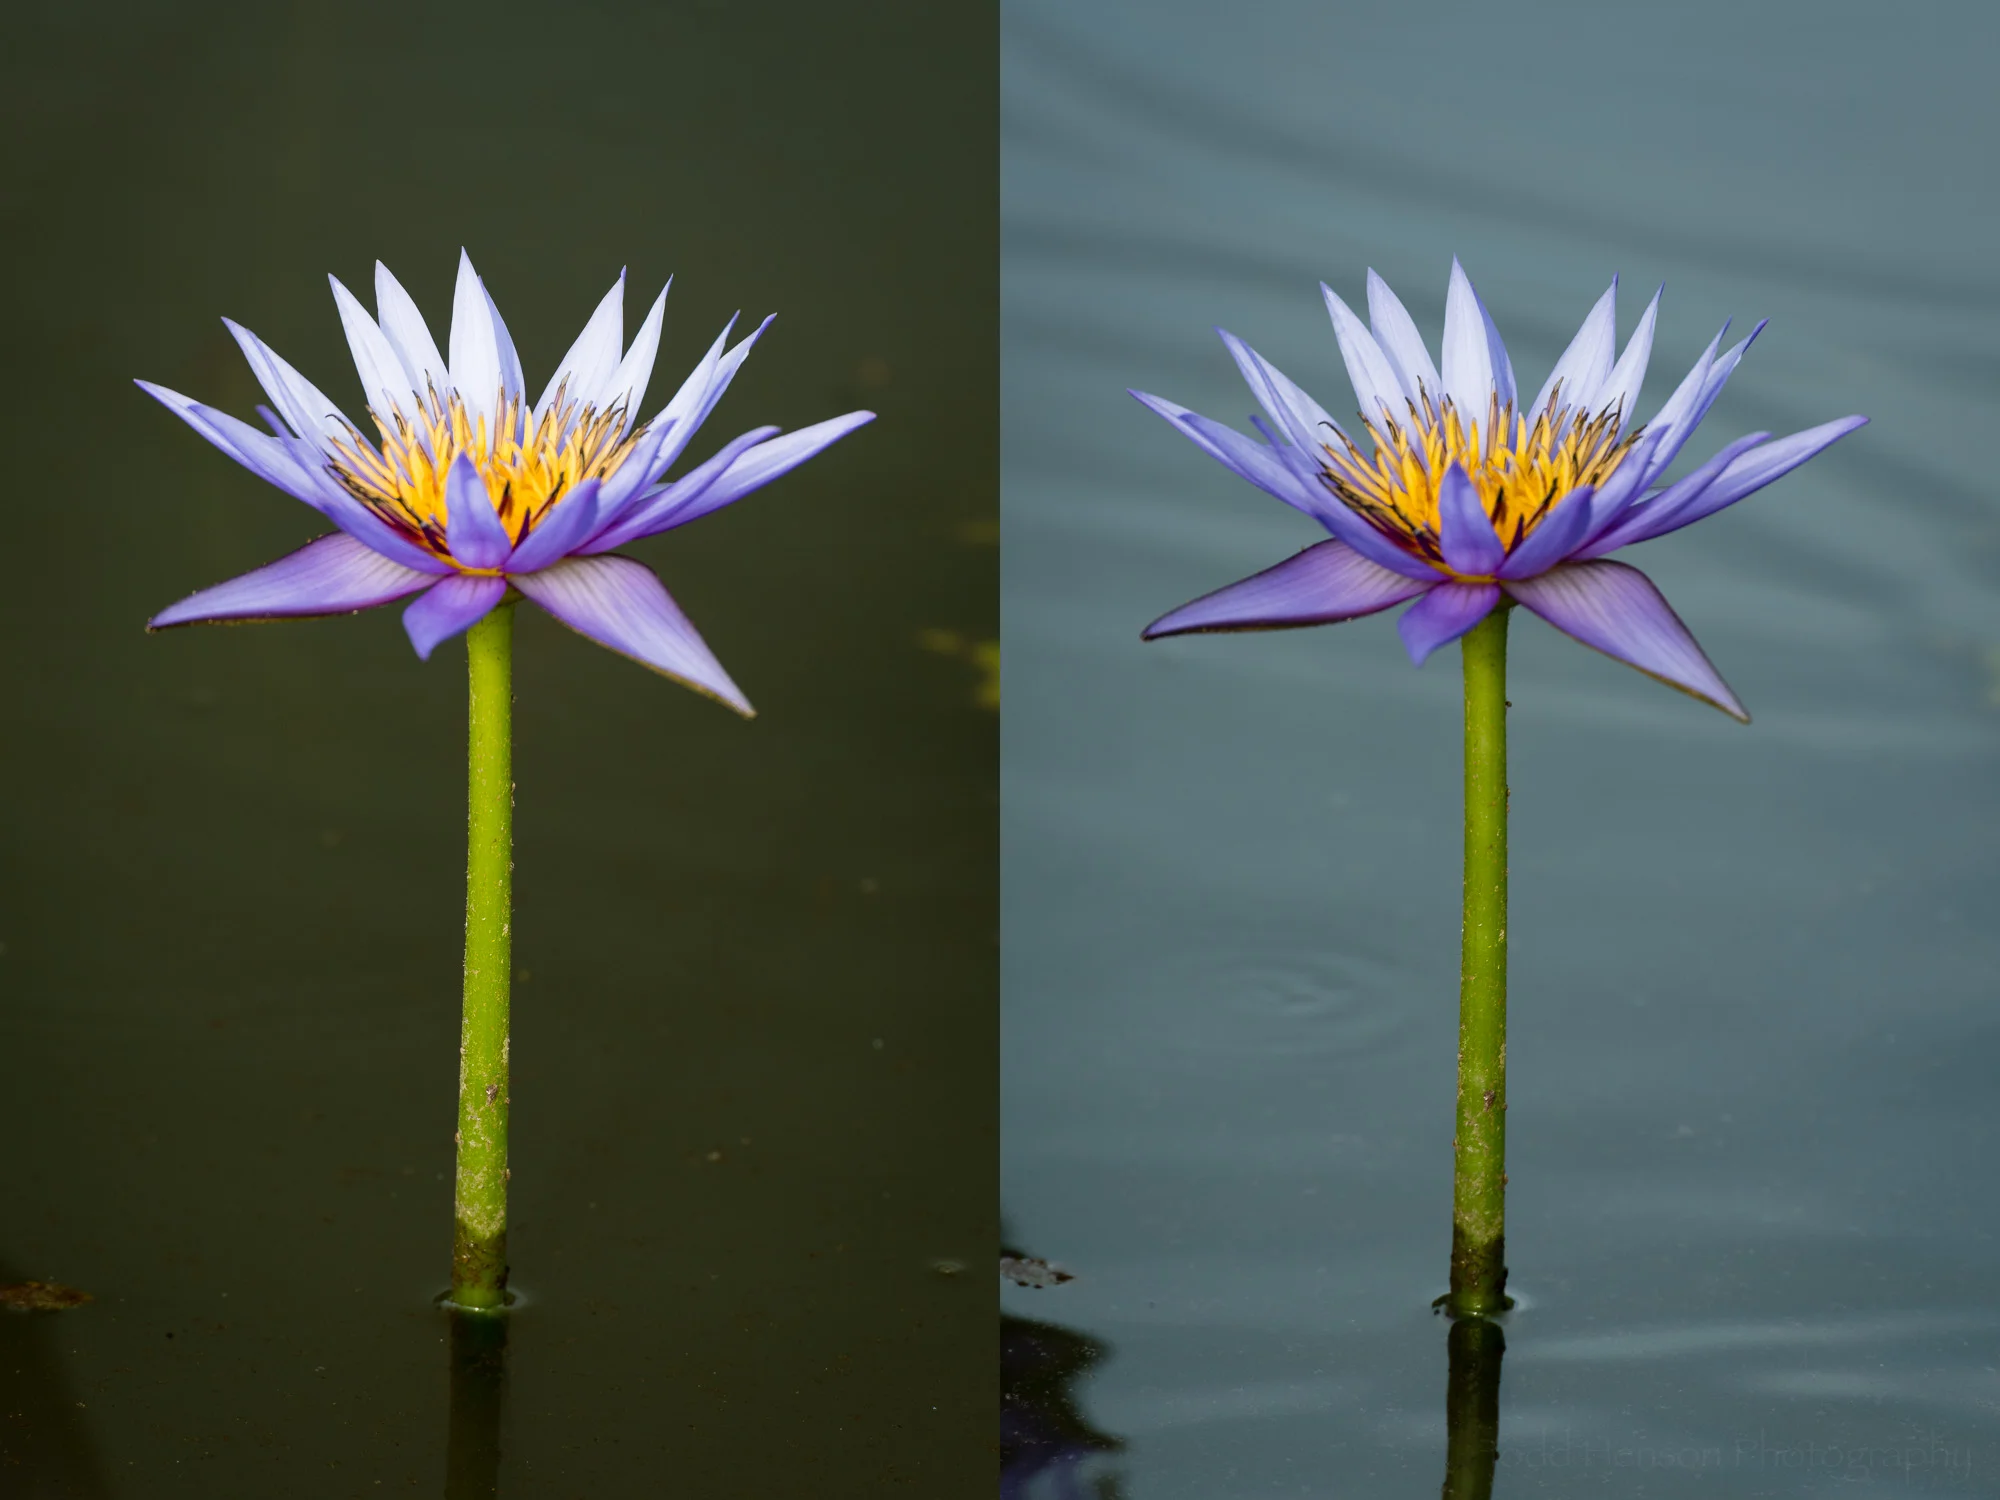
A polarizing filter is often used to reduce reflections and glare on surfaces such as water and leaves, to create richer colors, and to darken skies. A side effect of these filters is reducing the amount of light that reaches the sensor, usually by about 1 to 2 stops. This isn’t a lot but it might be enough to get the shutter speed slow enough to blur the water.

Using a polarizing filter and a small aperture helped slow down the shutter speed, blurring the water from the fountains. ISO 200, aperture f/25, shutter speed 1.6 seconds.

Use a Neutral Density (ND) Filter

If nothing else will get the shutter speed slow enough you’ll want to invest in a neutral density filter. Think of this as sunglasses for your camera lens. It’s a dark filter that reduces the amount of light entering the lens. Neutral density filters are available in a range of levels, some reducing 1 stop of light, some 3 stops, some 5, 10 or even 15 stops of light. You can even find variable neutral density filters that let you turn the filter like a polarizer to change the density of the filter. With neutral density filters you’ll be able to slow the shutter speed down as much as you’d like.

You can also stack filters, using multiple neutral density filters to slow things down even more. And you can stack a polarizing filter and neutral density filters. Just be aware that if you stack too many filters you may begin to see the filters at the corners of the image. If this happens you either need to remove some of the filters or crop the image when you’re finished.

A polarizing filter in the middle of the day allowed a slow exposure, but not slow enough to really blur (or still) the moving water. ISO 200, aperture f/22, shutter speed 1/8 second.

A polarizing filter and a 5-stop neutral density filter in the middle of the day allowed a slow enough exposure to blur (or mostly still) the moving water. ISO 200, aperture f/22, shutter speed 4 seconds.

It's reasonably early in the morning without a filter. ISO 200, aperture f/11, shutter speed 1/80 second.

Adding a Singh-Ray Gold-N-Blue Polarizer and a 10-stop neutral density filter shifted the colors and slowed the shutter speed way down, introducing a lot of blur into the water. ISO 200, aperture f/11, shutter speed 67 seconds.

In this triptych I used a Singh-Ray Vari-N-Duo filter, which combines a polarizing filter with a variable neutral density filter, to gradually slow the shutter speed down by increasing the amount of neutral density. All images are ISO 200 with an aperture of f/25. The left image has a shutter speed of 1/8 second. The center image has a shutter speed of 4/5 second. The right image has a shutter speed of 8 seconds.

I hope these tips for blurring moving water have been useful to you. It can be a lot of fun and it can really add a nice dynamic to a photograph. So head out there and try a few of them out, see what kinds of interesting photographs you can create.


Do you enjoy these posts?

Sign up to receive periodic emails with updates and thoughts. Don’t worry, I won’t spam you. And please consider purchasing artwork or products from my online store, and using my affiliate links in the sidebar to the right when shopping online.

I appreciate your support!

Prelude to Rafting - The Story Behind the Image by Todd Henson

Prelude to Rafting. Great Falls Park, Virginia.

The Story

I love Great Falls Park, a national park located in northern Virginia along the Potomac River. Who would think such a beautiful and wild location would be located just outside Washington, D.C.? Just across the river is the Chesapeake & Ohio Canal National Historical Park, which also gives some great views of the falls and the river.

I was on the Virginia side when creating this particular photograph. I had arrived to the park just before sunrise, both because it’s far less crowded this time of day, and because it’s such a great time to photograph. Not only do you have great light, but you also don’t need to worry as much about blowing out highlights in the waterfalls, which is very easy to do if you wait until the sun is high in the sky on a cloudless day.

This photograph was created from the overlook just south of Fisherman’s Eddy. It provides a nice view of the falls, and also looks down on the rocks below, where you will sometimes see people fishing, rafting or kayaking.

The rafts were not in the scene when I first began photographing. I was focusing on the falls and the scenery. This is a beautiful landscape I never tire of. But then a rafting crew brought their blue rafts to the edge of the water and began setting up for a trip downriver. I realized there might be a story here, so I started focusing on the rafts, integrating them into the photograph. The rafting crew left the rafts and went back up the hill to bring down the rest of their gear. I liked the idea of these empty rafts sitting by the river. I thought it added that slight bit of tension, anticipation, or longing. Empty rafts so close to the water, waiting for people to take them out. Of course, this led to the title of the photograph, Prelude to Rafting.

During one specific exposure, the one that would result in the final image, the sun peaked out from behind a cloud and, like a spotlight, illuminated the rafts, rock face, and part of the river with a beautiful warm glow. I was so pleased this happened just as I started an exposure. It didn’t last long, but it lasted long enough. I was very happy with the exposure. None of the others had quite the drama as this one. Light is everything in photography.

I had arrived on the scene around 6:54 AM, and created my favorite exposure at 8:06 AM. I continued photographing until after 10 AM, but none of the other photos came close to this one. But even when I think I have a great image, I almost always continue photographing. You just never know what might happen. Perhaps the light will surprise you. Maybe something or someone will move into a position that makes a better image. And it’s hard to leave these sorts of beautiful locations.

The Technique

My plan that morning was to create some long exposure images that would blur the movement of the water and turn the scene into something we can’t see in reality. I did this with my Singh-Ray Mor-Slow 10-Stop Neutral Density filter. Think of a neutral density filter as sunglasses for the camera lens, blocking some light from entering the lens. In the case of this filter it blocks 10 stops of light.

I was also experimenting with my Singh-Ray Gold-N-Blue Polarizer, a great creative filter that lets you play with color in the scene. I don’t use this filter all that often, but it’s a lot of fun to work with and can help create some really striking images. It’s just like a normal polarizer in that you turn the filter to adjust the polarization effect. The difference is that as you turn the filter it also affects the blues and golds in the scene. This can provide a very subtle effect that enhances the natural colors in a scene, or it can radically alter the colors and create very unnatural looking images. And like all polarizers, it also blocks some light from entering the lens, which allowed me to use even slower shutter speeds.

Because I was working on long exposures having the people around the rafts didn’t do much for the photos. They turned into blurred streaks, which can be nice in some images, but just didn’t seem to fit in this one. So I waited until the people went back uphill and out of the scene. Then I started really experimenting with the Gold-N-Blue polarizer, turning it a little at a time, creating exposures as I went. Each exposure was a little over a minute in length due to the 10-stop neutral density filter and the polarizer.

Two pieces of gear are necessary, or at least highly recommended, when creating long exposure images:

  • Tripod

  • Remote shutter release

I had the camera mounted on a sturdy tripod to keep it steady and prevent blur caused by camera movement. There’s just no way I could hold the camera steady for over a minute without a tripod. I used a remote shutter release instead of pressing the shutter release button on the camera. This helps reduce the chance of moving the camera when pushing the shutter button. Once you press the shutter release be careful not to touch the camera, lens, or tripod during the exposure. If you do accidentally touch anything you may get a blurry image.

The Processing

Before processing images comes the editing phase. This is where you go through all the photos from the day and decide which are worth further work. This can be a difficult process, but in this case it was pretty easy. I was most interested in the one long exposure that had caught that beautiful spotlight of sunshine.

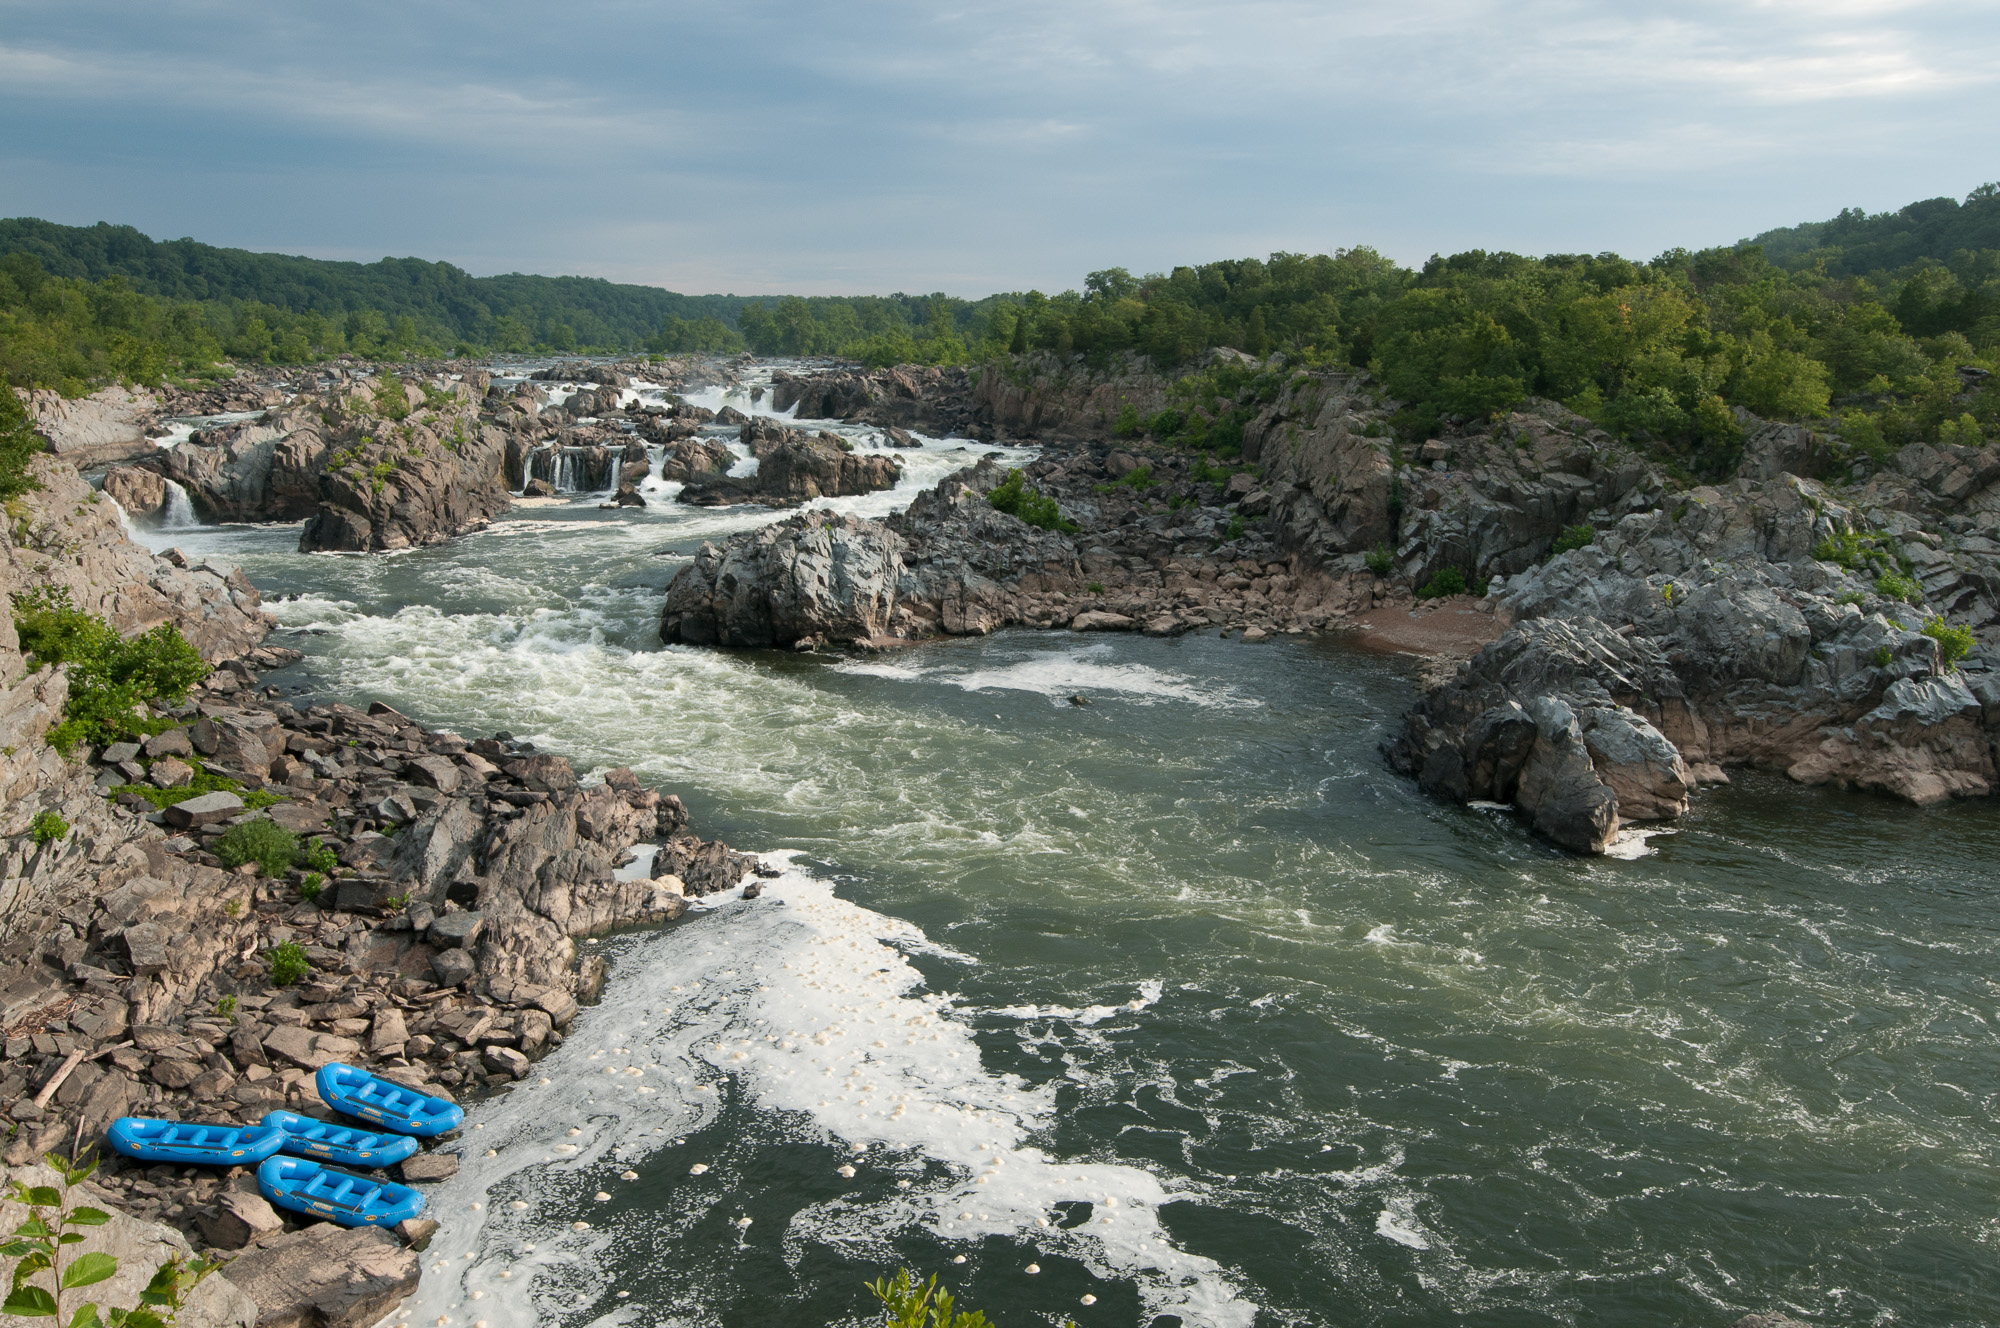
I’ve pulled out a few other photographs for this post to show the different versions of the scene. The first image is an unprocessed raw file without any filters. It gives a more accurate representation of the colors in the scene that day, though being a raw file it is lacking in contrast and punch.

Unprocessed raw image without any filters on the lens.

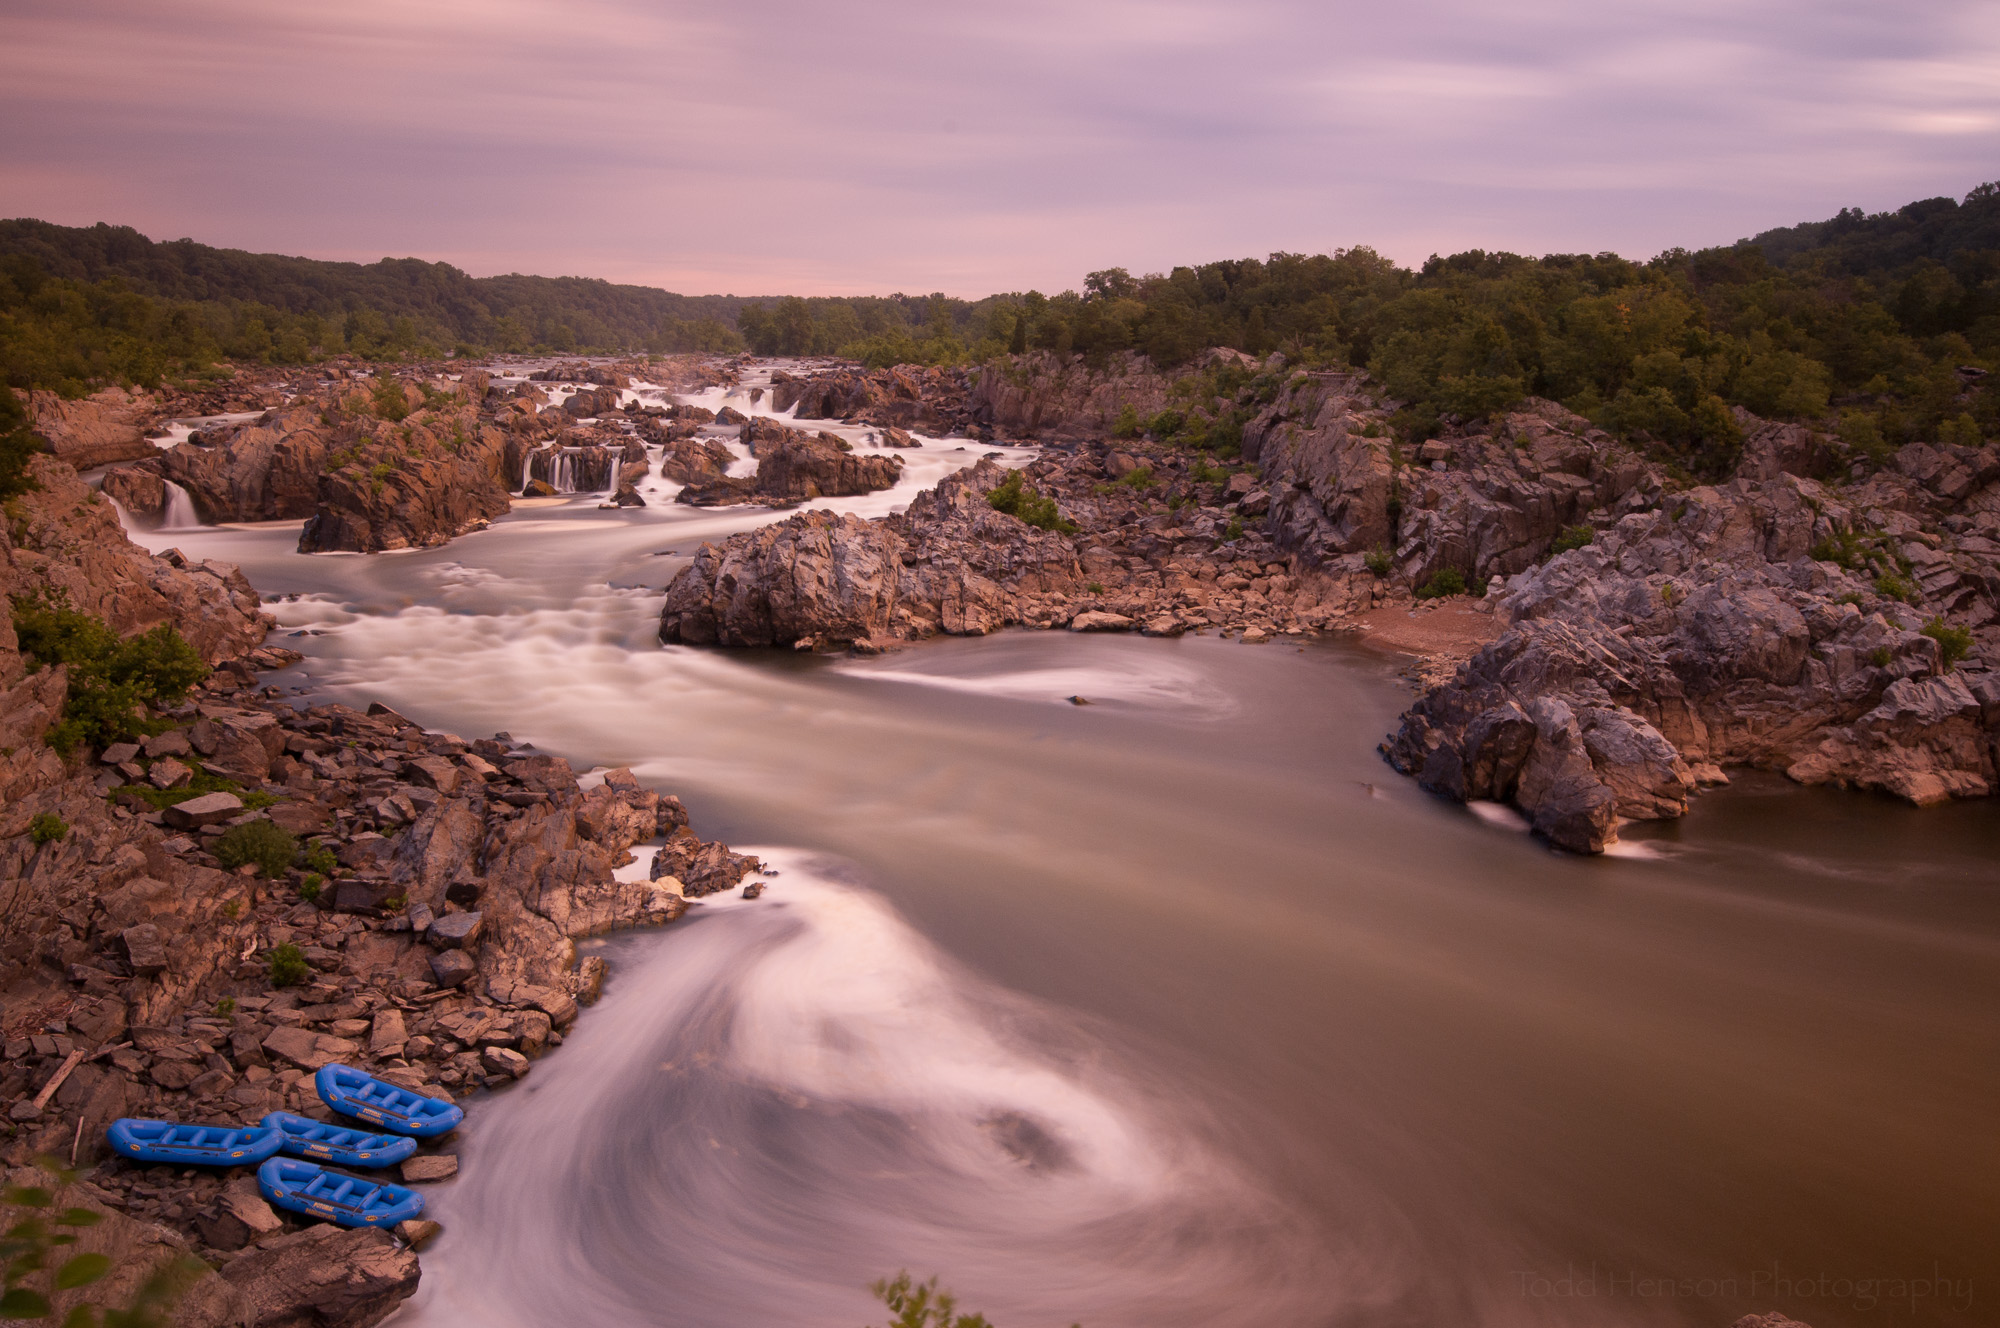
In the next photograph I’ve put on the 10-stop neutral density (ND) filter, which blocks light from entering the lens. This allows me to slow the shutter speed down significantly. I also put on the Gold-N-Blue polarizer to affect the colors, but this filter also blocks out a couple more stops of light, allowing an even longer exposure. By way of example, the version without any filters had a shutter speed of 1/80 second, whereas the versions with the filters had shutter speeds of between 60 - 90 seconds.

Unprocessed raw image with 10-stop ND filter and Gold-N-Blue polarizer (more toward the gold side).

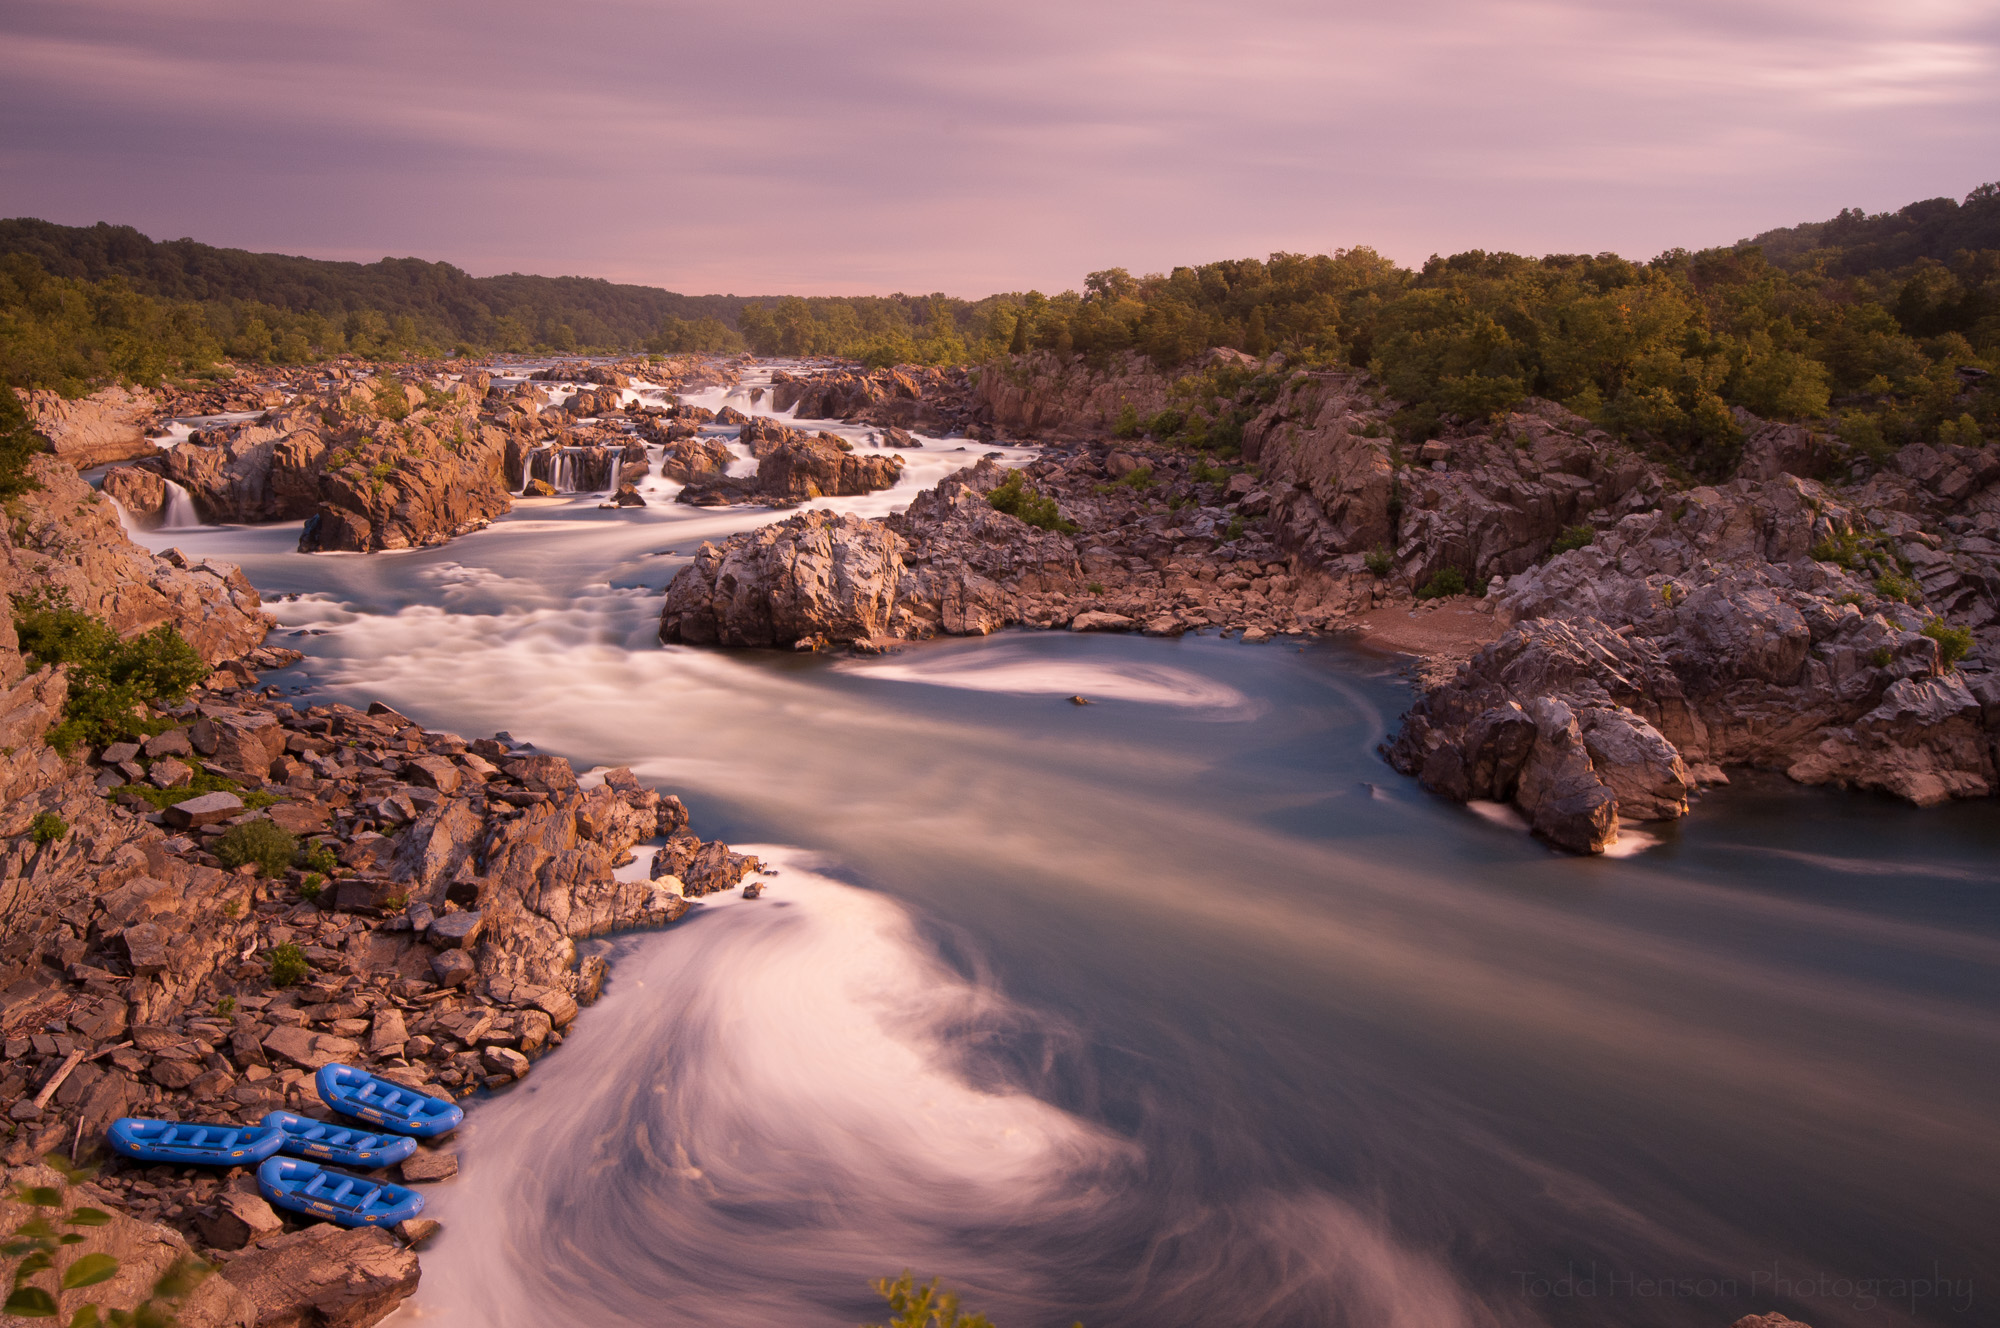
You can see the effects of the ray of sunlight in the next photograph, which is the unprocessed raw version of the final image. I still have both filters on the lens. I have adjusted the Gold-N-Blue polarizer, which changes the color balance in the image. You can see this most easily in the color of the water. In the previous image the water had a more gold tone, almost muddy, whereas in this image it has a bluer tone.

Unprocessed raw image with both filters (Gold-N-Blue more towards the blue side) and a little help from the sun.

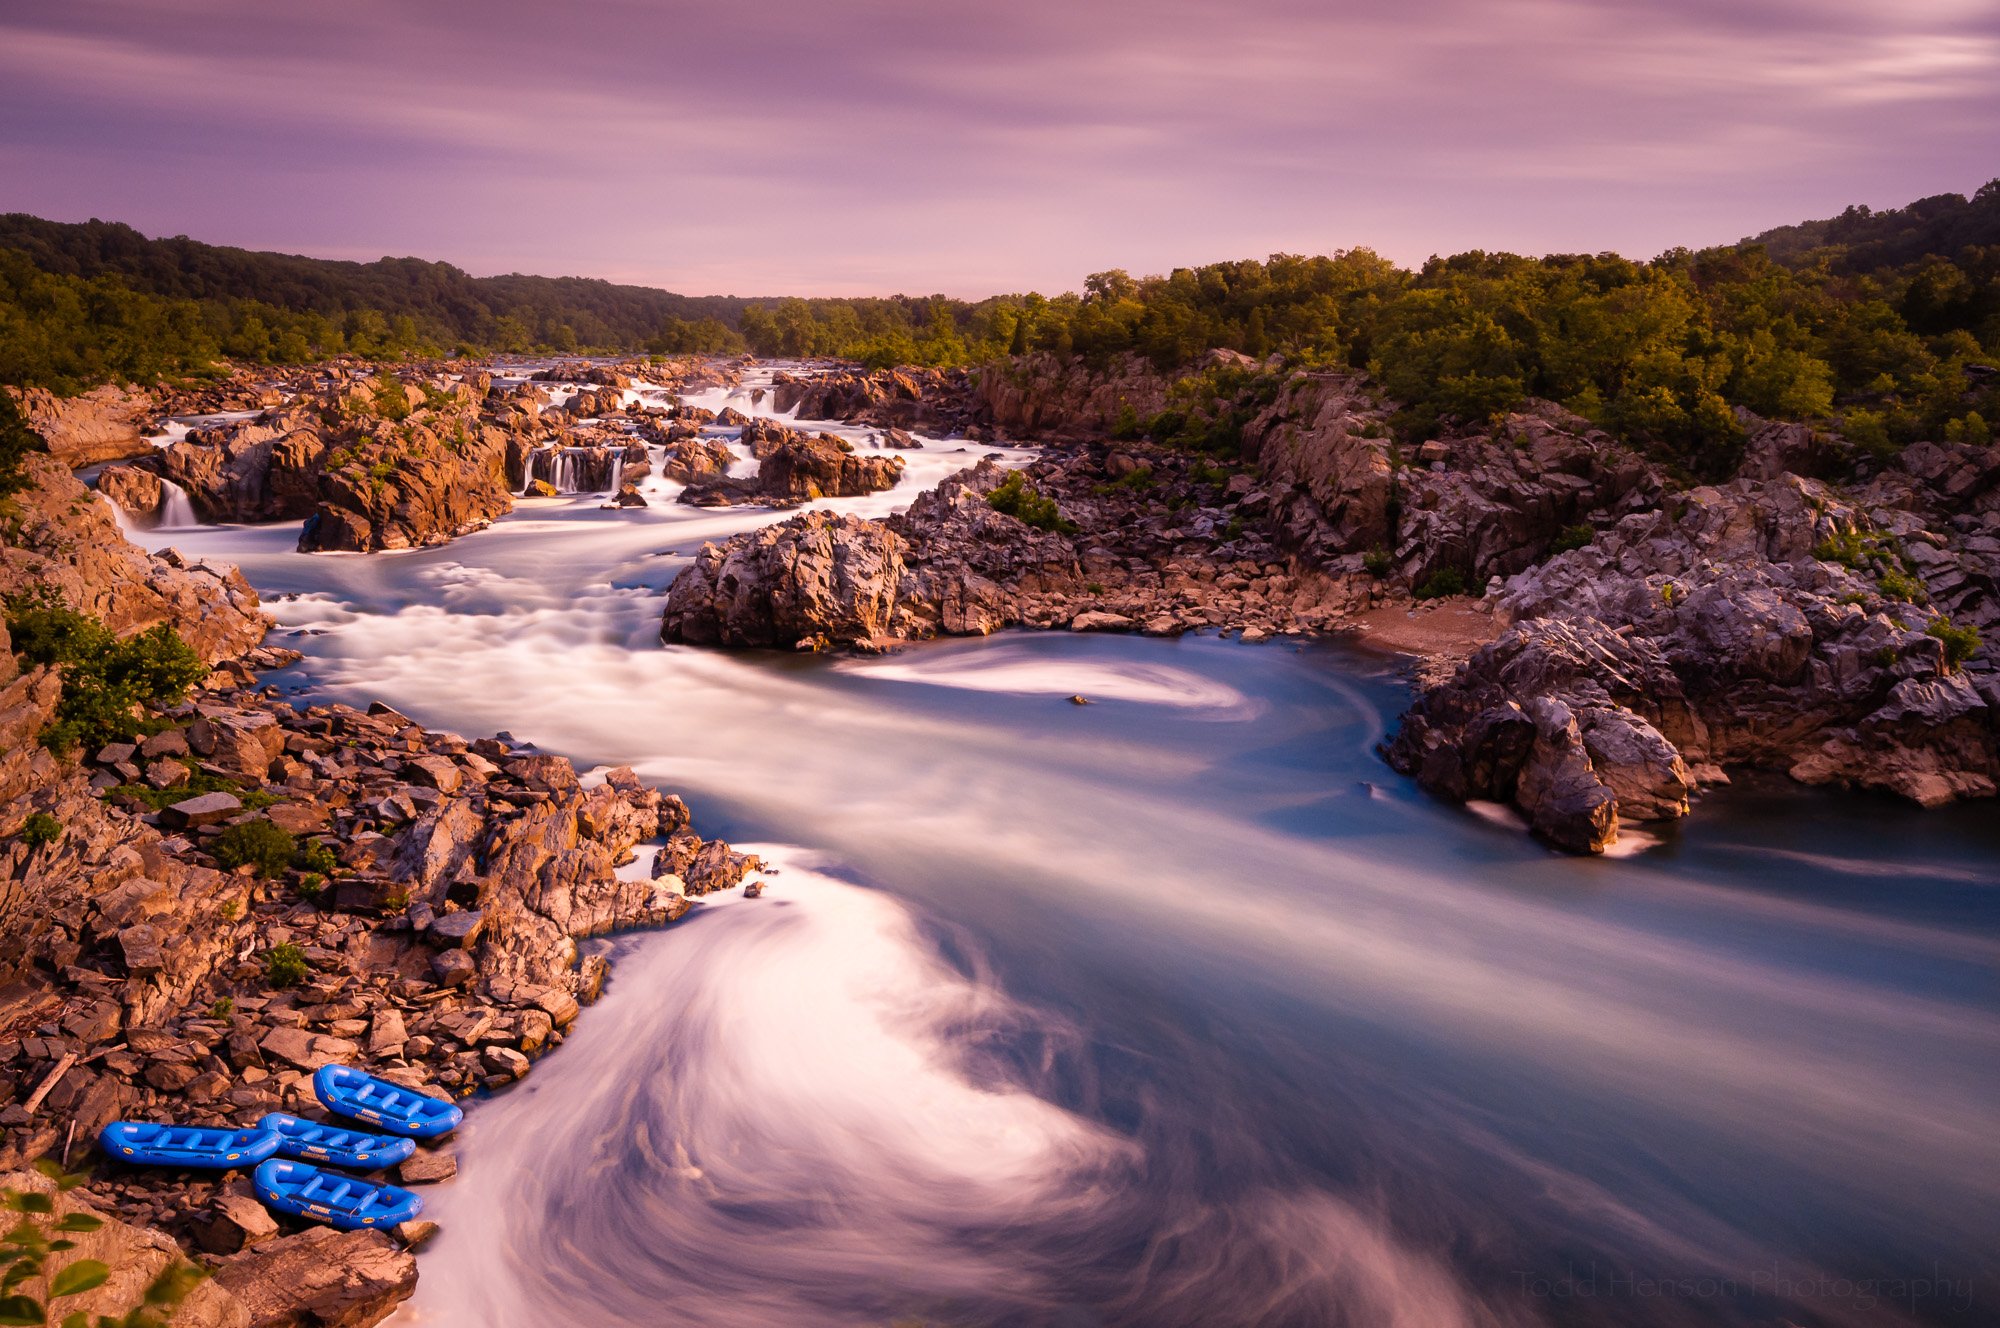
The final photograph is the processed image. I applied lens corrections, which undo some of the warp caused by the wide angle lens. I adjusted the color balance to keep the highlights of the water as white as possible. I adjusted whites and blacks and the tone curve to provide some contrast. I dodged and burned (lightened and darkened) some select areas to help draw the eye through the scene.

The final processed image. Includes use of 10-stop ND filter and Gold-N-Blue polarizing filter on the lens, the sun peaking through the clouds, and post-processing in Adobe Lightroom.

I also cloned out a few distractions. If you compare the images you’ll see I removed a small patch of leaves in the bottom center, a small rock extending into the lower right, and a tiny patch of brown leaves in the upper right that I found distracting. As I’ve discussed in the past, I would not have done these things if this was intended to be a documentary photograph, but I’m ok making these kinds of tweaks when creating a more artistic representation of what I saw. I want to keep the core reality of the scene, but add in the wonder and excitement I felt that day.

Click on the images below to step through each version of the photograph. I hope you enjoy it. Let me know if you would have done anything differently.


Do you enjoy these posts?

Sign up to receive periodic emails with updates and thoughts. Don’t worry, I won’t spam you. And please consider purchasing artwork or products from my online store, and using my affiliate links in the sidebar to the right when shopping online.

I appreciate your support!

Rocky Shoreline of Acadia National Park by Todd Henson

My favorite image of a rocky beach in Acadia National Park, Maine

Acadia National Park, in Maine, has some absolutely beautiful coastline. Most of it is rough coastline with rocky beaches, which I much prefer over the more common sandy beaches down south. During a recent vacation my father and I explored parts of Mount Desert Island, which contains the main portion of Acadia National Park. Park Loop Road loops through a large part of the park and contains the majority of the sites most commonly seen (though there is much to be seen outside this loop). On our final day in the park we drove through the one-way portion of the loop and were favored with fantastic views of the rocky coastline extending out into the Atlantic Ocean, with some islands in the distance.

The morning had begun with light rain and some fog. We started the day with a drive towards the summit of Cadillac Mountain, but it was completely fogged in, much as it had been the very first day we drove up there. So we turned around, went back down the mountain out of the fog, and took the one-way portion of Park Loop Road. I’m glad we did.

The Panoramic View

We found a location with a small pull out on the side of the road. It was a small enough location they hadn’t put in a full parking area. A trail led from the road out along the top of a cliff line that ran above a small inlet and rocky beach. It was a fantastic view with several places to photograph from. At one of the views I created a series of images, holding the camera vertically and rotating the camera a little between each frame, knowing I’d merge these into a multi-image stitched panorama when I got home. The final image was created from 8 individual vertical frames.

Little Hunters Beach Panorama in Acadia National Park

Little Hunters Beach Panorama is available for purchase as a print or on a variety of products.

Down to the Rocky Beach

A wooden stairway led from the road down to the rocky beach. There were still storm clouds around from the earlier rain, and the tide was slowly coming in, moving up the beach. I decided this inlet would be perfect to try some long exposure images of the water lapping at the rocky beach. The lack of parking kept the crowds down and I had the entire beach to myself for the majority of the time.

I tried two different compositions, one facing the shoreline and cliffs to the left, where I’d created the panoramic image, and one facing the shoreline to the right. I processed each differently, tweaking the white balance just slightly to give each a different mood.

For the first composition I faced towards the right, including part of the rocky beach and the right edge of the inlet. I used an aperture of f/22 for a large depth of field and a slower shutter speed, and put on a 10 stop neutral density filter, allowing me to hold the shutter open for 70 seconds. This turned the water into a milky mist. In post-production I lowered the color temperature, which shifted the white balance towards the blue end of the spectrum. This gives the image a colder feel.

Long exposure (70 sec) of right side of inlet taken from rocky beach, cooler tones

For the second composition I faced towards the left, including part of the rocky beach and the left edge of the inlet. I had stood at the top of this cliff line to create the panoramic image. Once again I used an aperture of f/22 and a 10 stop neutral density filter to slow the shutter speed. This time I held the shutter open for 100 seconds. In post-production I warmed up the color temperature a little, though it’s still naturally towards the blue end, and I shifted the tint slightly towards magenta, giving a warmer feel to the image. I think this is my favorite of the two.

Long exposure (100 sec) of left side of inlet taken from rocky beach, warmer tones

Tips For Long Exposures

A tripod is critical when creating these longer exposure images. It’s also good to use a remote release if you have one. If not you can use the timer on the camera to activate the shutter. The key is not pushing the shutter button on the camera during the exposure. Anytime you touch the camera you can introduce vibrations.

To get slower shutter speeds you can use the base ISO for your camera (200 in my case) and stop down the aperture (larger f/stop numbers, f/22 in my case), but you’ll need a neutral density filter to get very long exposures. A 10 stop neutral density filter allowed me to get exposure times in the 1 to 2 minute range. You can try using a polarizer if you don’t have a neutral density filter. Depending on which polarizer you have it should slow the shutter speed down 1 to 2 stops. This may not be enough for very long exposures, but it’s a start. For more ideas about using slow shutter speeds see my post, 9 Creative Uses for Slow Shutter Speeds.


The book recommendation below contains affiliate links and I will be compensated if you make a purchase after clicking on my links. This is at no extra cost to you.

A Book Recommendation

If you’d like to see more examples of the beautiful scenery all throughout Acadia National Park, check out the book, Acadia National Park: A Centennial Celebration. I picked up a copy in a small store in the town of Northeast Harbor, on Mount Desert Island. It’s a large format book, about a foot wide and tall, and around an inch thick. It contains 224 pages, most of which are filled with beautiful images from all over the park, showcasing not just the amazing landscapes, but also some of the wildlife and plant life that inhabits the park. I’m very pleased with the book.


Do you enjoy these posts?

Sign up to receive periodic emails with updates and thoughts. Don’t worry, I won’t spam you. And please consider purchasing artwork or products from my online store, and using my affiliate links in the sidebar to the right when shopping online.

I appreciate your support!