aperture

Aperture and Depth of Field with Cherry Blossoms by Todd Henson

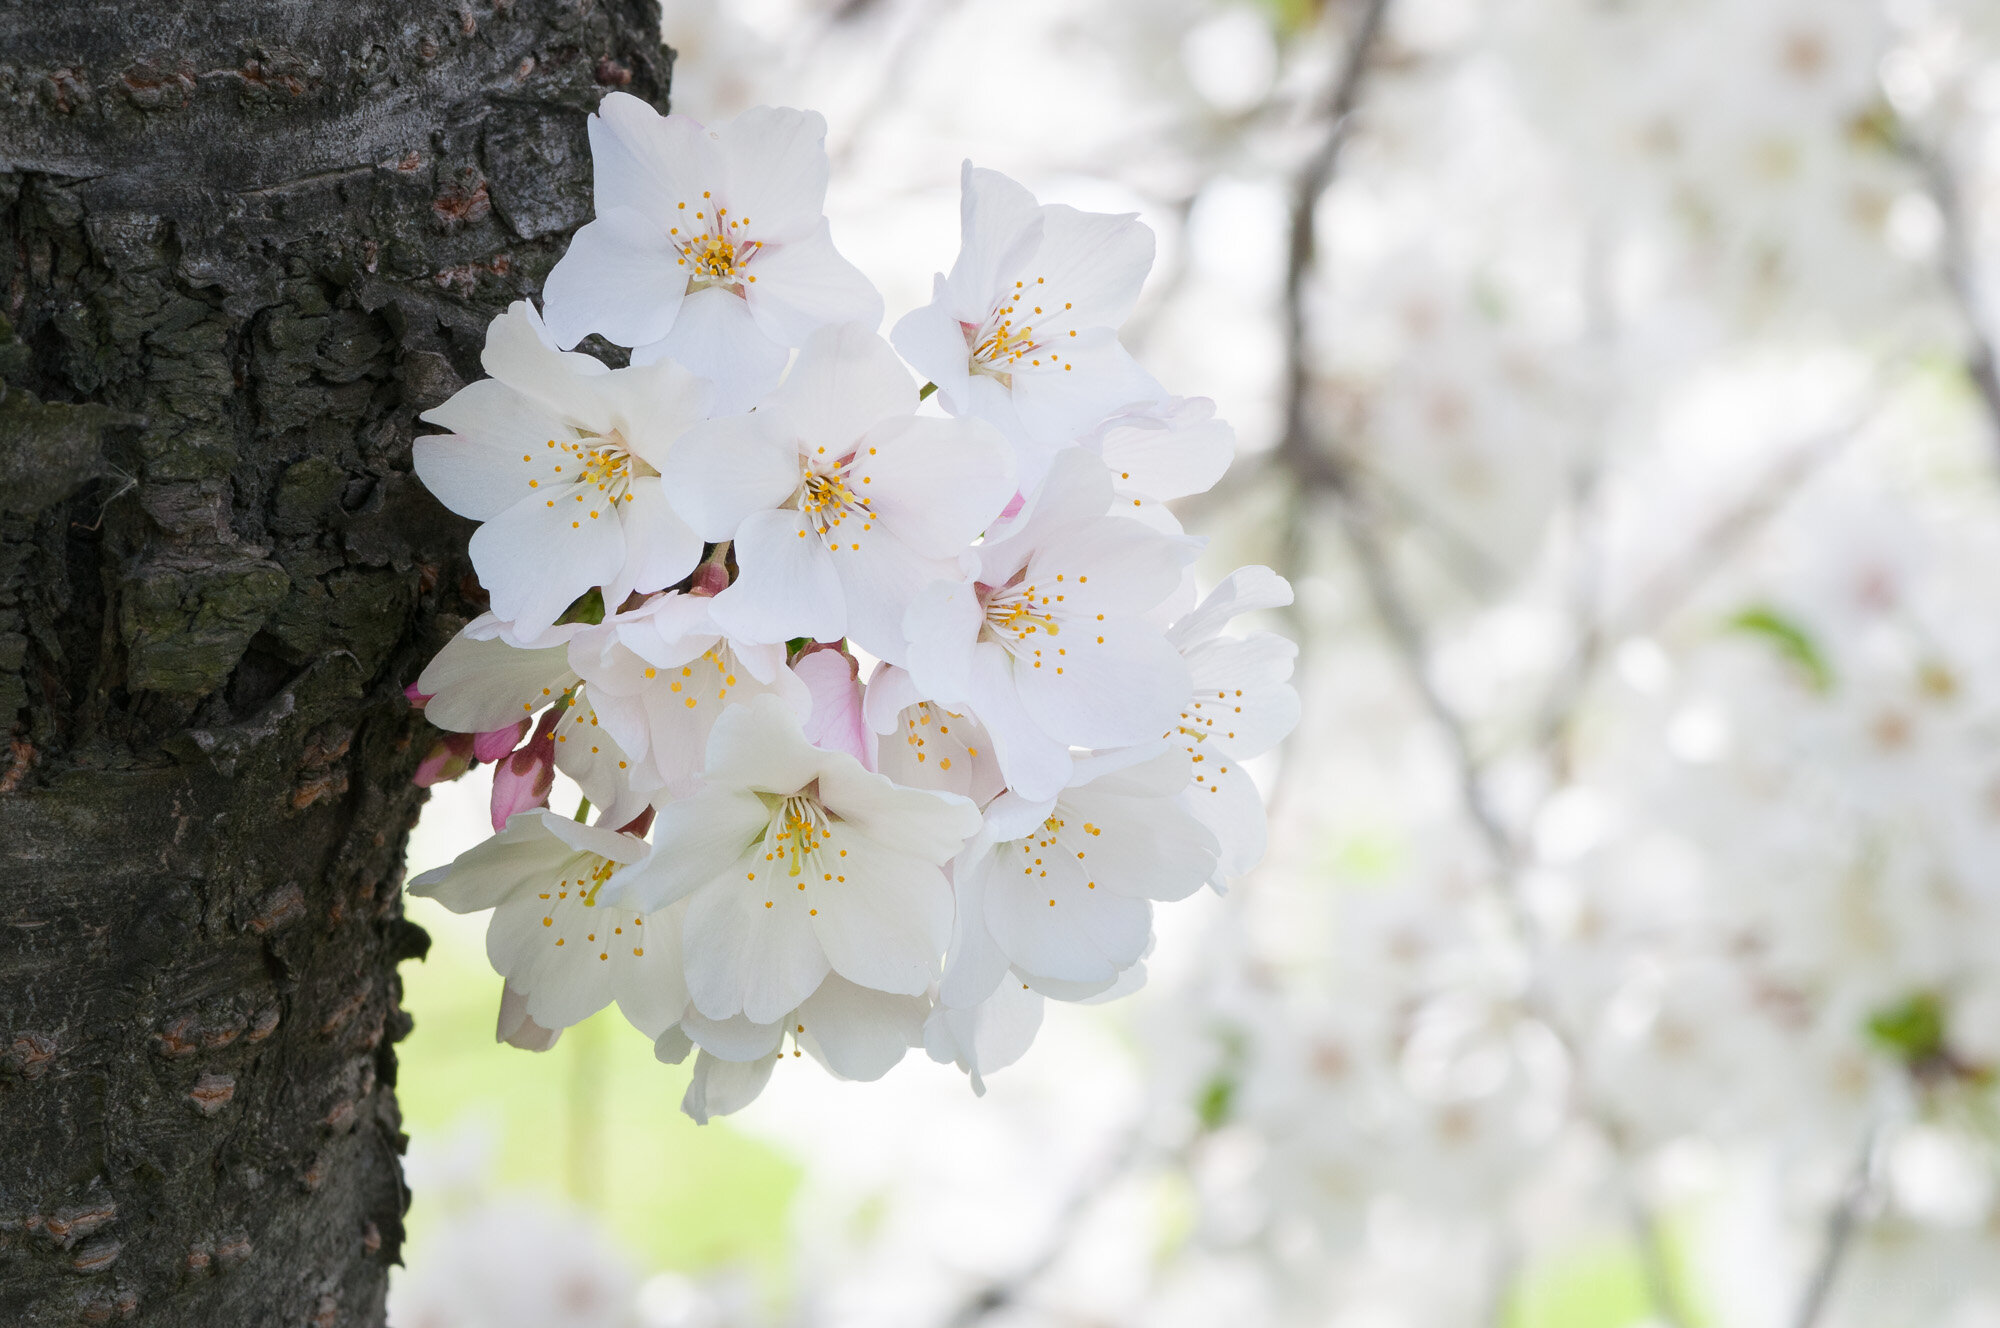
An example of aperture and depth of field with cherry blossoms.

One of the early concepts we learn as photographers is the relationship between aperture and depth of field. Aperture is the opening in the lens (or camera) that light travels through to reach the sensor or film. And with most lens/camera combinations you can adjust the size of this opening both to create the exposure you desire and based on the depth of field you desire for the photo.

Aperture

The aperture opening is measured in f-stops. I don’t want to get into too much technical detail with this post, but f-stops are represented with values like this: f/1.4, f/2, f/2.8, f/4, f/5.6, f/8, etc. The smaller the number the larger the aperture opening. So f/1.4 has a much larger aperture opening that does f/22, meaning much more light can enter the camera. This affects exposure, but it also affects depth of field.

Depth of Field

The depth of field is the amount of the photo that is considered acceptably sharp, with everything outside the depth of field getting progressively less sharp or more blurry. When it comes to the relationship between aperture and depth of field, the larger the aperture opening (the smaller the f-stop value) the less depth of field, meaning less of the photo will be in focus. Conversely, the smaller the aperture opening (the larger the f-stop value) the more depth of field, meaning more of the photo will be in focus.

Cherry Blossom Examples

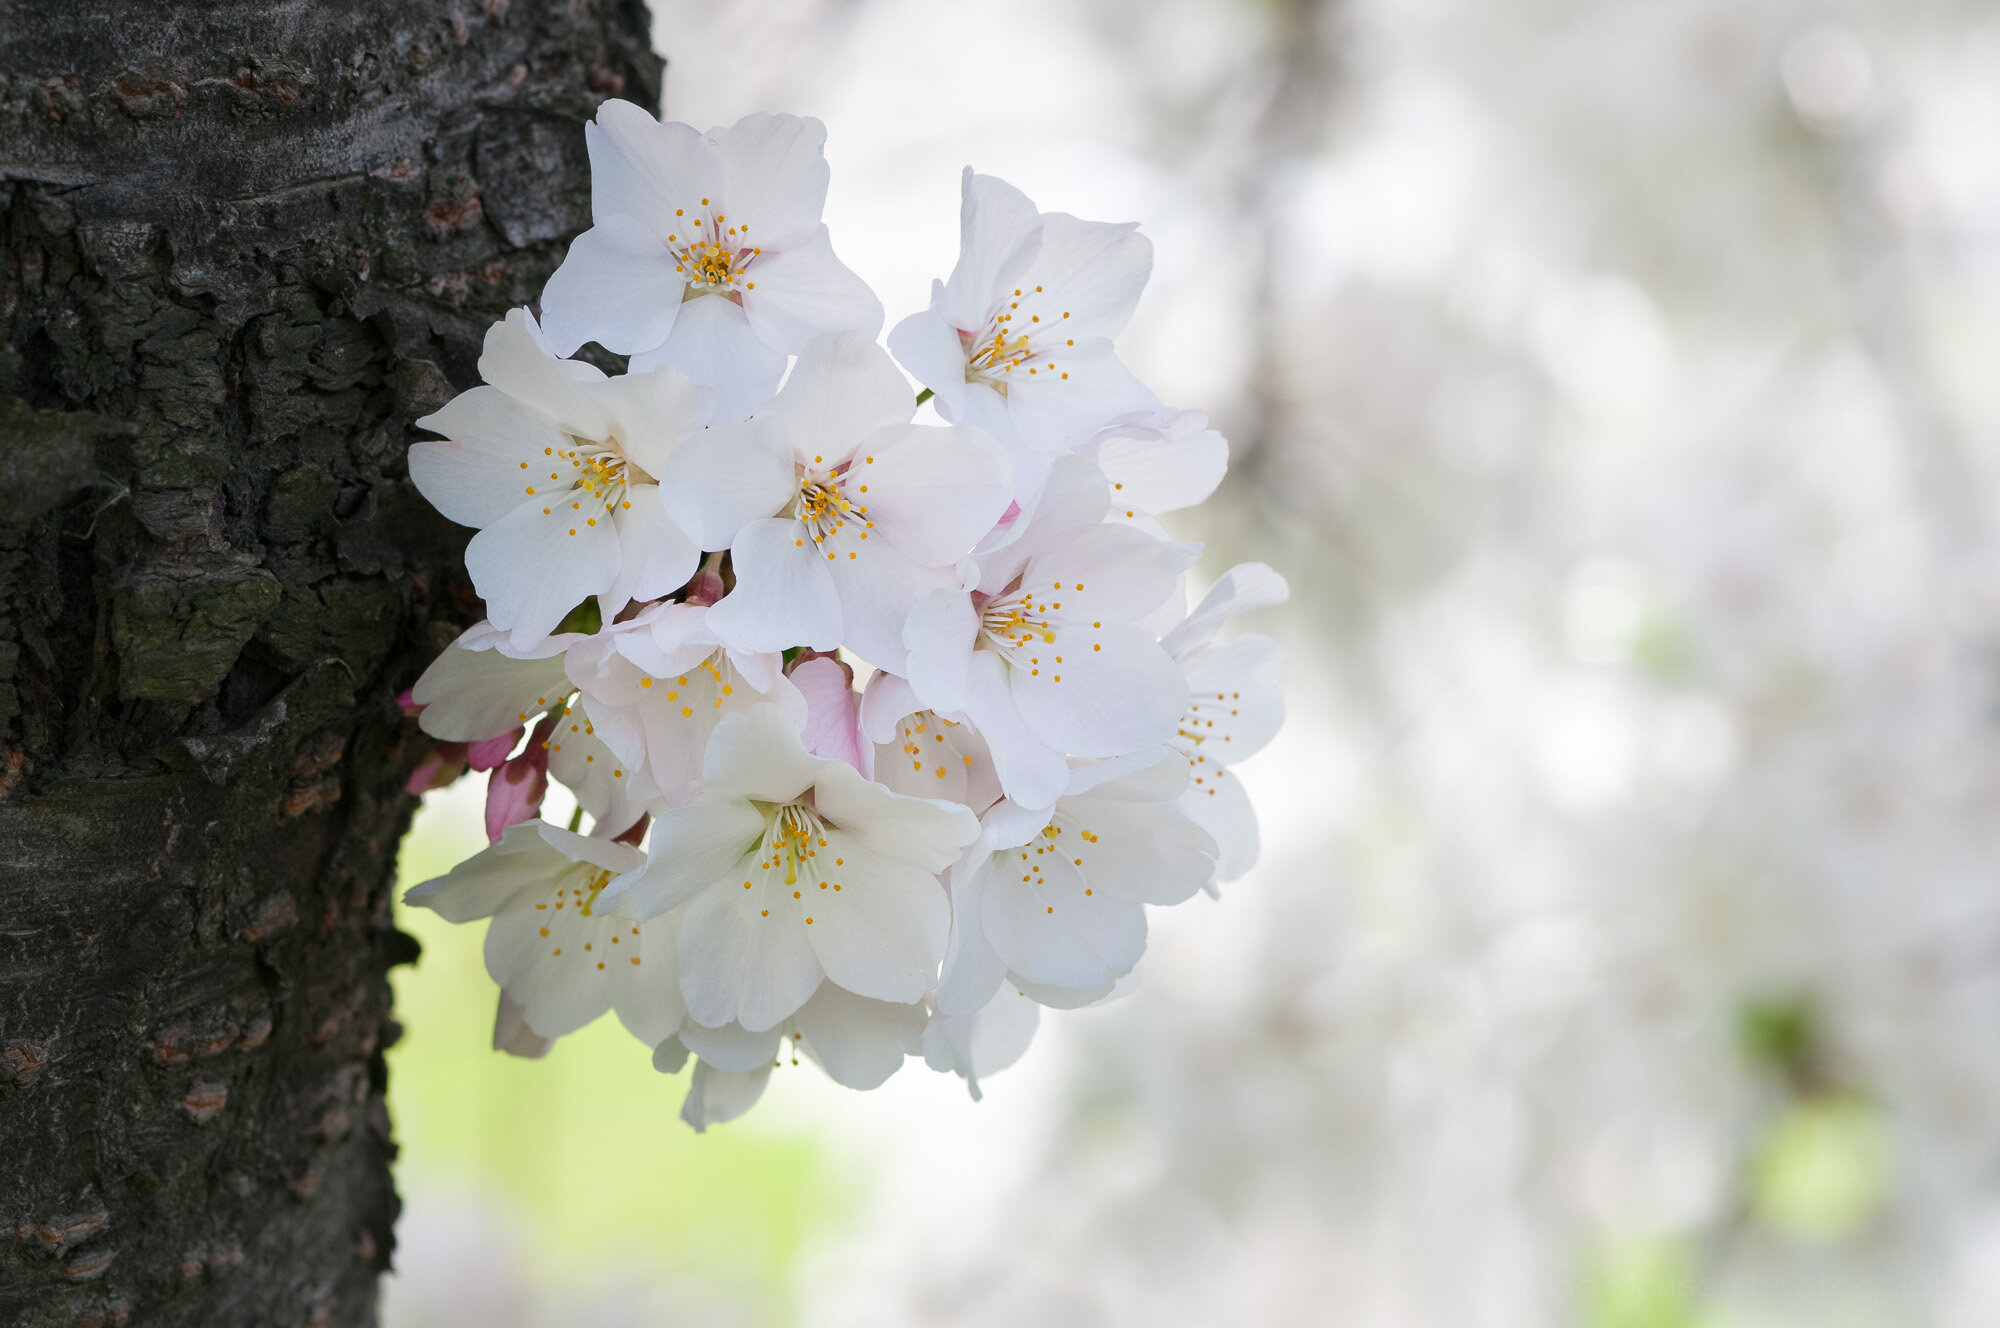
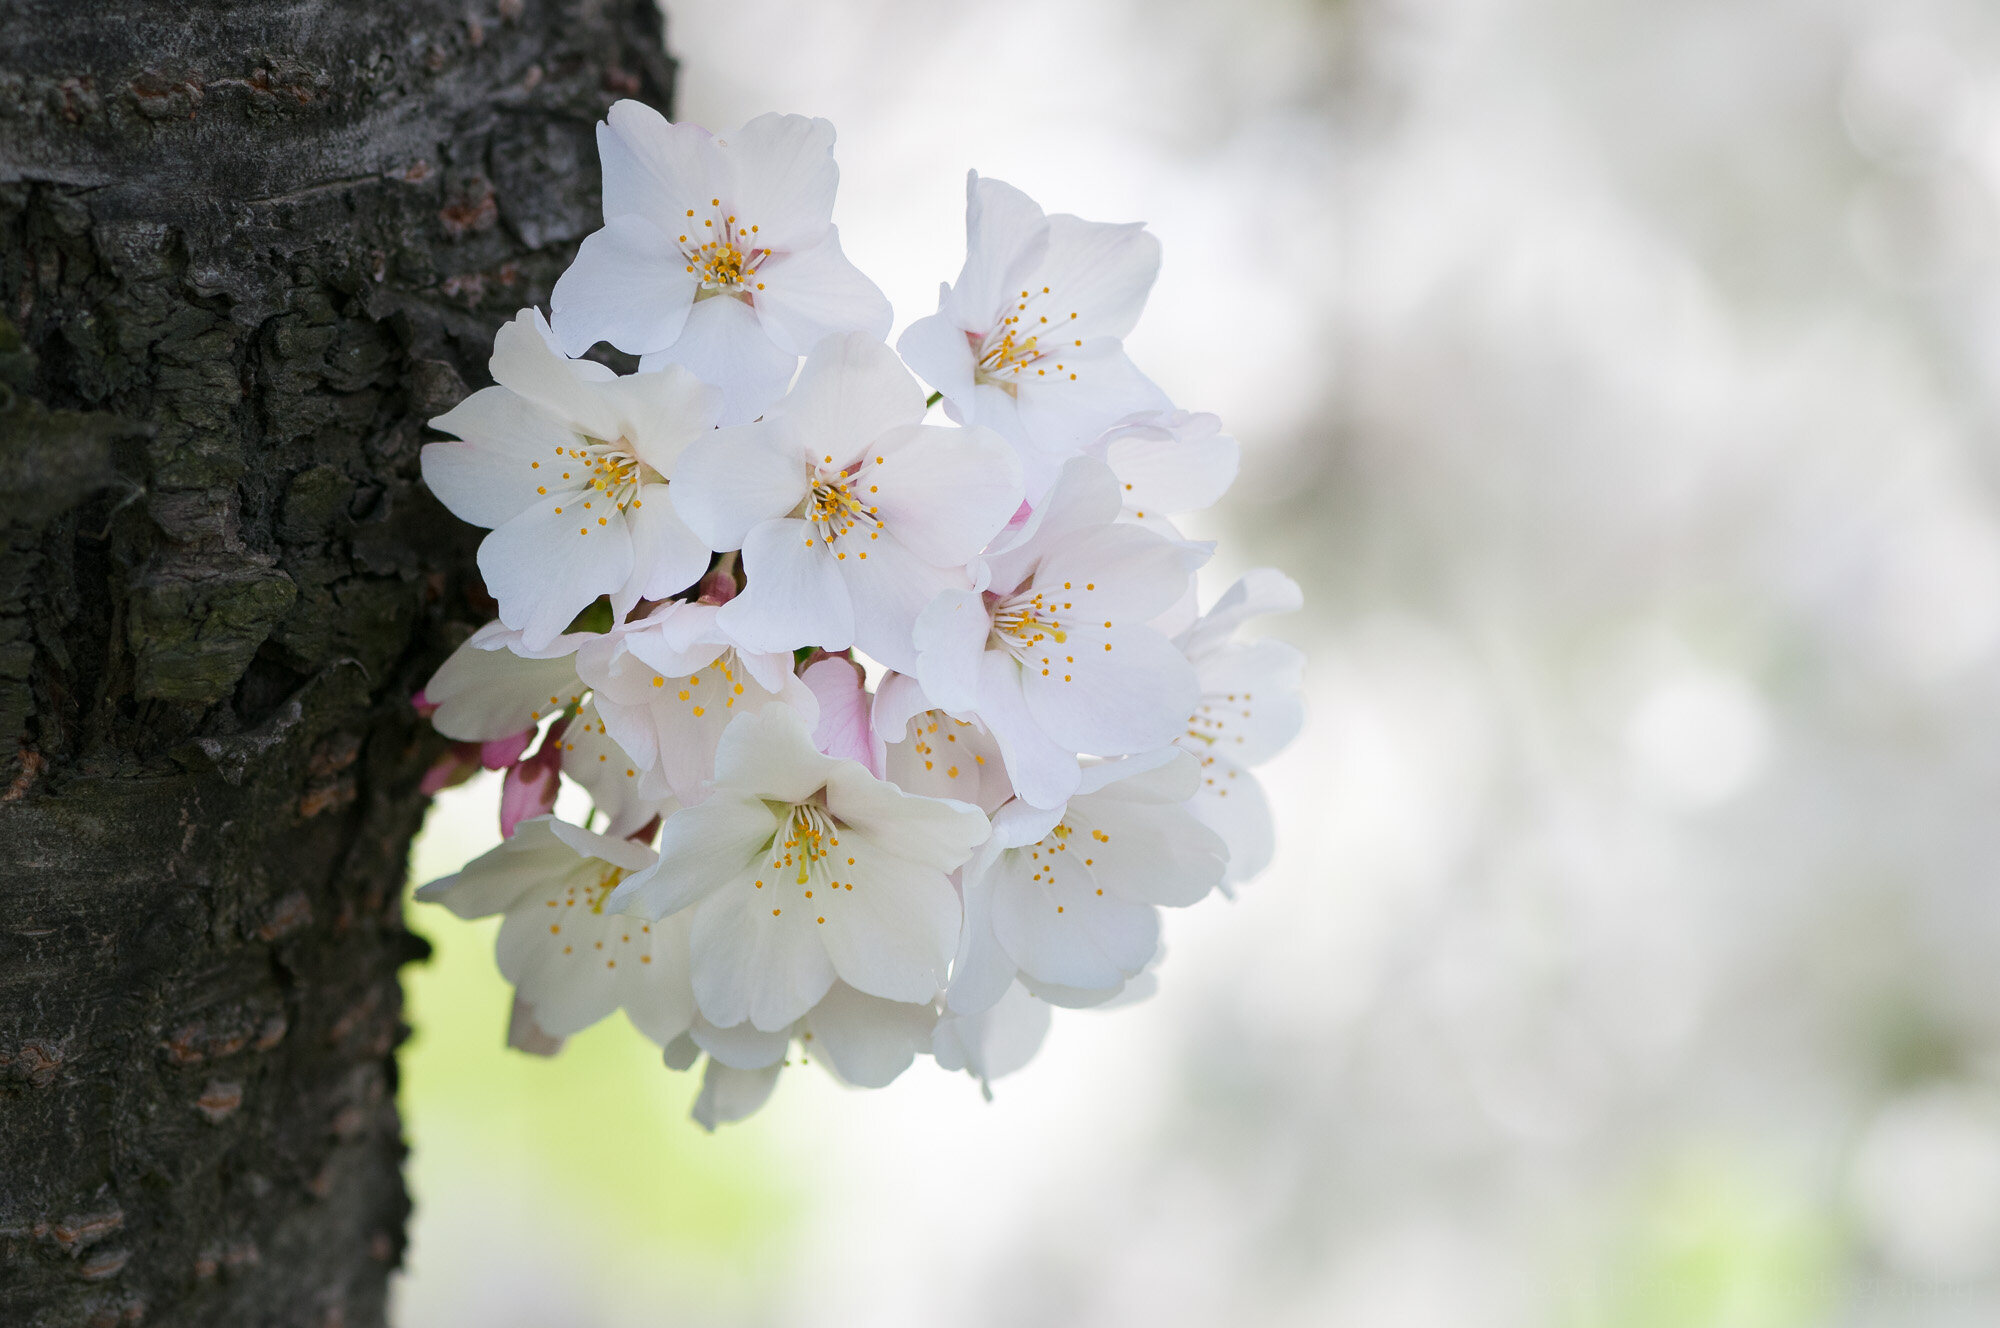
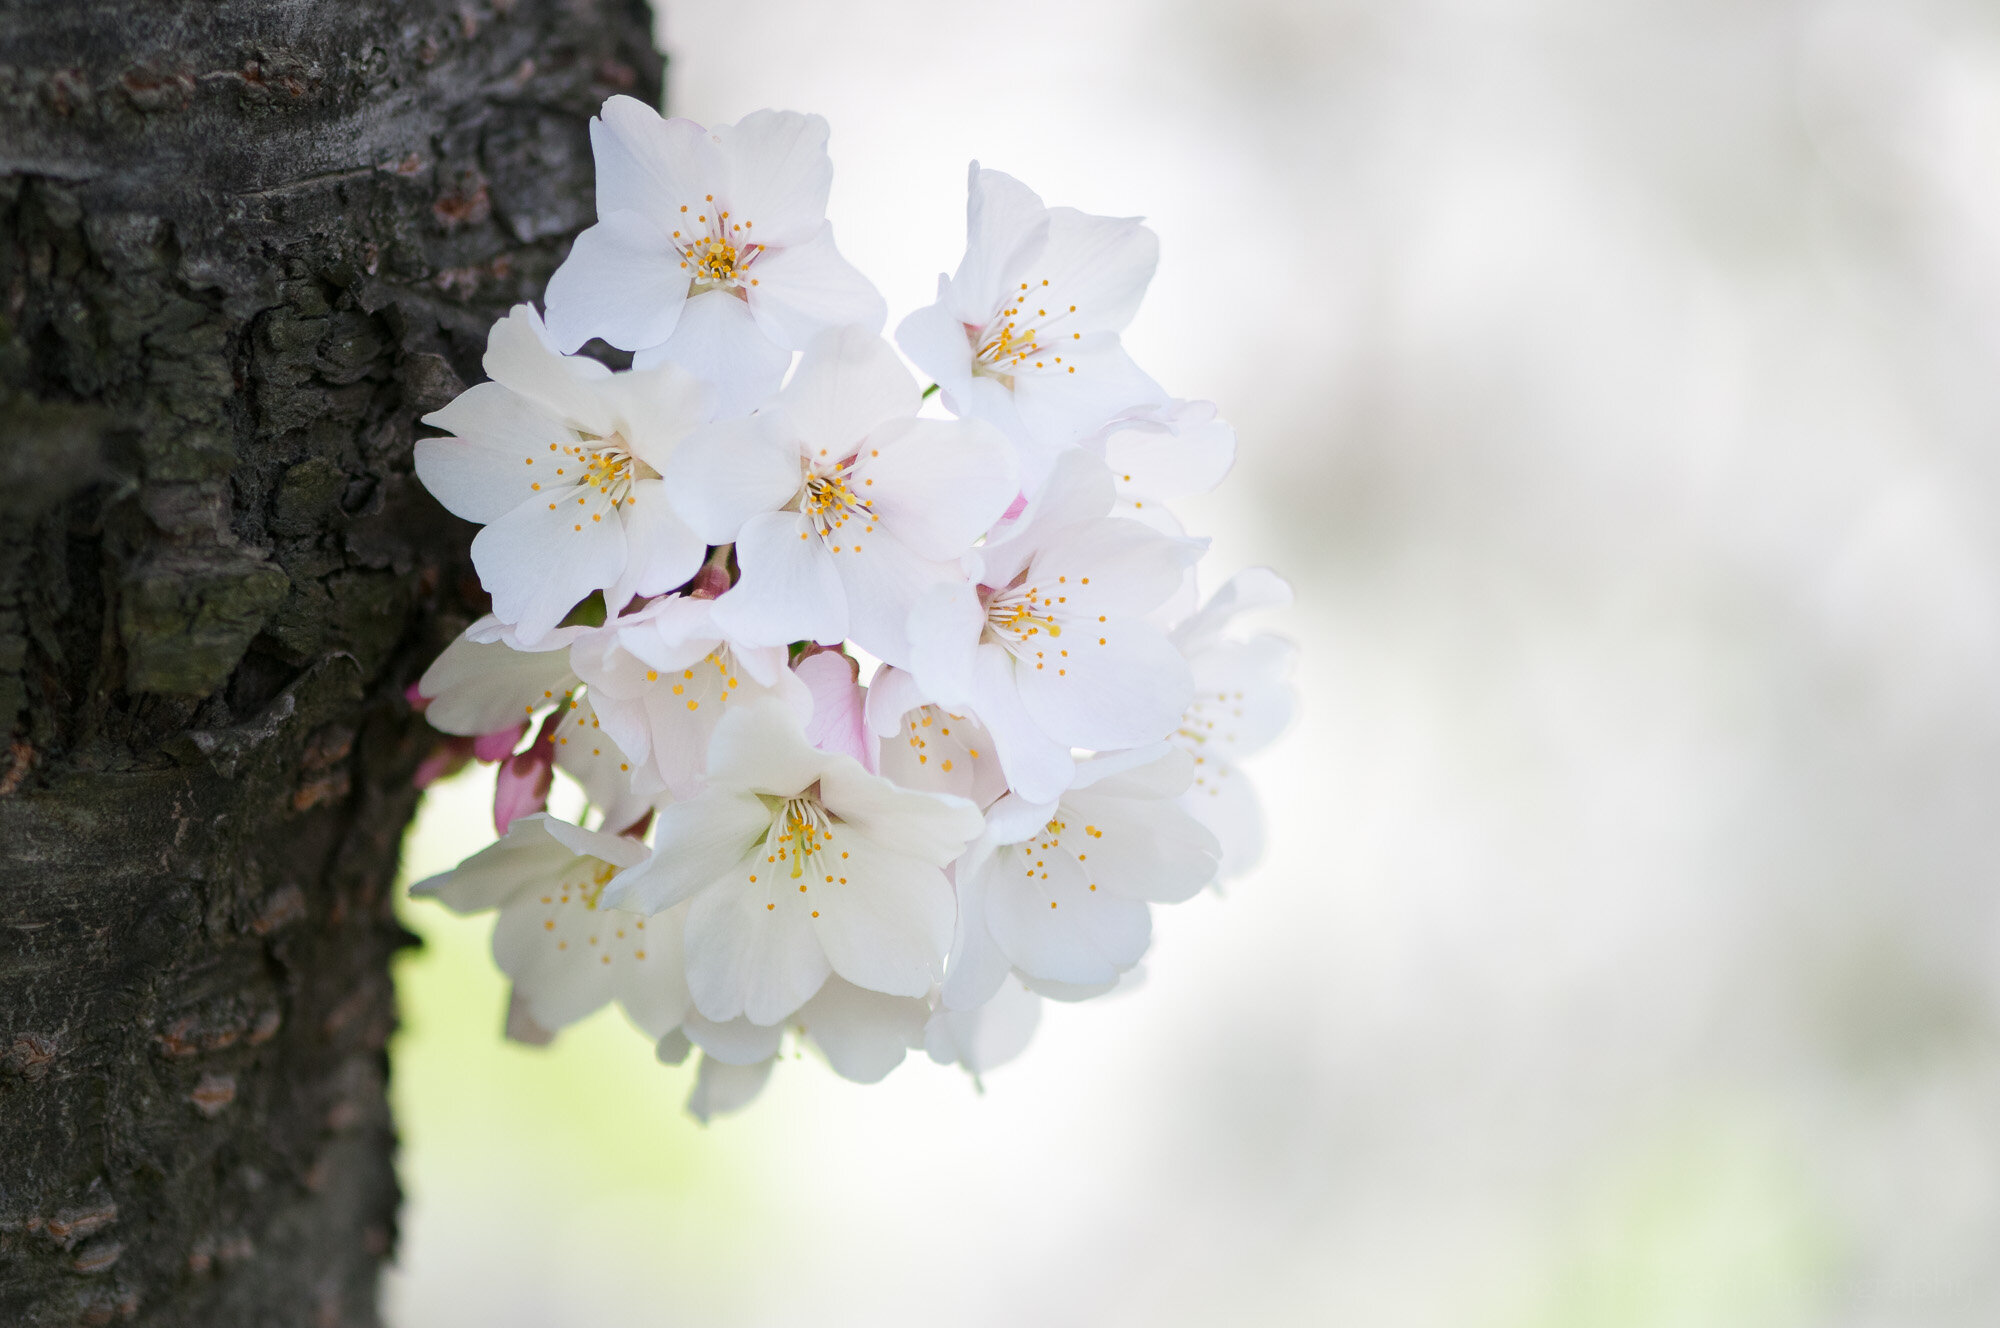
You can see an example of this in the photo at the top of the post and duplicated just below. The top portion of the photo has an aperture setting of f/3. You can see the background is very out of focus. The bottom portion has an aperture setting of f/16. You can see the background is still out of focus, but less so. Artistically, which do you prefer? There’s no right or wrong answer, just personal preference. And knowing how to adjust the aperture to give you the depth of field you want lets you be more creative with your photography.

The top half has an aperture opening of f/3 with shallower depth of field, the bottom half has an aperture opening of f/16 with more depth of field.

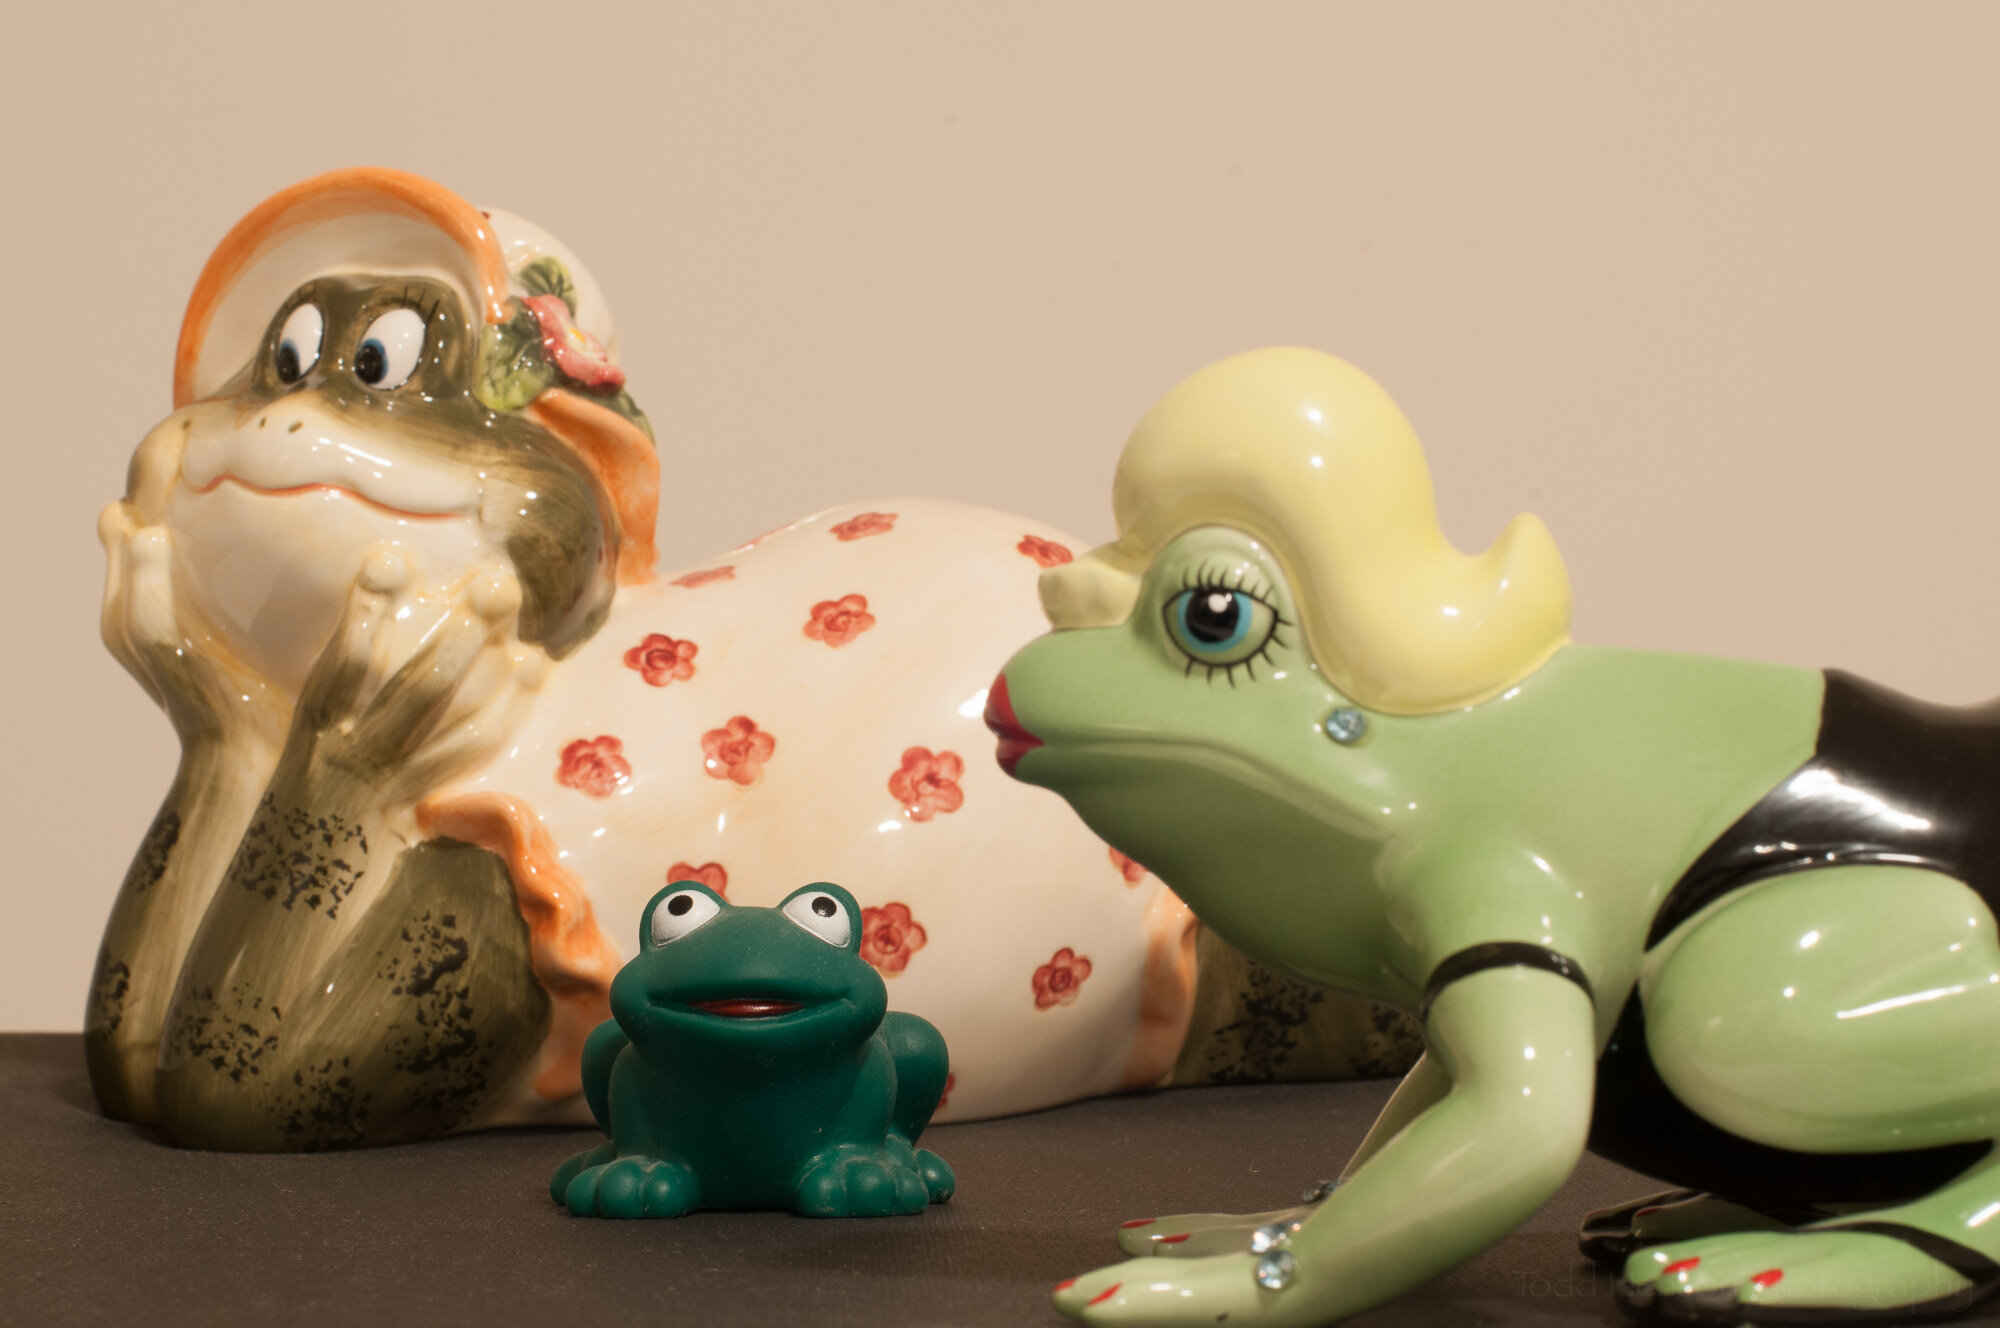
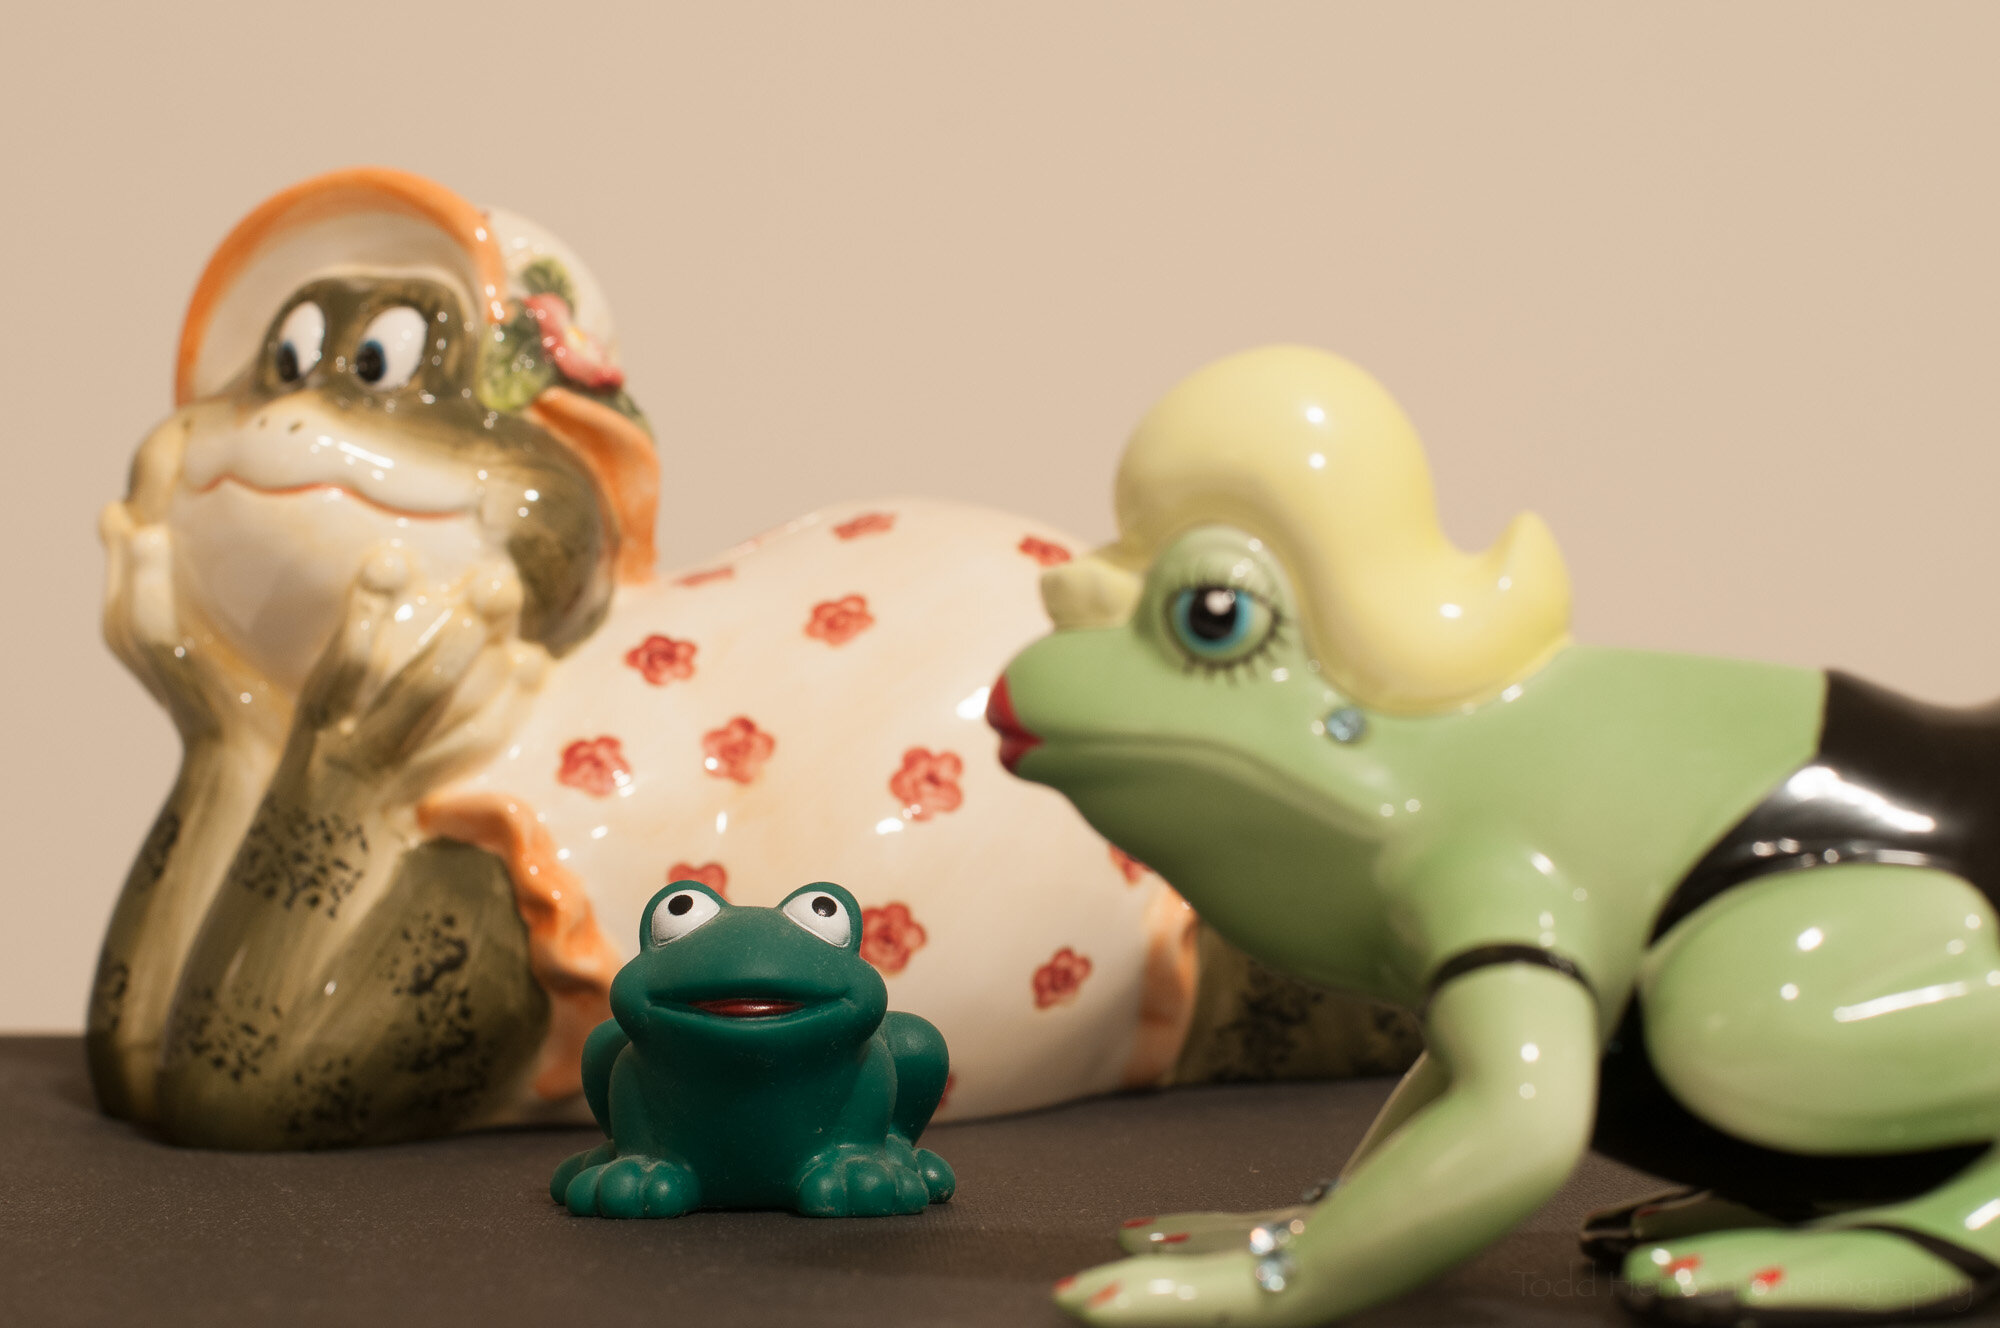
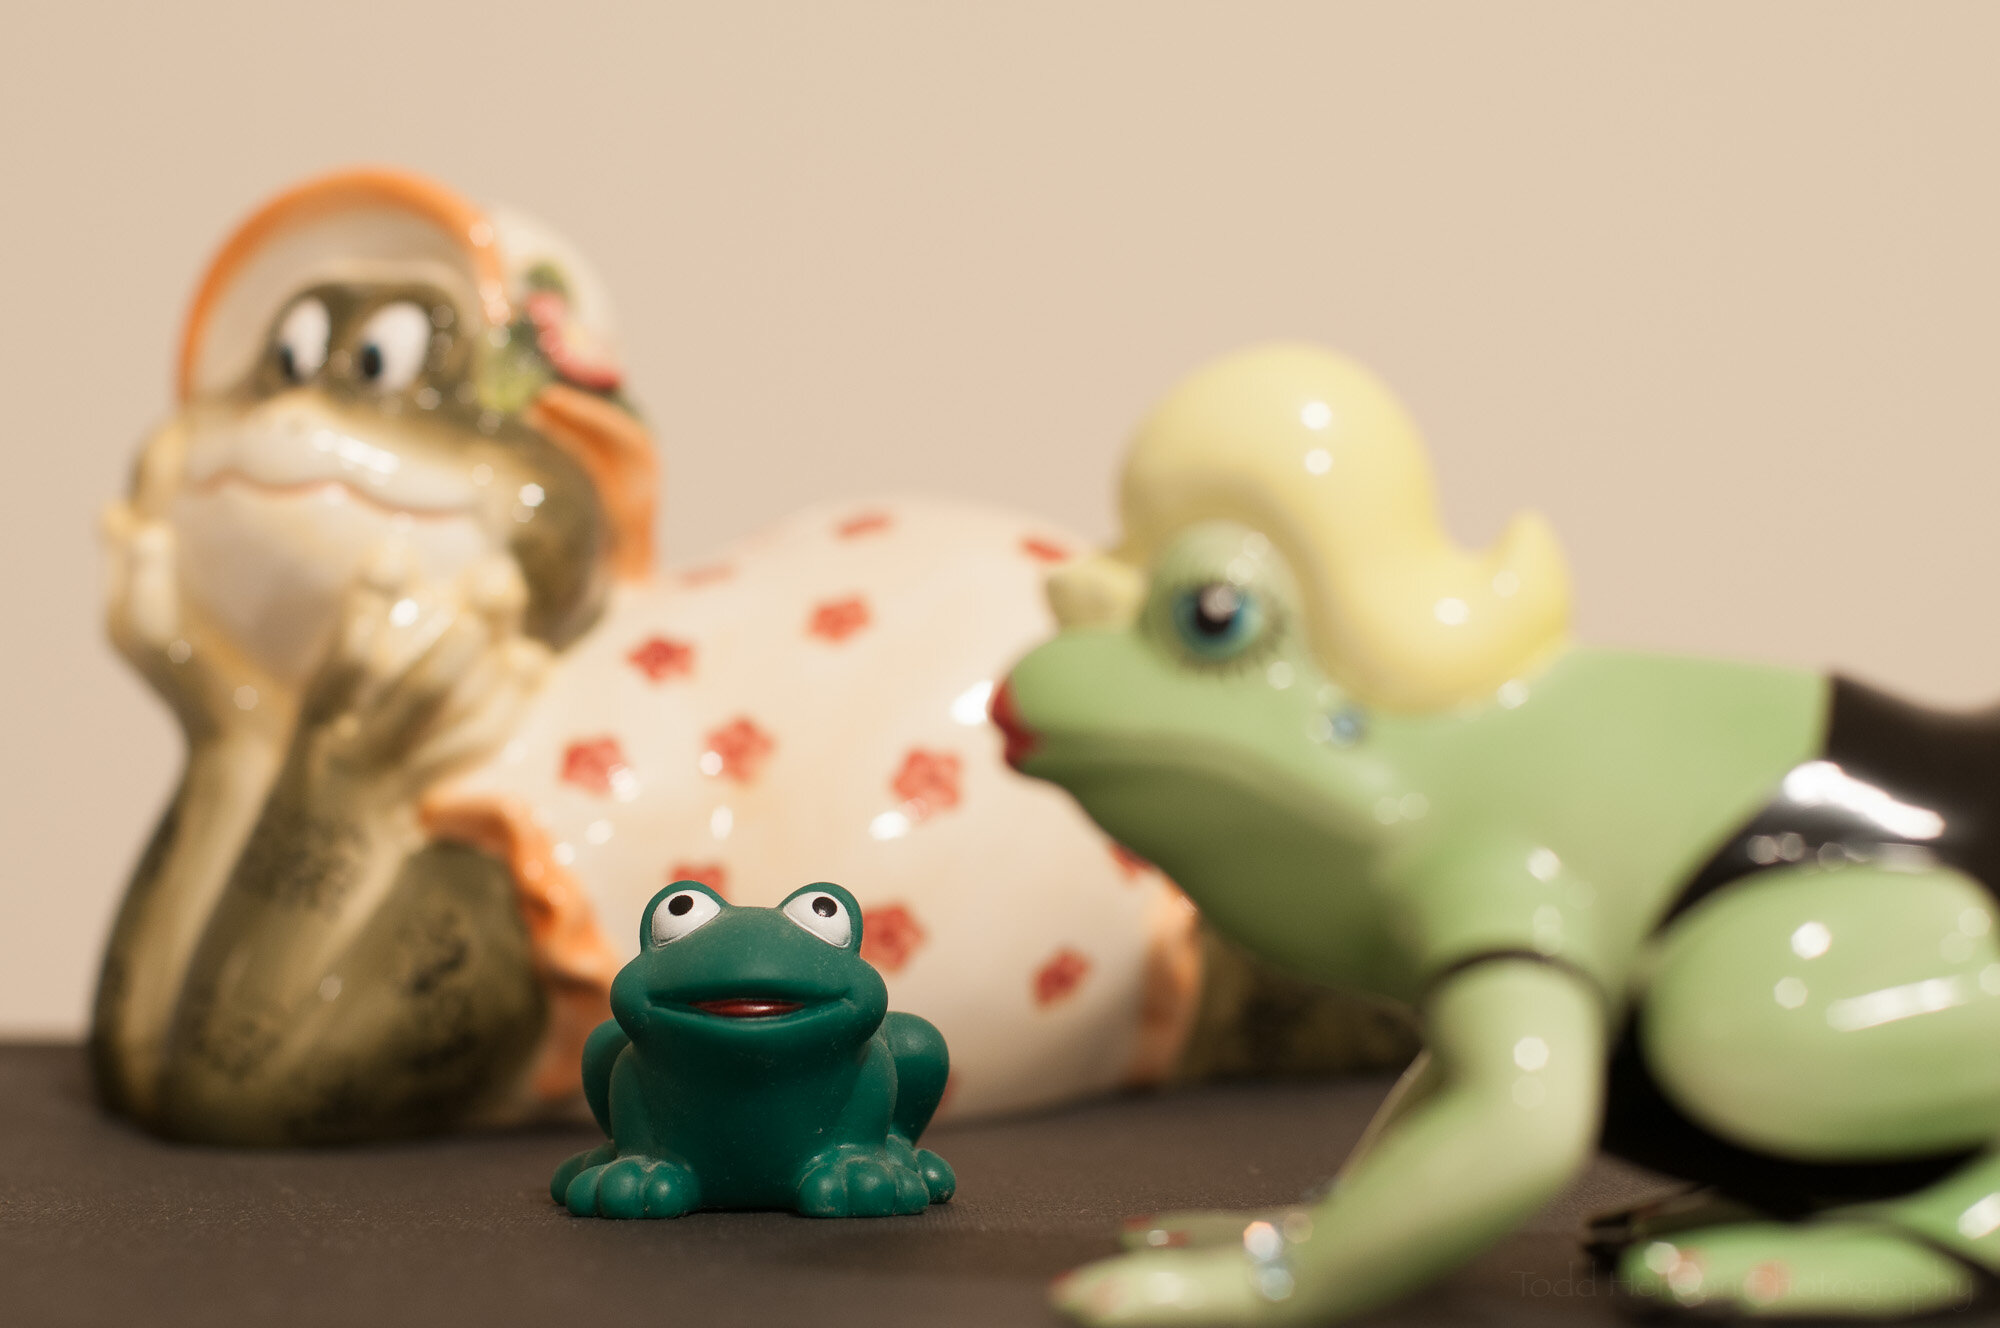
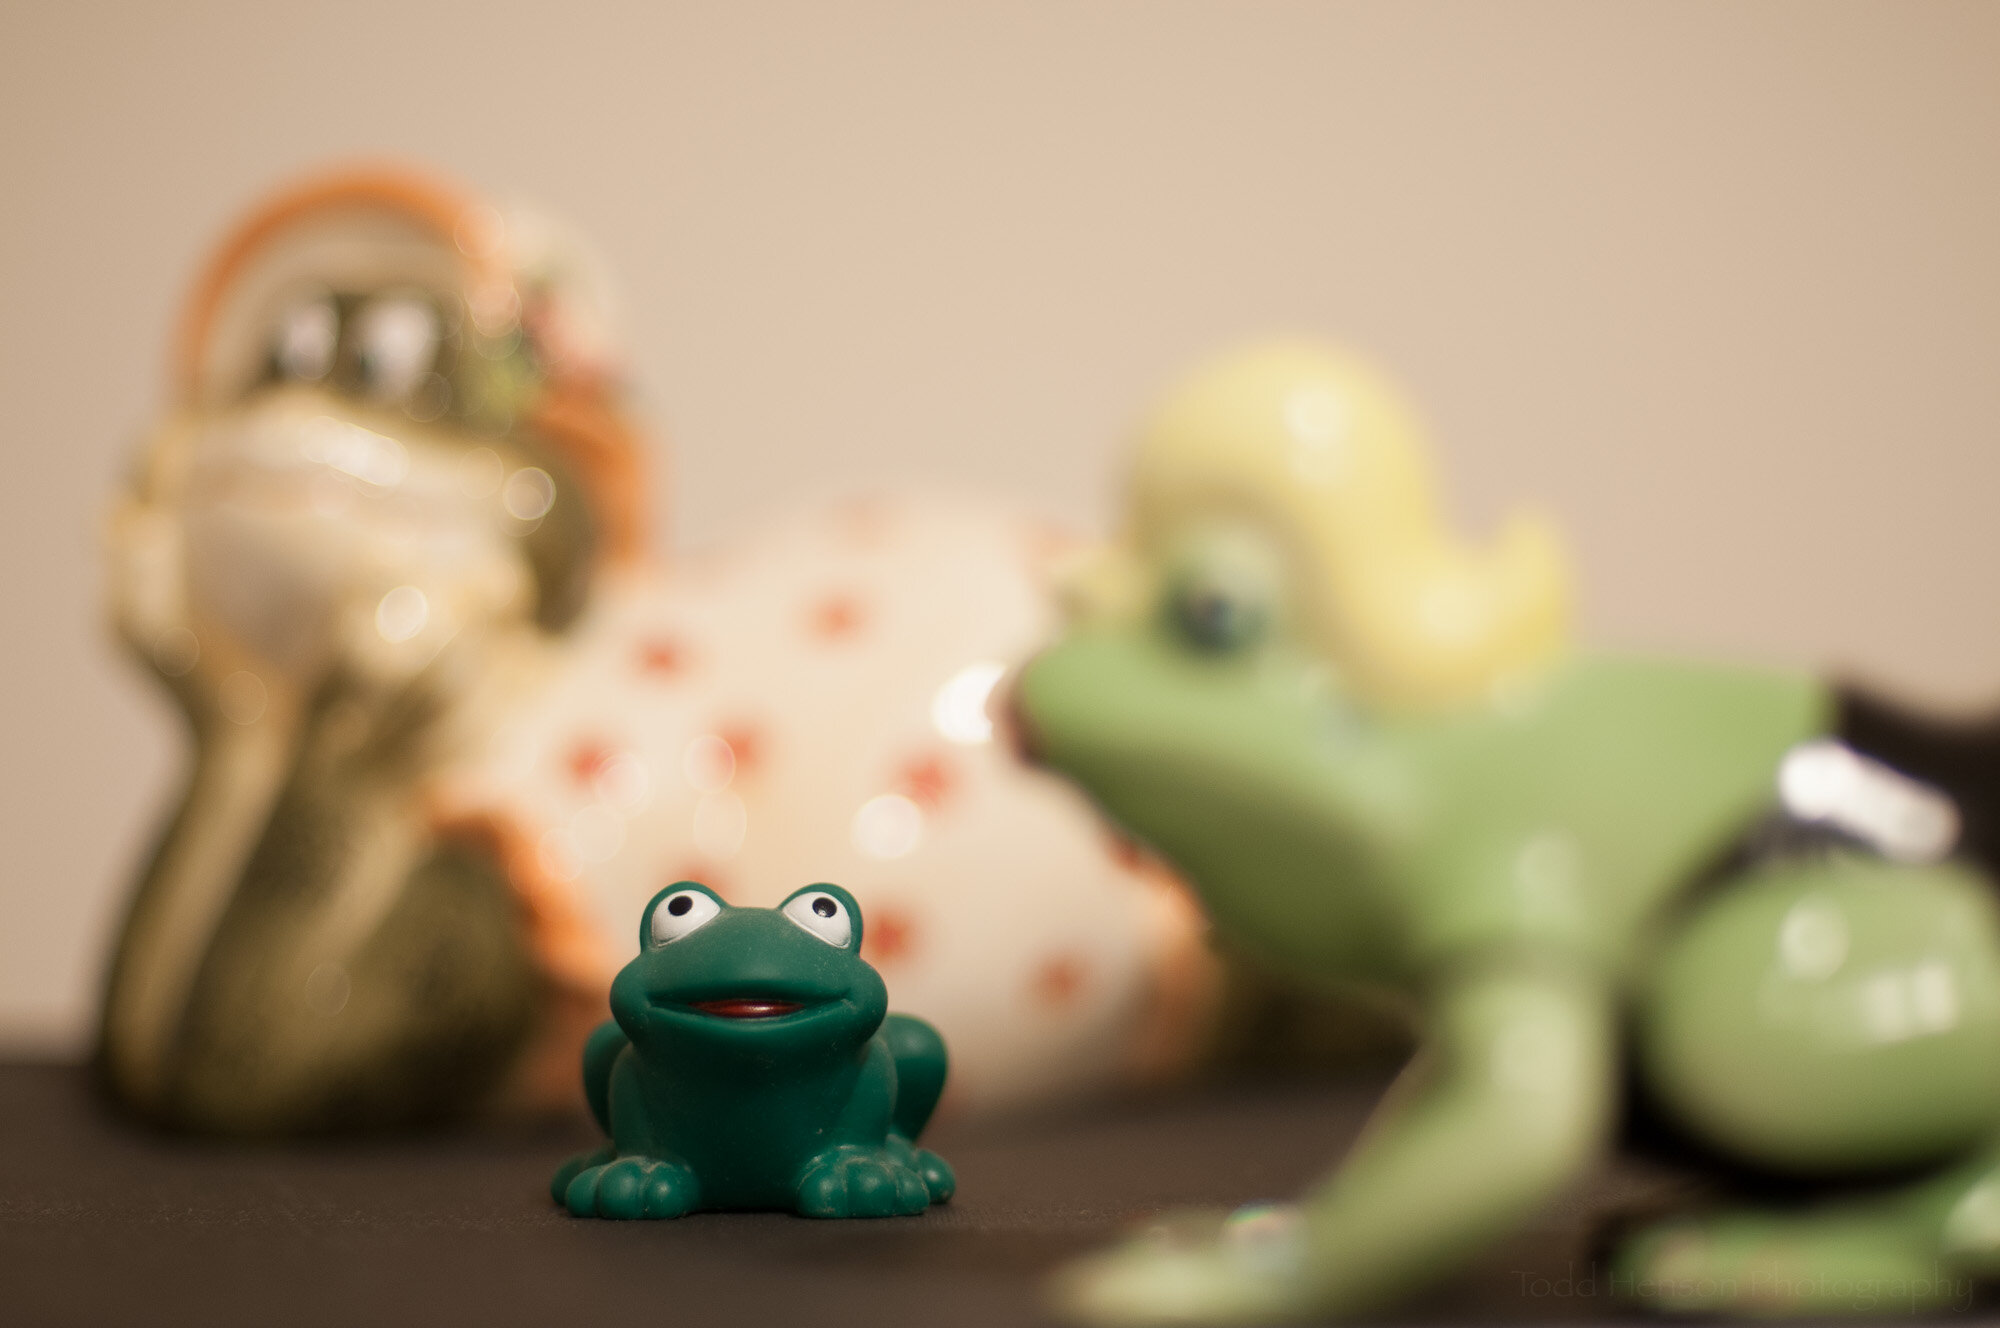
Click the images below to step through photos created with different aperture openings. Notice the differences in the look of the background, and even sometimes the foreground as the aperture opening gets larger, letting in more light but resulting in less depth of field.

Lens and Still Life Examples

And just to help demonstrate this further we’ll take a step away from cherry blossoms and look at an example using some still life subjects. First, below is an example of what the aperture in the lens actually looks like at different f/stop values using a 50mm lens.

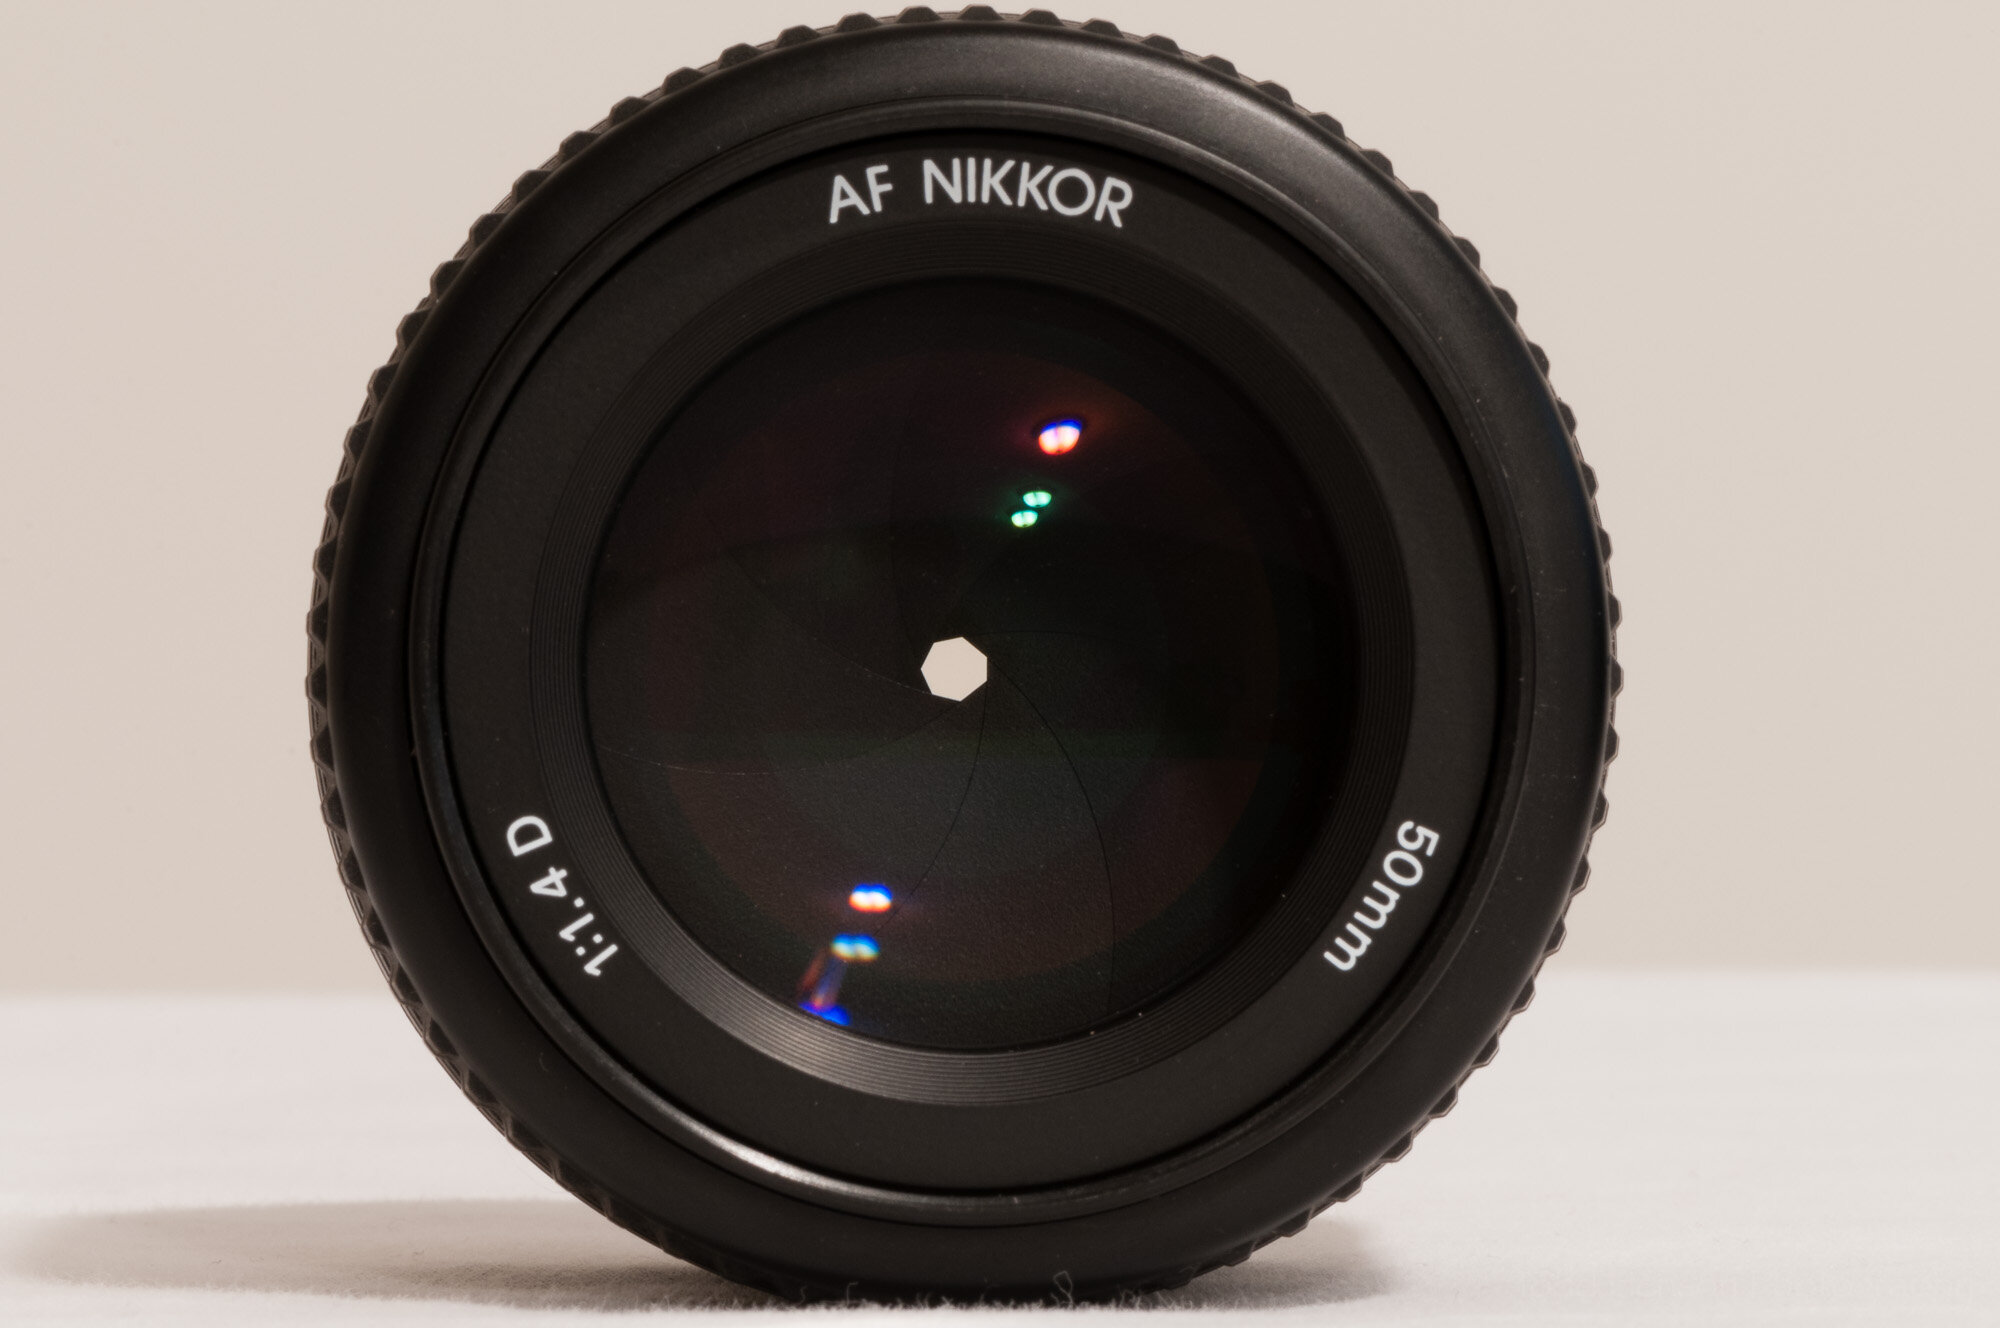
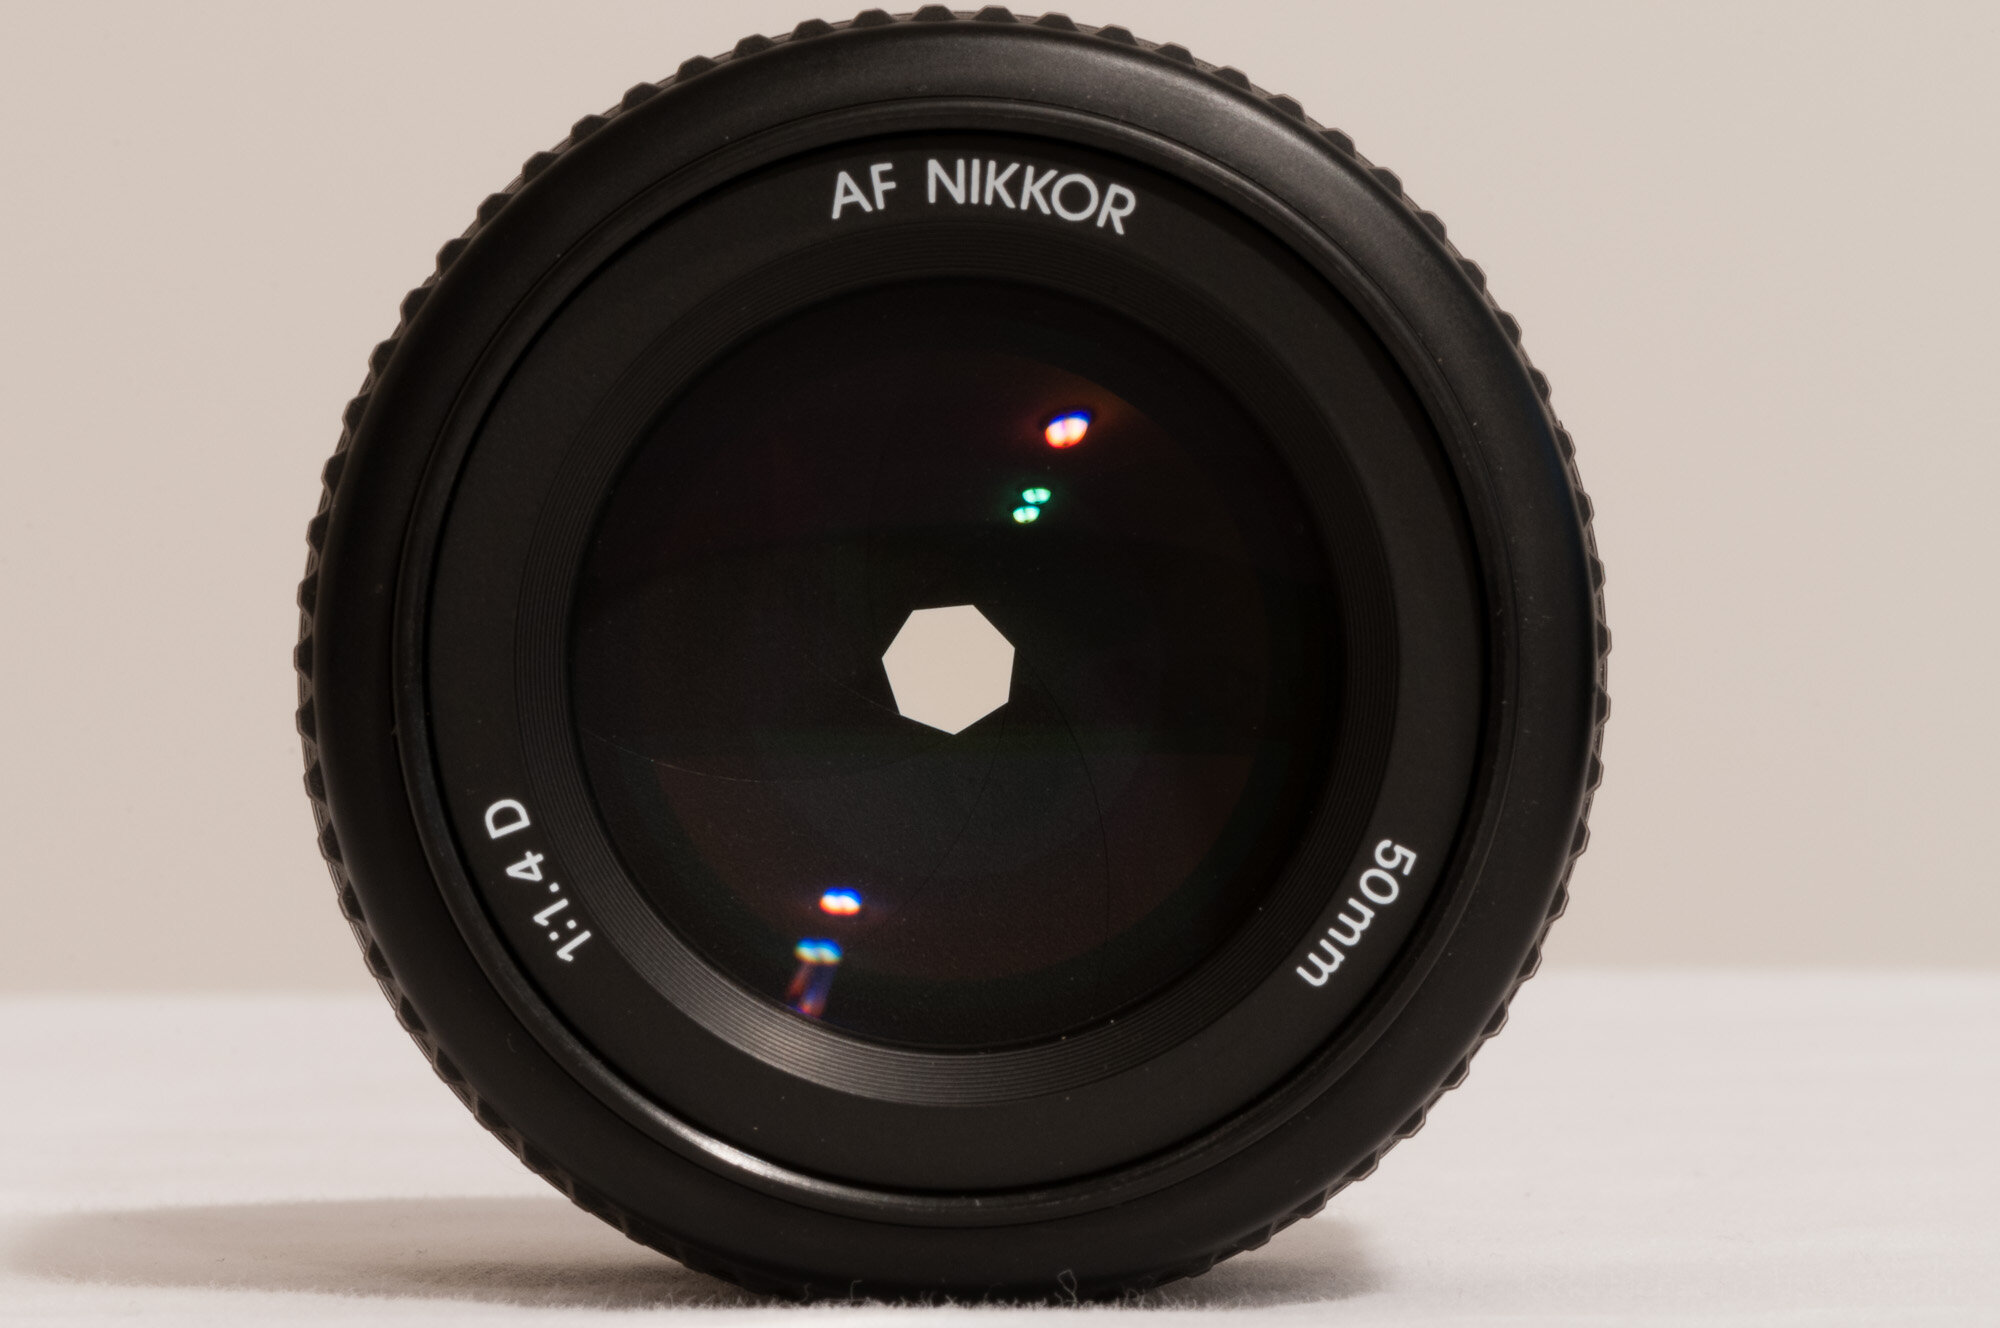
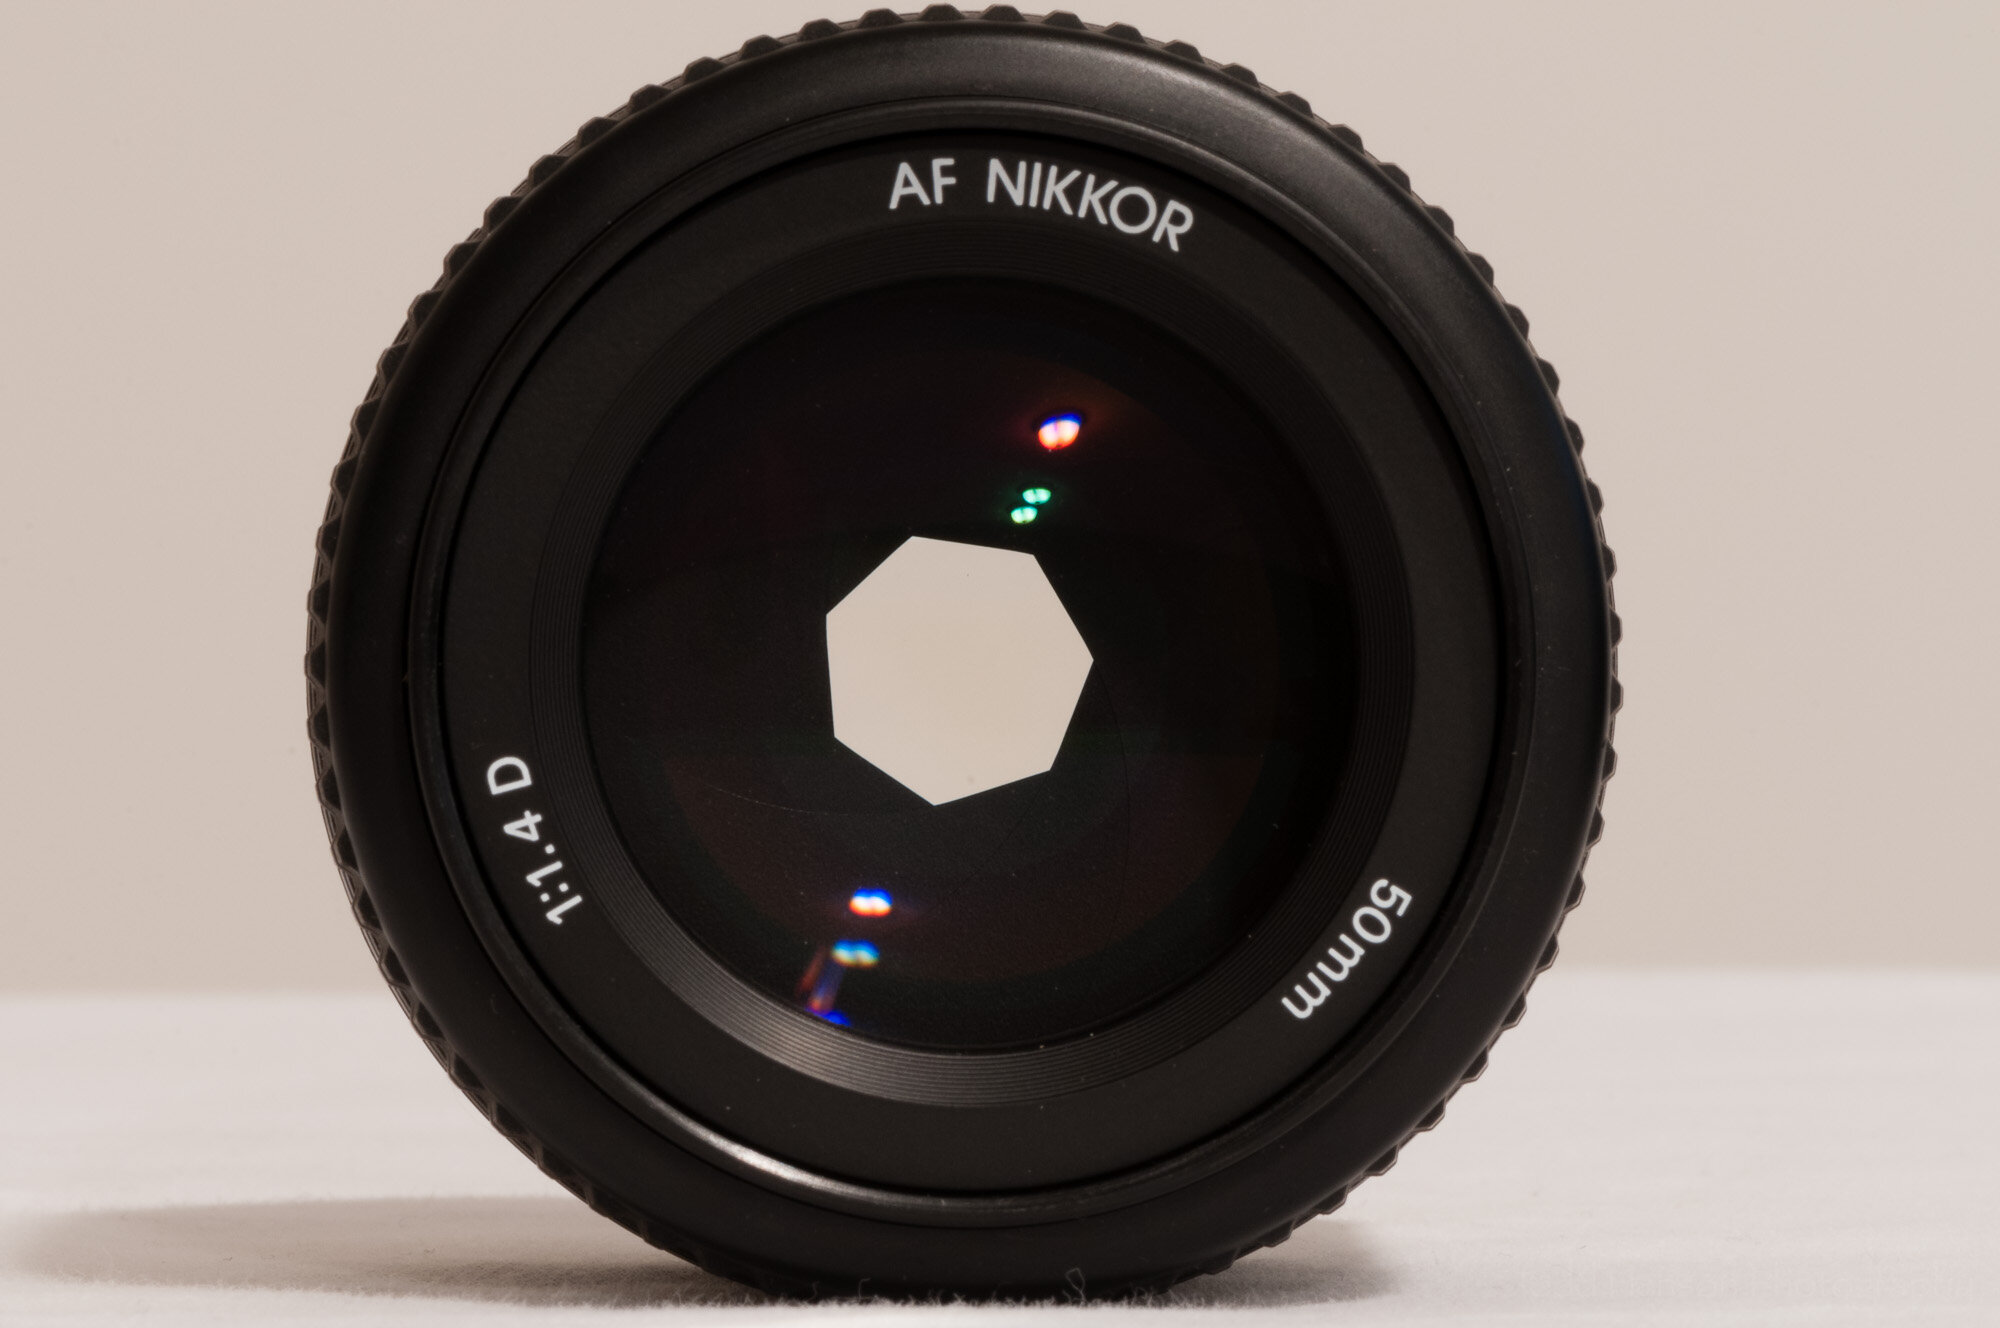
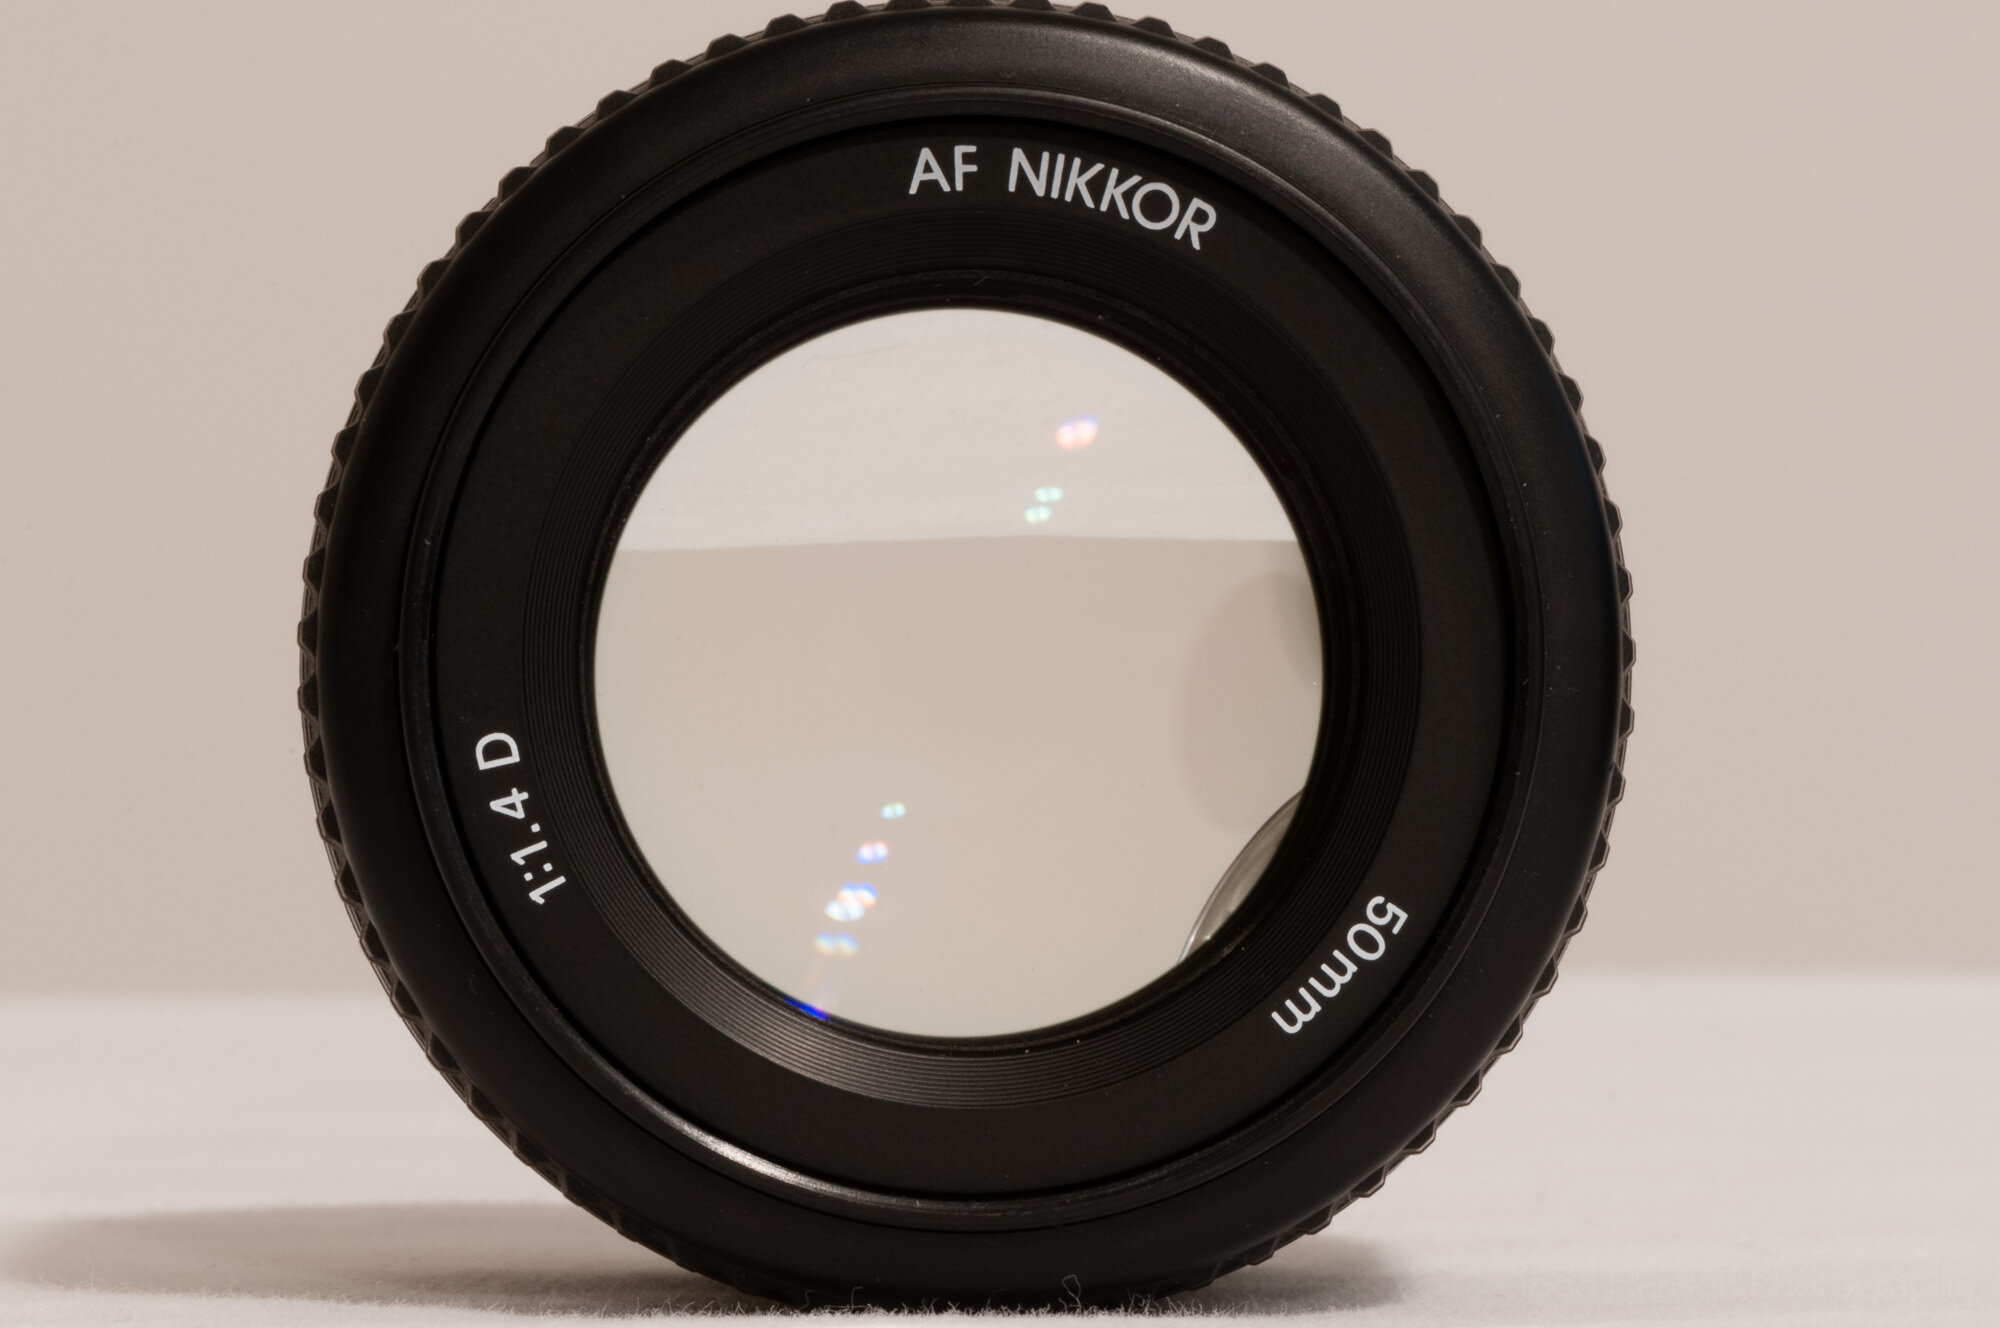
And now take a look at the still life examples where a photo was created at each aperture shown above. Step through both the lens photos above and the still life below so you can see how changing the aperture opening affects depth of field.

I hope this was helpful to some of you. Aperture is a great creative tool we have, so go out there and use it.


Do you enjoy these posts?

Sign up to receive periodic emails with updates and thoughts. Don’t worry, I won’t spam you. And please consider purchasing artwork or products from my online store, and using my affiliate links in the sidebar to the right when shopping online.

I appreciate your support!


2019 Manassas Airshow by Todd Henson

The Bealeton Flying Circus Wingwalkers

It’s been a few years since I attended an airshow, so this year my father and I made our way to the Manassas Regional Airport for the 2019 Manassas Airshow held on Saturday, May 4. This is only my second time at this show, and I certainly hope it’s not my last. I really enjoy these shows.

This year had some of the same performers as the last show we attended, but it also had new ones to add a little variety. And some of the same pilots were flying different aircraft. The weather looked somewhat questionable at first, with the possibility of rain, and some low lying clouds. Thankfully it cleared enough by noon that the aerial performers were given the go-ahead.

Click on any of the photographs for a larger view.

RJ Gritter and his Bellanca Decathalon

RJ Gritter was flying his Bellanca Decathalon, performing some amazing aerobatics, trailing white smoke through most of the show. His plane is painted in red, white and blue.

RJ Gritter pulling up in his Bellanca Decathalon

RJ Gritter flying by in his Bellanca Decathalon

The Flying Circus Wingwalkers

The wingwalkers from the Bealeton Flying Circus always put on an amazing performance. Chuck Tippett flies their Stearman biplane while Joe Bender climbs out on the wings to perform a number of different incredible moves. He flies like superman, stands atop the plane, and this year they also flew the US flag. Beautiful sight.

Look closely to see Joe Bender flying like Superman between the wings of the Stearman biplane, flown by Chuck Tippett, of the Bealeton Flying Circus.

Chuck Tippett and Joe Bender of the Bealeton Flying Circus flying a US flag atop their Stearman biplane.

Art Nalls and his L-29 Albatross

Art Nalls performed this year in his L-29 Albatross, a very maneuverable jet flown by a very capable pilot.

Art Nalls performing a flyby in his L-29 Albatross.

Art Nalls and his L-29 Albatross may look like they are floating above the runway because of the fast shutter speed I used, but he was, in fact, flying by quite fast.

The Bealeton Flying Circus

This year the Bealeton Flying Circus flew four of their biplanes in formation, circling the airport a number of times. They looked amazing as they turned against clouds, the sun highlighting each plane. I’d love to visit Bealeton and see them perform on their home turf.

Four biplanes from the Bealeton Flying Circus flying in formation against the cloudy sky.

The Bealeton Flying Circus Stearman biplans flying in formation.

Lee Leet and his Super Tucano

I love the look of Lee Leet’s Super Tucano, a turboprop aircraft that was a lot of fun to watch.

Lee Leet flying his Super Tucano.

Lee Leet landing his Super Tucano.

Chef Pitts and his Pitts S1S

Chef Pitts performed some absolutely incredible aerobatics in his small red Pitts S1S. This guy was absolutely amazing. There’s no way I could list all the incredible moves he performed. This was one of my favorite parts of the airshow.

Chef Pitts and his amazingly aerobatic Pitts S1S biplane.

Chef Pitts taking his Pitts S1S down for a 1-wheeled landing.

Warrior Flight Team

The Warrior Flight Team was back, flying a pair of Czechoslovakian L-39 jets, piloted by Charlie “V+12” VandenBossche and LCDR Mark “Crunchy” Burgess. Awesome performance.

Charlie “V+12” VandenBossche and LCDR Mark “Crunchy” Burgess of Warrior Flight Team performing a synchronized flyby in their L-39’s.

One of the Warrior Flight Team L-39’s coming in from a distance, trailing smoke.

US Air Force A-10 Demonstration Team

One of the highlights of this years show was the performance by the US Air Force A-10 Demonstration Team. I have always loved the A-10, both the look of it, and the way it moves. It’s such an incredible and capable aircraft, and they did a great job showing off some of its capabilities.

USAF A-10 Thunderbolt performing a flyby.

USAF A-10 Thunderbolt quickly changing orientation. Notice the air being forced over the tops of the wings near the fuselage and trailing from their tips.

P-51 Mustang in the Parade of Planes

At the end of the show was the Parade of Planes, where a large number of aircraft all took to the sky, one at a time, most of which had not performed in the airshow. One of the highlights for me was an absolutely gorgeous shiny silver P-51 Mustang. I just love the look of this aircraft.

P-51 Mustang taking off. The rear tire has already left the runway.

US Marine Super Stallion CH-53 and the Crowds

In addition to the performances, the Manassas Airshow included a nice collection of static displays. The photo here shows some of the crowd walking around the show, along with a US Marine Super Stallion CH-53 helicopter in the background. The tail of the helicopter was open, with folks lining up to walk through it.

Crowds walking around the 2019 Manassas Airshow, with a US Marine Super Stallion CH-53 helicopter in the background.

Final Thoughts

I had a great time at the 2019 Manassas Airshow. These shows always seem to be over far too quickly. I do wonder sometimes if I should try attending one without bringing a camera, so I can just relax and watch the show. But I really enjoy photographing them, so that would be tough to do.

This year I decided to use my 200-400 mm f/4 lens, a large and slightly heavy lens, but one that works really well for these shows. Though it’s a bit heavy, it’s still light enough to hand hold for short bursts as the planes fly by. A lighter lens would be nice, though. In the past I’ve also used and been happy with a 70-200 mm.

I found myself switching back and further between aperture priority mode and shutter priority mode. I used shutter priority for the slower flying propellor-based aircraft so I could capture motion in the propellers. And I used aperture priority for the faster flying jets to get a faster shutter speed. In the future I think I will just stick to shutter priority and adjust the shutter speed as I see fit. I don’t really know why I kept flipping to aperture priority, other than that’s the setting I most often use.

For the fast moving jets I tended to use a much faster shutter speed, for example 1/1000 to 1/3000 of a second. That helped assure I captured sharp images of the jets, though in one case it captured the L-29 Albatross seemingly hovering over the runway, when in fact it was moving very fast. I should have used a slower shutter speed in that case to blur the background as I panned with the jet.

When the propeller aircraft were flying I lowered my shutter speed to between 1/25 to 1/125 of a second. This increased the chances of blurry photographs, but it assured I’d capture movement in the propeller. If you use a fast shutter speed you may freeze the propeller, which looks very strange when the aircraft is in the air. This also helped blur the background as I panned with the planes when they flew low enough to see trees behind the planes.

This year was a great year for the Manassas Airshow. I thoroughly enjoyed myself. I very much look forward to attending again in the future. If you’ve never been to an airshow I’d highly recommend you give one a try.


Do you enjoy these posts?

Sign up to receive periodic emails with updates and thoughts. Don’t worry, I won’t spam you. And please consider purchasing artwork or products from my online store, and using my affiliate links in the sidebar to the right when shopping online.

I appreciate your support!


Choice of Aperture for a Clematis in the Garden by Todd Henson

A clematis in the garden (shot with an aperture of f/4).

One day while visiting my folks I was taken by the sight of this beautiful purple clematis flowering in their garden, hanging from a black metal trellis. Thankfully I had my camera with me that day, though only a single lens, the 16-35mm f/4. I don’t often use this lens for photographing flowers, but it seemed like a good time to start.

The photos in this post show 3 different angles I tried when photographing these lovely flowers. They weren’t all that high off the ground so I used the 35mm end of the zoom to focus in on the flower without too much distracting background. Then I experimented with framing and with aperture.

An example at aperture f/8.

An example at aperture f/4.

I most often use the 16-35mm when I’d like a lot of depth of field. Wide angle lenses are usually good at providing this. But when photographing these clematis I was more interested in a shallow depth of field. The widest aperture of this lens is f/4 and that ended up being the aperture I used for my favorite shots of this series. I did, however, create 2 images at f/8 to show you the difference this makes.

I held the lens physically close to the subject, probably very close to the minimum focusing distance of the lens. Even with an aperture of f/8 the background is nicely blurred, but it does still have some detail. Notice the difference when I opened the aperture one more stop to f/4, its widest setting. It throws the background even more out of focus, but it also throws some of the main flower out of focus.

An example at aperture f/8.

An example at aperture f/4.

There’s no right or wrong in these situations. It all depends on what look you are going for. For myself, I tend to prefer the images with a shallower depth of field. Which do you prefer?


Do you enjoy these posts?

Sign up to receive periodic emails with updates and thoughts. Don’t worry, I won’t spam you. And please consider purchasing artwork or products from my online store, and using my affiliate links in the sidebar to the right when shopping online.

I appreciate your support!