Washington Monument

Before & After: Dawn Reflections of the Washington Monument by Todd Henson

A before & after look at Dawn Reflections of the Washington Monument

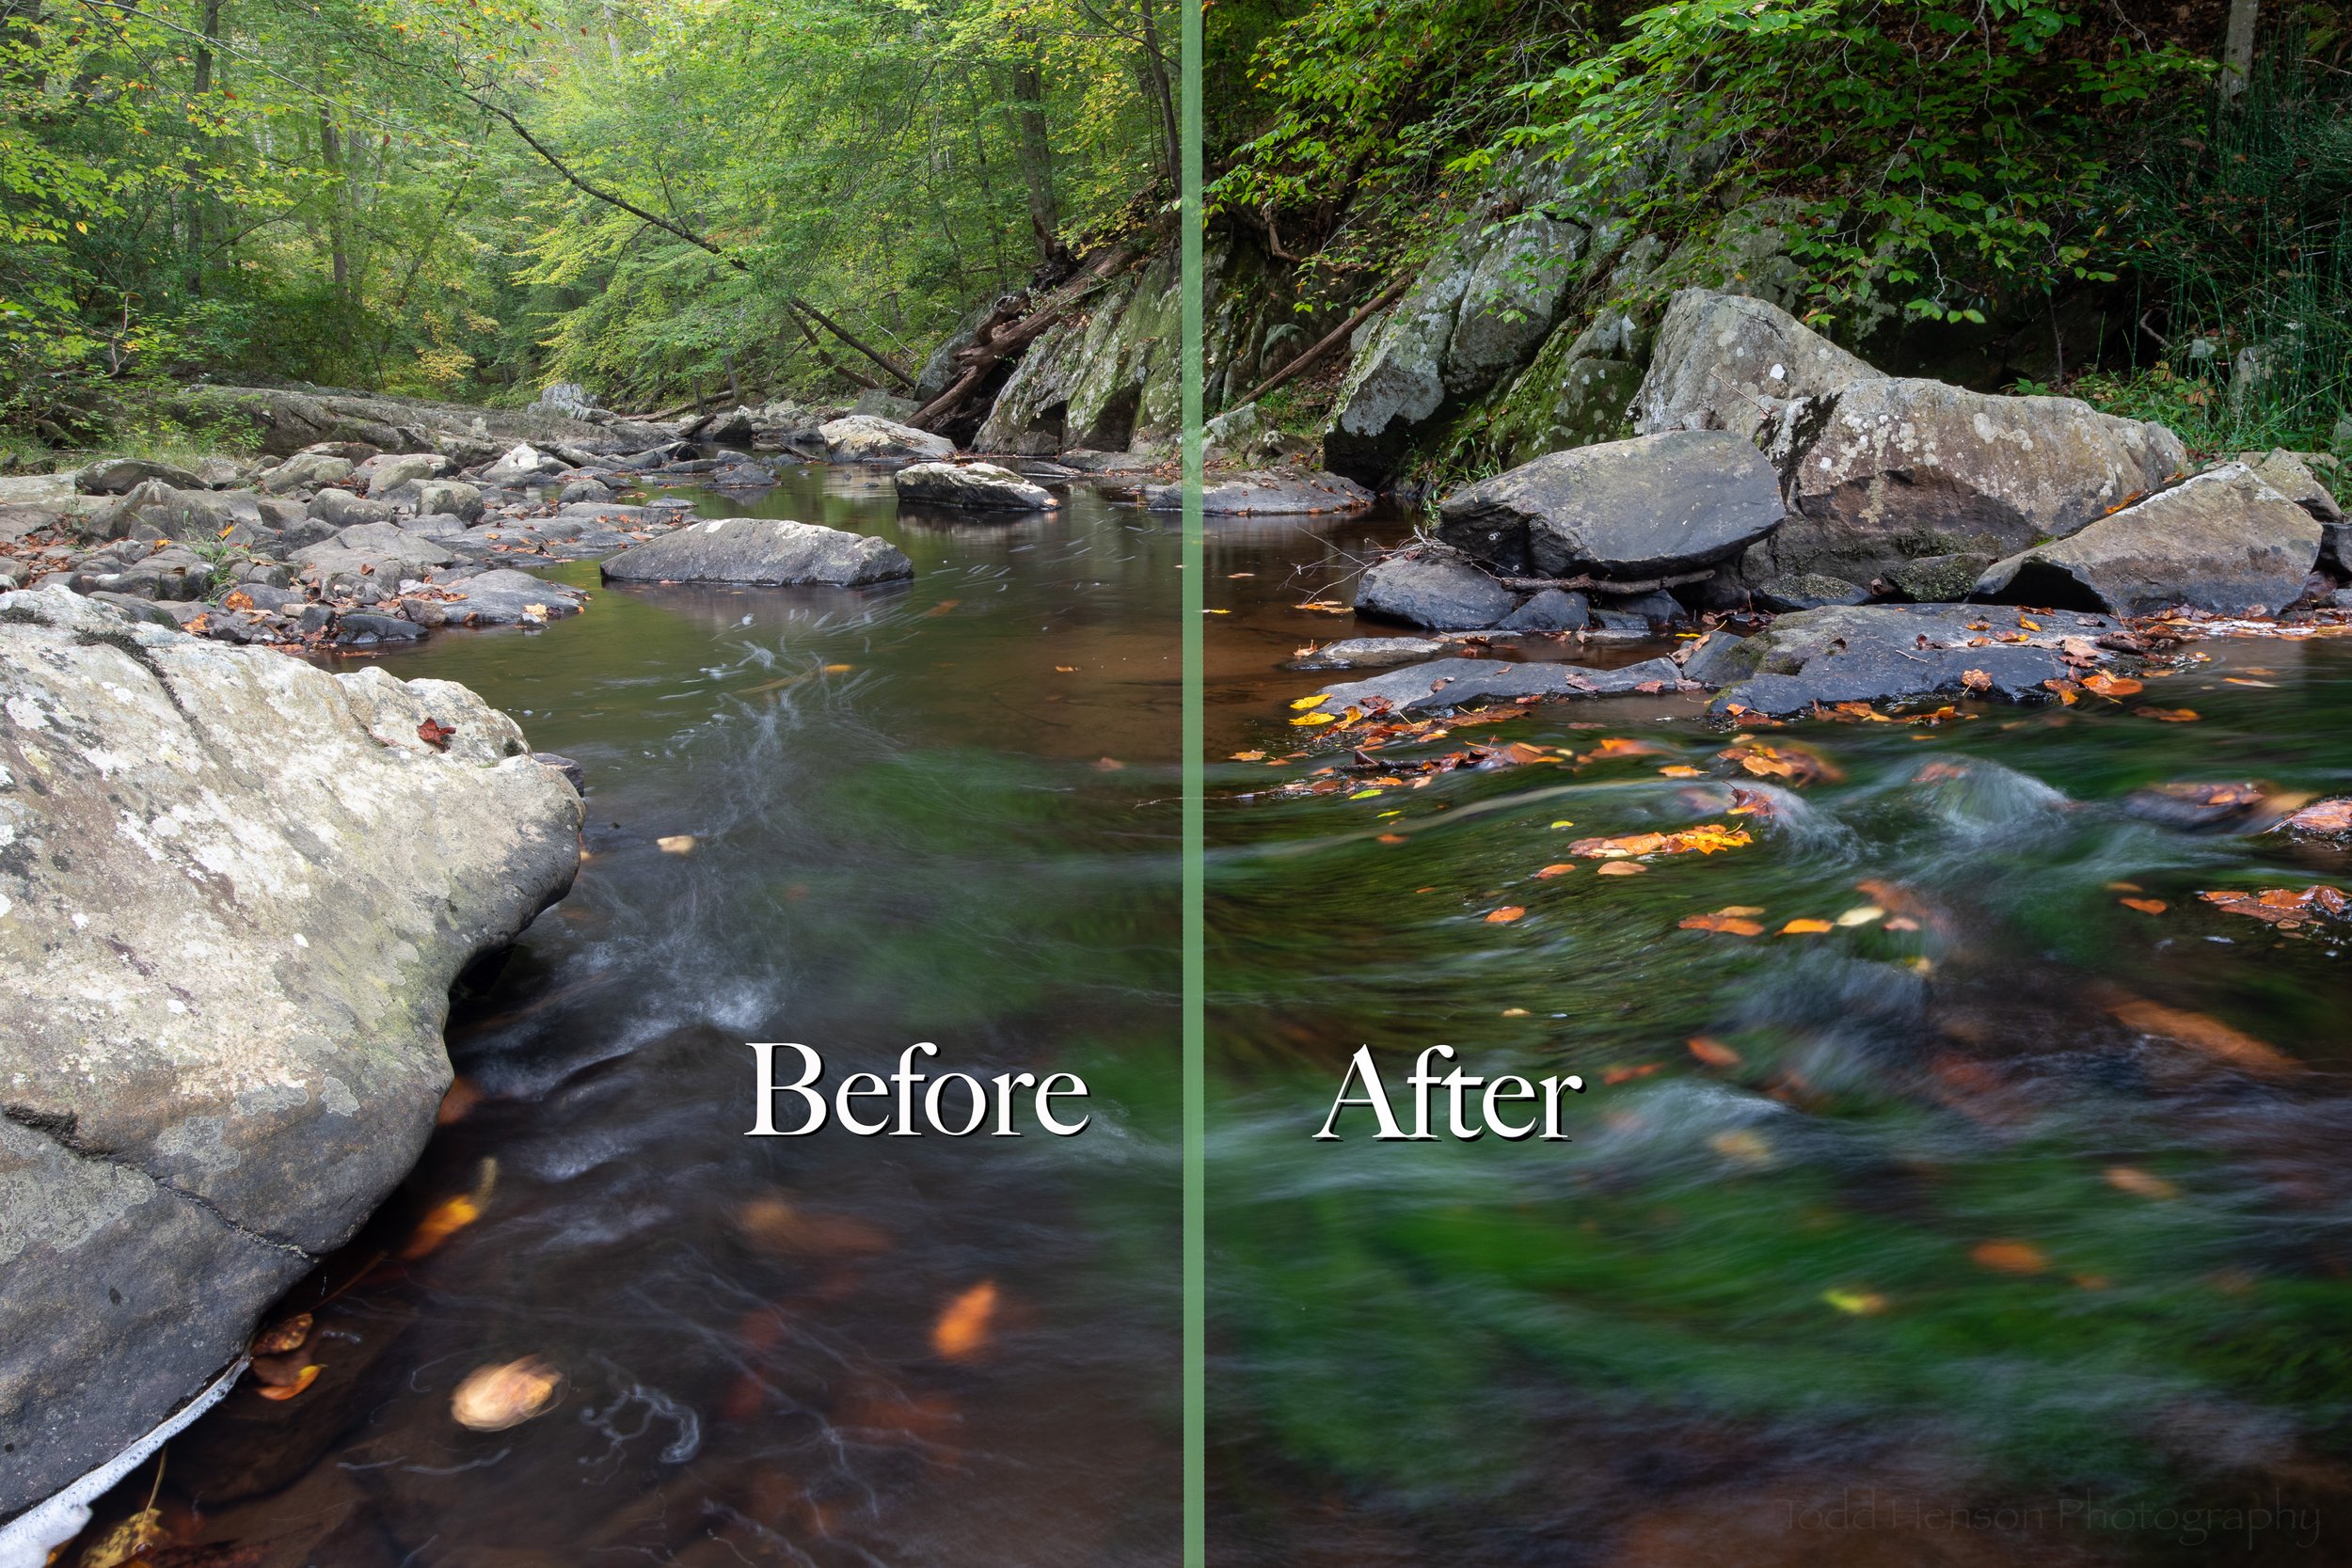
Today we’ll look at a set of before and after images comparing the raw capture straight out of the camera with the final image after all post-processing. I’ll also show some of the steps that went into transforming the image from one to the other.

When shooting in a camera’s proprietary raw format the end result out of the camera is a digital negative that requires some level of processing to convert it to an image suitable for viewing or printing. Some of these steps can be very simple, resulting in very little changes to the look of the image. And others can drastically alter the look, better capturing the mood of the scene.

One of the first decisions I typically make in post-processing is whether or not to crop the image. Sometimes I don’t, preferring to keep the framing out of the camera. Other times I prefer a different aspect ratio, or I want to crop out sections that, to me, detract from the image. In this case I chose to crop out the stone sidewalk at the bottom of the frame, creating a more wide angle view.

You can click on most of the images for a larger view.

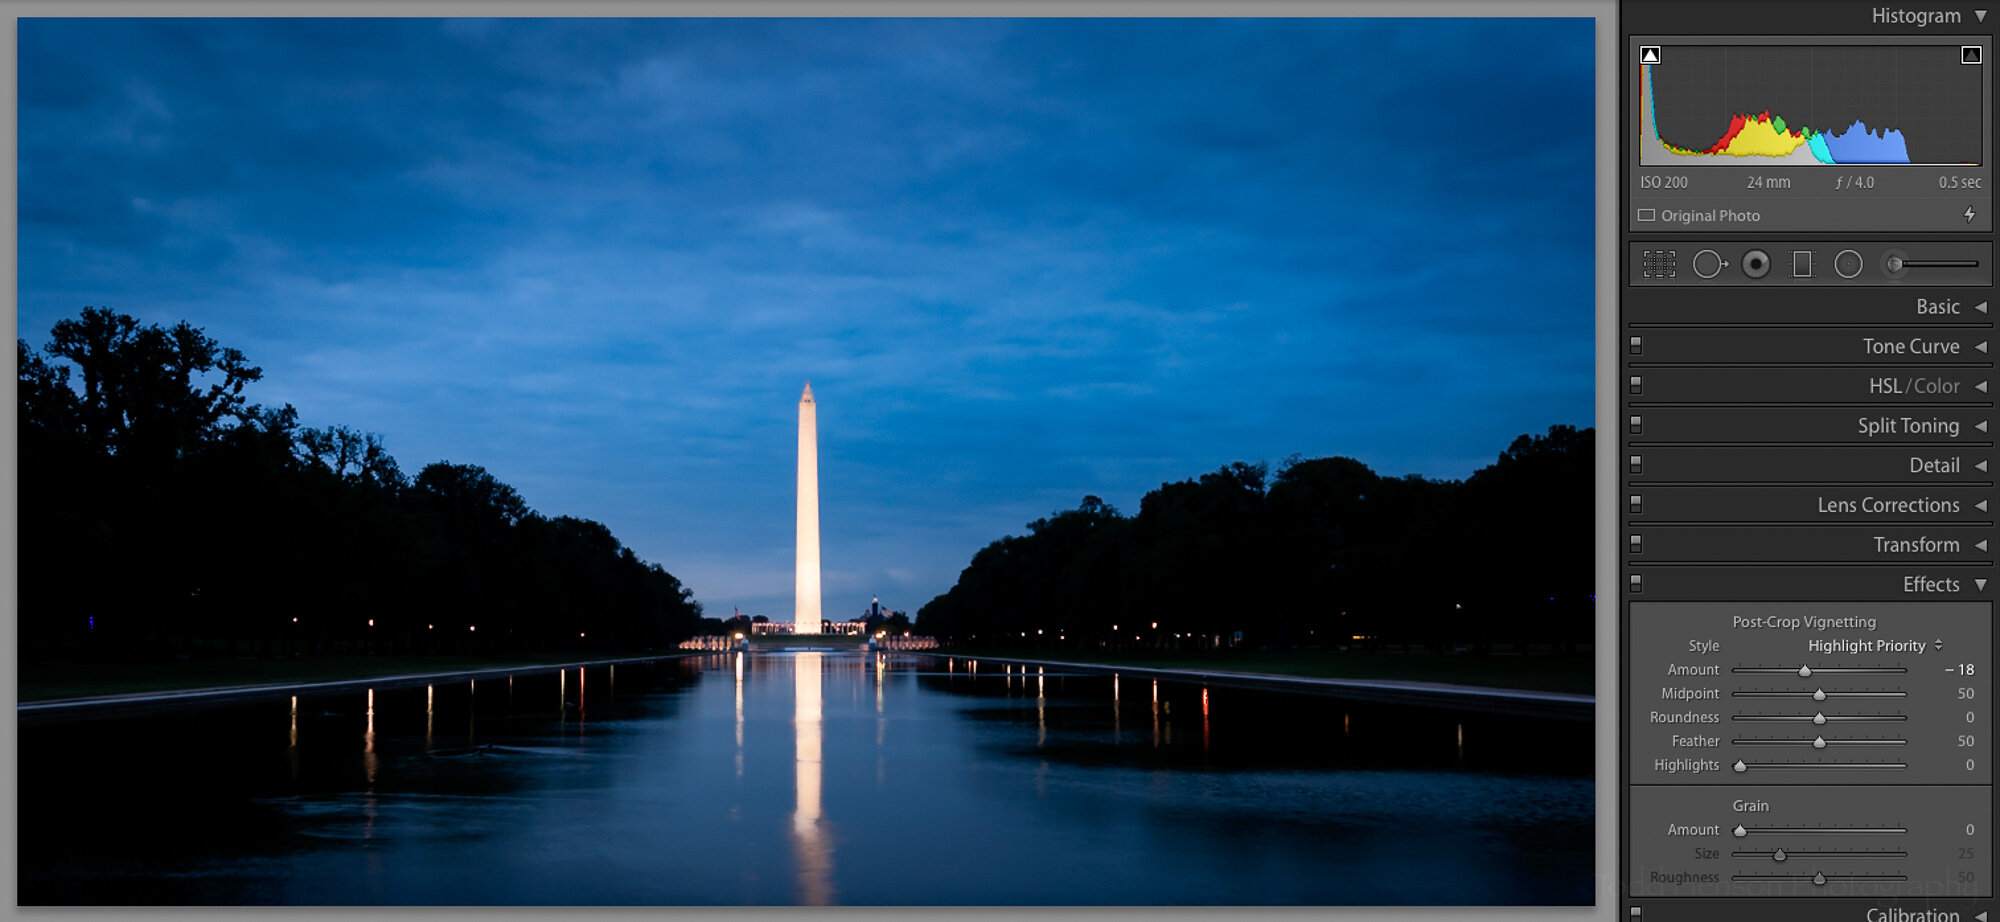
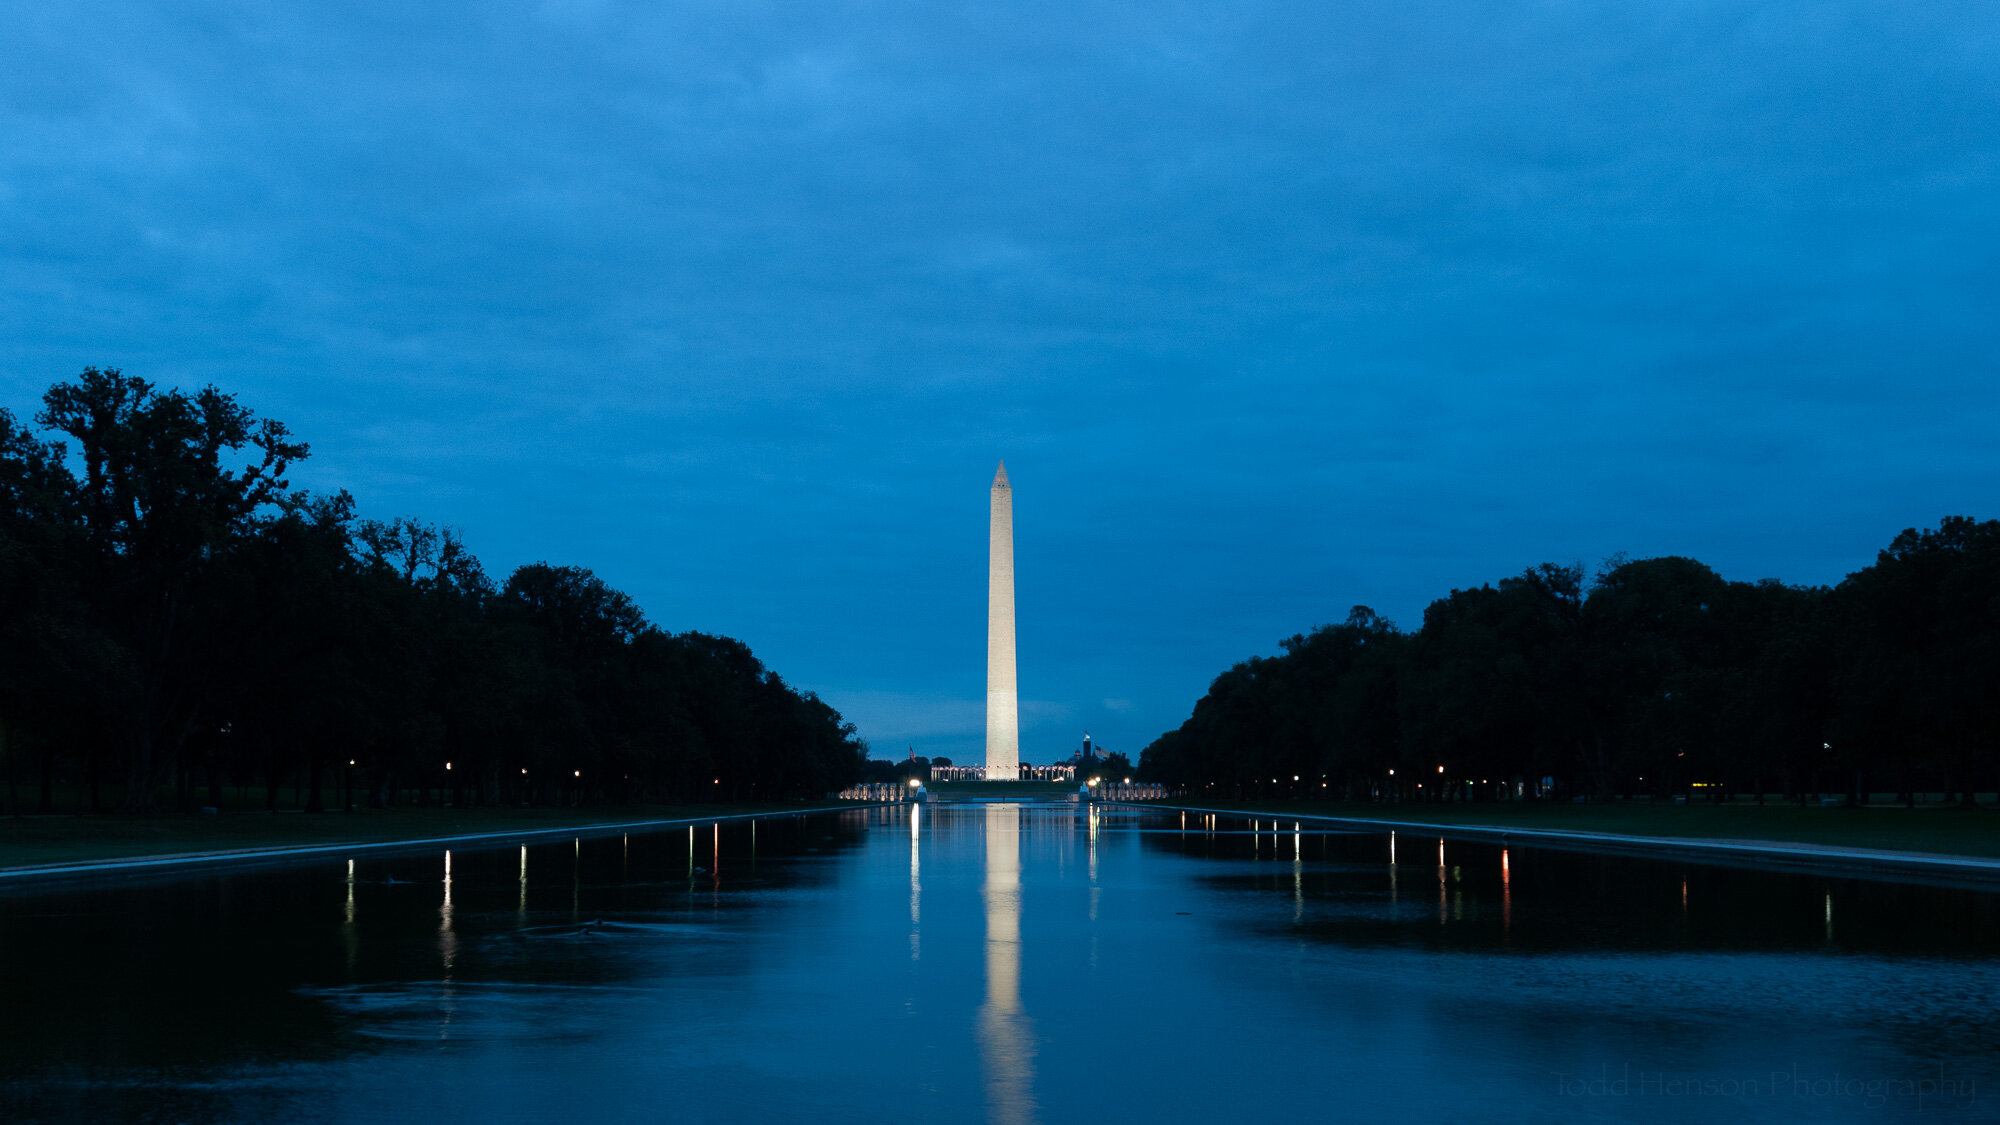
This is the original image, before cropping and post-processing.

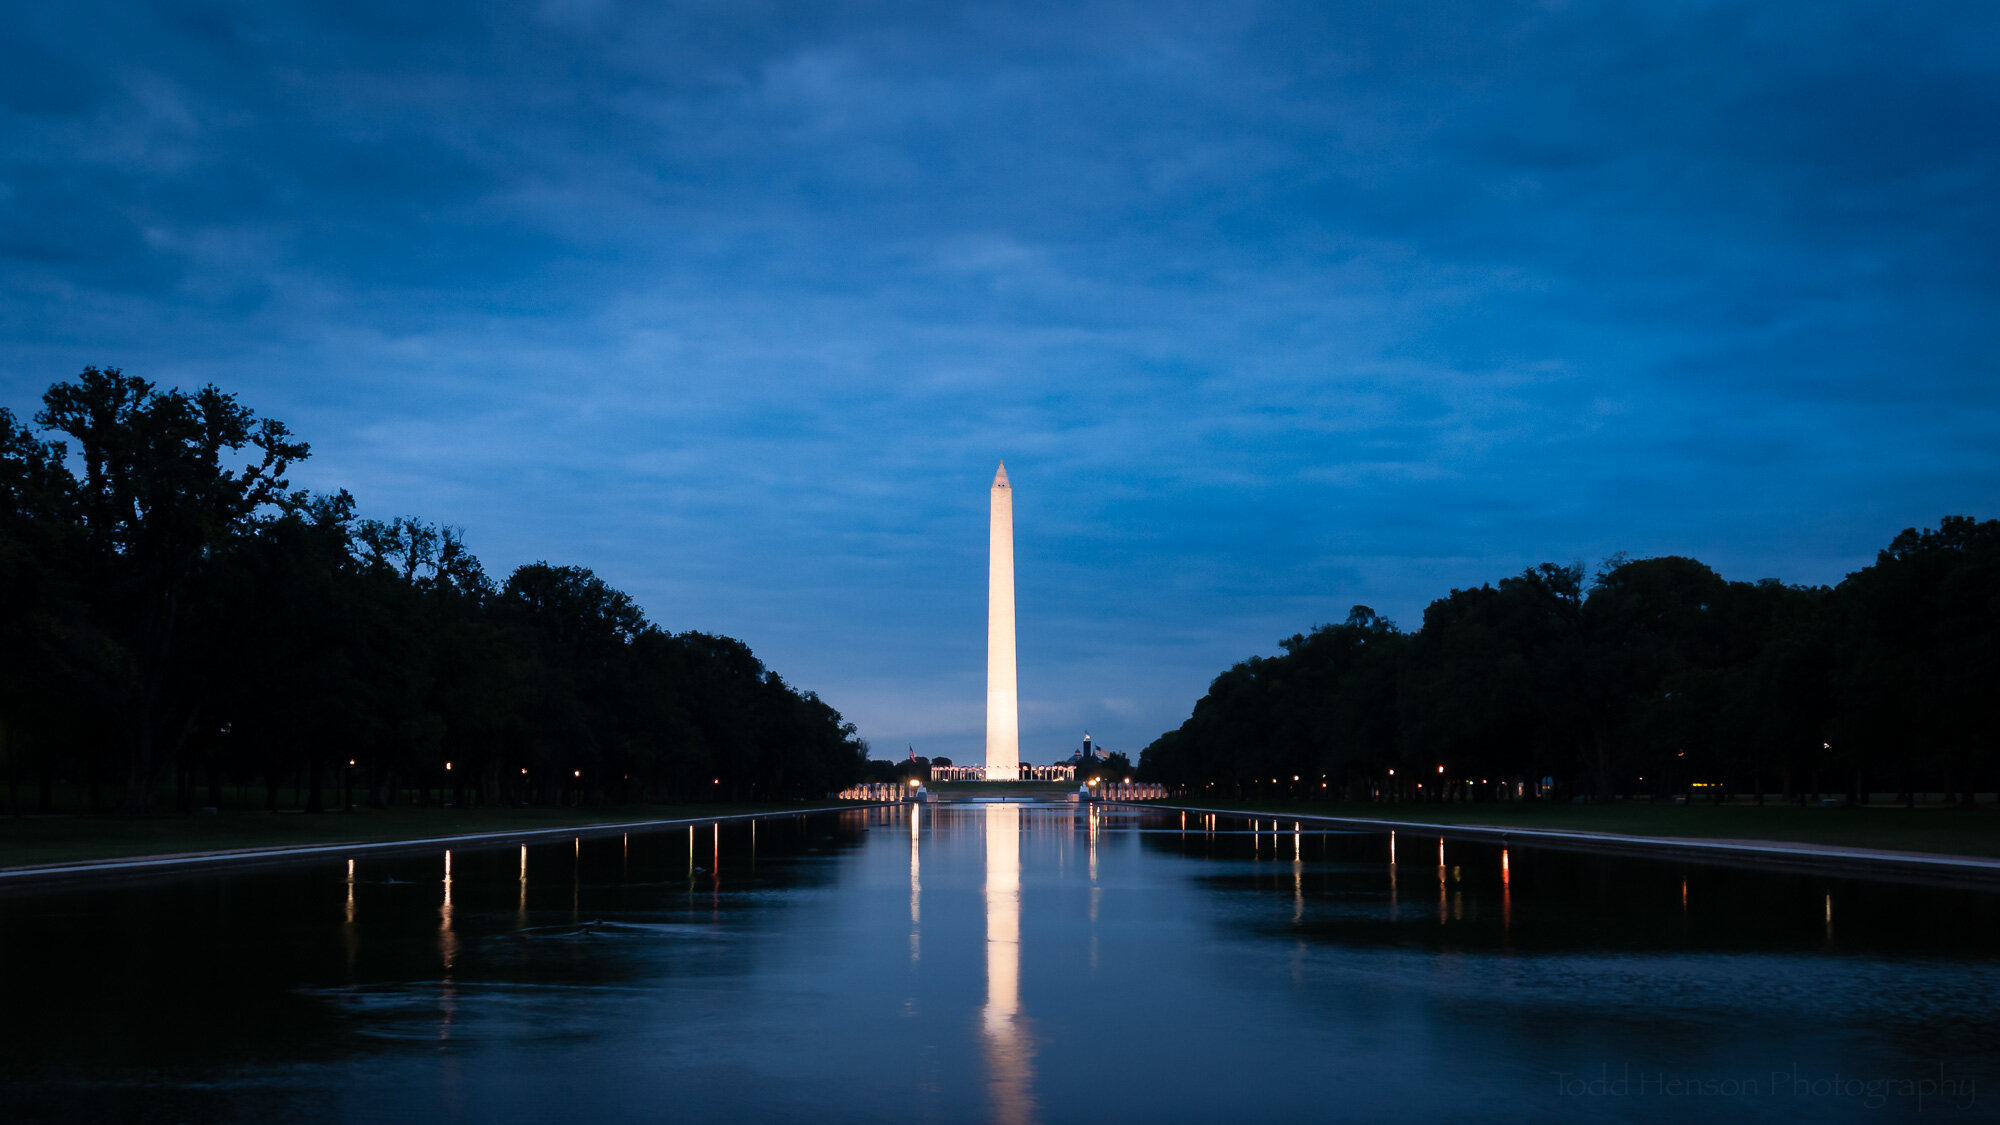
This is the original image after cropping. I decided I didn’t like the stone sidewalk at the bottom of the frame.

I could have stopped right there, after cropping. I like that version of the photo. The blue light of early dawn created a great look. But I wanted something a little more dramatic. And the next step to getting there was adjusting the white balance and various other image-wide settings.

When I first started photographing with a digital camera I didn’t have a firm grasp of white balance so I almost always set it to auto and left it alone in post-processing. But slowly, over time, I grew to appreciate the power of adjusting the white balance settings. It can correct color casts or add some nice drama by shifting the colors just a bit. That’s one of the major steps I took to alter the look of this photo.

These were the white balance and basic settings before I adjusted anything.

Here’s what it looked like after my initial white balance and basic adjustments.

Next I looked at drawing more attention to the bright monument in the middle. That meant applying a couple graduated neutral density filters to the sky, gradually darkening it as it reached the top of the frame. I also applied a filter to upper left corner. That side of the frame was slightly brighter than the right corner and I wanted to balance them out a bit.

This is the first of three graduated neutral density filters I applied. The pink shows the area of effect. The adjustments applied to this filter area are on the right.

The first graduated neutral density filter wasn’t enough for me, so I added a second to the top of the sky. I didn’t adjust quite as many settings with this filter.

Finally, the left corner of the sky was a bit brighter than the right, so I added a graduated neutral density filter there to darken it just a bit, trying to balance it with the right corner.

I chose to brighten the monument to draw a bit more attention to it. To do this I masked out the monument and its reflection, increasing its exposure and tweaking several other adjustments. You can see the adjustments I applied to the mask on the right side of the image.

Here I used an adjustment brush to select the monument and reflection. I then brightened them and applied a few other adjustments, which you can see to the right.

Finally, to really push the eye towards the center of the frame, I applied a vignette around the edges of the frame. In this case it was a reasonably strong vignette, but even a slight vignette can help drawn the eye inward, if that’s your intent. Click on the images below to cycle back and forth between the version without the vignette and that with. It’s easier to see the difference that way.

And so we arrive at the final image.

Click the image below to swap back and forth between the cropped before image and the after image. The changes made quite a difference, didn’t they?

What do you think? Would you have done anything differently? Thinking back there are a couple things I might have tried if I could go back to that day:

  • It might have been interesting to shoot a longer exposure, see if I could still the water a bit more, perhaps creating a more perfect reflection, though I do also like the movement in this reflection which was mostly caused by ducks swimming in the water.

  • If I’d owned a taller tripod at the time I might have raised it to its tallest setting. Doing that perhaps I could have included the entire reflection of the monument in the water.

Dawn Reflections of the Washington Monument


Do you enjoy these posts?

Sign up to receive periodic emails with updates and thoughts. Don’t worry, I won’t spam you. And please consider purchasing artwork or products from my online store, and using my affiliate links in the sidebar to the right when shopping online.

I appreciate your support!


Turn Any Lens Into a Wide Angle Using Stitched Panoramas by Todd Henson

You’re walking around town and you’ve only brought a 50 mm lens. You know this can limit what you photograph, and that can be a good thing, forcing you to think more creatively.

Then you stumble across a great scene that is just too expansive to capture with 50 mm. You don’t have a wide angle lens with you. You can’t move back enough to get everything in the frame. What do you do? Move on, accepting your limitation? Maybe. But perhaps better still is to think more creatively and realize you can use your 50 mm lens to create a stitched panorama of the wide angle scene.

If you’re unfamiliar with stitched panoramas, the idea is to create multiple images, each overlapping the next. When you get home you can use software, such as Adobe Lightroom, Photoshop, or others, to merge all the images together into a finished photograph that captures more of the scene than a single image at that focal length could.

Handheld Stitched Pano Using 3 Images

3 Image stitched panorama of the Washington Monument.

Washington, DC is full of subjects worth photographing. One of these is the Washington Monument on the National Mall. In this case you may be able to move back enough to capture the wider view, but perhaps doing so would alter the perspective too much. If so, try creating a stitched pano as I’ve done here.

The 3 photos that were combined into the final stitched panorama.

You can see in the sample photos I created 3 vertical images. Look closely and you can see each image overlaps a bit with the next image. This is important to give the software enough information to properly stitch them together.

The 3 images in Adobe Lightroom.

I imported the images into Adobe Lightroom and selected all 3. I right-clicked to bring up the menu and chose Photo Merge. From within this I selected Panorama.

Panorama Merge Preview window in Adobe Lightroom.

This brought up the Panorama Merge Preview window, where Lightroom shows a preview of the stitched photo. The first thing you’ll want to do is choose which Projection to use: Spherical, Cylindrical, or Perspective. I won’t get into technical details here because it’s easy to just click on each one and see what effect they have on your photo. I most often use the default Projection Lightroom chooses, but sometimes I find a different one works better.

After you’ve chosen a Projection, notice how there is some white space around the edges of the photo. This is because I was handholding the camera and didn’t perfectly line everything up. This can also happen when using a tripod, but it will happen more often when you handhold. It’s not a problem, though.

Lightroom’s Boundary Warp control set to the full amount.

Notice the Boundary Warp control. It starts off with a value of 0, meaning no boundary warp. If you slide the control towards the right you will see the image begin to warp, removing the white space. Effectively, Lightroom is stretching parts of the photo to make it fit into the image space without the white space. This can distort parts of the photograph, but that’s not a problem with some photographs, those without a lot of straight lines or objects where you’d notice the change.

Lightroom’s Auto Crop option.

If you don’t want to use Boundary Warp because of how it distorts your image, you will need to crop the image to remove the excess white space. Lightroom has a checkbox called Auto Crop that will perform the crop for you. Just check the box and it automatically crops the image. Of course, you can always leave this box unchecked and manually crop the image yourself later.

When you’re finished click the Merge button, then sit back and wait for Lightroom to merge all the photographs into a single image. Once this is done you can make adjustments to the image as you usually do, adjusting exposure, color balance, contrast, and what not. Lightroom makes this entire process very easy.

Handheld Stitched Pano Using 4 Images

4 Image stitched panorama of the National Museum of African American History and Culture.

In this example I created a 4 image panorama using the same steps mentioned above. However, this scene included moving cars. I present it here to show what you may see from Lightroom when there is something moving in your scene. Note, there are more advanced techniques to take care of these things, but I want to present just the basics, to show how quickly and easily you can create your own panos

The 4 photos that were combined into the final stitched panorama. Notice the locations of the cars, some of which move from frame to frame.

In this scene there were a couple vehicles close to me that were moving, which appeared in multiple frames. There was also a red taxi in the background that moved from frame to frame. I used default settings in Lightroom and it produced the final image you saw above. Notice how it chose only one version of the foreground cars, but it actually shows 2 versions of the red taxi. We see the same car twice in the final image.

So be aware of moving objects. They can complicate creating a stitched pano, unless you’re ok with how the software chooses what to show, or you use more advanced techniques/software to manually decide what to show.

Handheld Multi-level Stitched Pano Using 6 Images

6 Image multi-level stitched panorama of the Smithsonian Castle.

In the 2 examples above I held the camera vertically to create a longer horizontal image. In this example I want to show that you can also create multi-level panos. In this case I chose to hold the camera horizontally, but you could also hold it vertically.

The 6 photos that were combined into the final stitched panorama. Lightroom is capable of handling multiple levels when creating a larger panorama. Notice some are even titled, as I was hand holding.

I started by taking a photograph of the upper left of the Smithsonian Castle. Then I panned to the right to photograph the upper middle of the building, and finally the upper right, each time overlapping some with the previous image. Then I moved the camera back to where I started on the left, but photographed the lower left of the building being sure to overlap some with the portion I’d photographed above. Then I panned to the right to photograph the lower middle, and finally the lower right. This created 6 images.

Please note, this isn’t a great photograph. It wasn’t the right time of day to photograph this scene, as the sun was above and behind this scene, which washed out the sky. But I wanted to capture the scene, and I wasn’t going to be there at a good time, so I did the best I could with the gear and skills I had at the time.

Once again, I imported everything into Lightroom, selected the 6 photos, worked through the options on the Panorama Merge Preview window, then made my usual adjustments after Lightroom had created the stitched pano. As you can see in the final image, the sky is still washed out, but I’m pleased I was able to capture the entirety of the building, something I just couldn’t do with my 56 mm lens.

In The Field

Ok, so hopefully I’ve convinced you stitched panos can be another great tool in your bag. If so it’s time to get out there and try creating some of your own. But before you do, here are some tips to make your life, and Lightroom’s, a little easier.

  • Take all of your camera’s exposure settings out of auto. Manually choose the white balance, aperture and shutter speed. The reason is you don’t want these settings changing from frame to frame, something that would make it more difficult to merge them into a single photo.

  • Set the camera to manual focus mode and focus on whatever is most important to you. The key is you don’t want the camera autofocusing on each frame as it can result in different things being in focus in different frames, which can make stitching more difficult.

  • If it’s a very wide scene you may have to compromise on your exposure settings. One side of the scene may be much darker than another side. In that case expose for the part of the scene that is most important to you, generally something in the middle range, and let the rest fall where it may.

  • Use a tripod if you have it. This will make it easier to line things up and keep the camera steady, reducing the amount you have to crop out later.

  • Use a bubble level if you have it, or a digital level in the camera if yours has one. This will help you keep things level and lined up.

  • If you don’t have a tripod, don’t worry. You can still hand hold your camera. All the photos in this post were handheld. Try to hold your camera as steady as you can. Face the middle of the scene, then pivot your body towards the left. Steady yourself. Line it up as well as you can. Create your first image. Then slowly pivot your body towards the right, making sure the next image overlaps the previous image by a decent amount. Stop moving, steady yourself, take the next image. Keep repeating this, pivoting towards the right between each image. Always be sure to steady yourself before clicking the shutter button. You don’t want your movement to create a blurry image.

That’s the basics of what you need to know. You can use almost any kind of camera to do this. In fact, many cell phones have apps that will automatically create a longer pano image as you pan the phone across the scene.

So head out there and give it a try. Let me know how it goes, and pass on any tips you have.


Do you enjoy these posts?

Sign up to receive periodic emails with updates and thoughts. Don’t worry, I won’t spam you. And please consider purchasing artwork or products from my online store, and using my affiliate links in the sidebar to the right when shopping online.

I appreciate your support!


Cherry Blossom Crowds 2019 - Washington, DC by Todd Henson

Washington, DC Cherry Blossom Crowds along the Tidal Basin

Early each spring large crowds of people travel into Washington, DC hoping to see the cherry blossoms framing the Tidal Basin and scattered in many other areas around the capital. Some years and certain days of the week or times of day are more crowded than others, but if it’s cherry blossom season it’s a good bet there will be crowds of some size anytime you visit.

This year (2019) my brother and I visited DC on Saturday, March 30th, with peak bloom predicted to be April 1st. We took the first Metro into town, which arrived sometime around 8 am. This isn’t early from many a photographer’s perspective, but it is early as far as most folks are concerned. You will still find crowds at that time, but they will be smaller than those around noontime.

Washington Monument Cherry Blossom Crowds

The photos in this post give an example of how the crowds might look at different locations around the Tidal Basin. It was a clear day with no rain forecast, so there was nothing to keep people away, except perhaps for the Kite Festival on the Mall. I heard the crowds on the following weekend (April 6-7) were larger than those we saw.

This year there were several sections of grass that were fenced in, keeping people to the paved path around the Tidal Basin. I assume this was to let the grass regrow in these areas, as it can get rather trampled with all the foot traffic. Other areas were open, letting people wander under the trees.

Some of the monuments, such as the Martin Luther King, Jr. Memorial, have large open areas where people can gather. The FDR Memorial doesn’t have as many large open spaces but has lots of small to medium spaces.

Martin Luther King, Jr Memorial Cherry Blossom Crowds

Tidal Basin Inlet Bridge Cherry Blossom Crowds

It was nearing noon when we made it to the Jefferson Memorial, a favorite of the crowds. Its large extended steps are perfect places to sit and rest for a bit, watching the paddle boats out on the Tidal Basin. But the inside also draws large crowds. I’m not one for crowds, but these places are well worth visiting if you never have.

Cherry Blossom Crowds on the steps of the Jefferson Memorial

Cherry Blossom Crowds inside the Jefferson Memorial

Looking out at the Cherry Blossom crowds from the Jefferson Memorial

Jefferson Memorial Cherry Blossom Crowds

When leaving town just after noon it takes far more time to walk from the Tidal Basin back to a Metro stop than it does to walk from the stop to the Tidal Basin earlier in the morning. You’re stuck walking the speed of the general crowds, which always bunch up around crosswalks. I really feel for those crossing guards, having to manage so many people and vehicles all vying for the same space.

Cherry Blossom crowds while leaving Washington, DC

I hope this post has given you a realistic look at the crowds you might expect if heading into Washington, DC on a cherry blossom weekend. It may be more or less crowded when you arrive, but you should certainly expect some crowds. So give yourself time, bring along some water and a snack, and have patience. You’ll run into people of all sorts, but overall I’ve always found the majority of the crowds to be pleasant and polite. They’re typically there for the same reasons you are. So head into DC and enjoy your stay.


Do you enjoy these posts?

Sign up to receive periodic emails with updates and thoughts. Don’t worry, I won’t spam you. And please consider purchasing artwork or products from my online store, and using my affiliate links in the sidebar to the right when shopping online.

I appreciate your support!